

Adding Client Notes in PDFs From InDesign Using the Slug Area

The slug area in InDesign is one of the most underutilized and misunderstood features in the program. It’s not a particularly complex feature, it’s just that a lot of people don’t understand how to use it in their particular workflow.
What is a slug?
Let me first begin by saying that the term “slug” has many meanings within the printing industry. In traditional typesetting, it refers to a piece of lead used to add spacing between paragraphs. In the newspaper industry, it’s a term that refers to an article. Over the course of my career, I’ve heard many more uses of the term as well.
In InDesign however, the slug refers to an area outside of the boundaries of the document page that can be used for any number of things including job information, notes, and agency logos just to name a few. There are no rigid rules for what you can or can’t put in the slug area. In this article, we’ll focus on how to make the slug useful for conveying information to a client.
Defining a Slug in InDesign
Unless you’re looking for it, you may not even know where to define a slug in InDesign because it’s found in a somewhat inconspicuous location in the New Document dialog box. When you choose File > New Document, you’ll recognize the standard settings for page size, margins, etc. If you look towards the bottom of the dialog box however, you’ll see an area called Bleed and Slug. If you click the disclosure triangle in that section, it will show you the values that can be defined for both bleed and slug in your document.
For the slug values, you can set a slug to appear on the top, bottom, left, and right sides of a page in a non-facing page document, and top, bottom, inside, and outside in a facing-page document. The inside value is a bit deceiving because for a facing-page document, the inside slug can only appear on the first and last pages of a document due to the spine. Regardless, if you turn the preview on in the New Document dialog box, you’ll be able to see how the slug will appear on your document. The size is up to you and your purpose for the slug. For this example an outside slug was defined with a value of 2 inches.

This creates an area on the outside of each page of the document where any information can be added.

If you need to add a slug to an existing document, choose File > Document Setup, and define the desired slug value to add it to that document after the fact.
Adding Information to the Slug
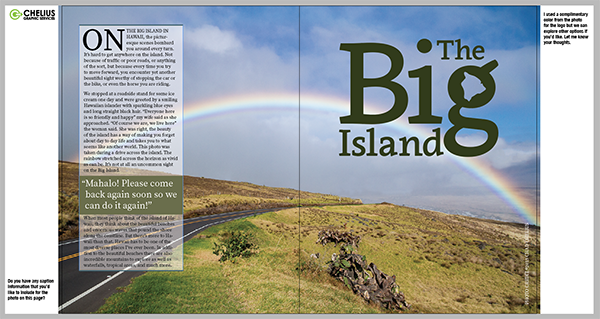
As a designer, you may need to convey or obtain information about the project from the client. Doing so verbally over the phone can sometime be a challenge. But putting this information in the slug allows both the designer and the client to see where questions or direction is needed. There’s no trick to adding information in the slug area, you can use any of the tools you normally do. Text, graphics, and native InDesign objects are all fair play! In the figure below, a logo and notes have been added in the slug area asking the client questions about the project.

Viewing the Slug Area
In Normal view, the slug area is clearly visible. However, if you switch to preview mode, it will hide the slug area and only display what will actually print in the document. If you click and hold on the preview button at the bottom of the Tools panel, you’ll notice a couple of additional views that are helpful when viewing a project.
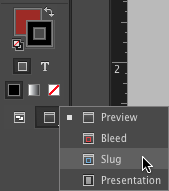
Bleed mode displays not only the artwork that will appear in the final product but also the bleed area that is defined in the document. Slug mode shows you the artwork that will appear in the final product along with the slug area defined in the document. This mode is helpful when you want to see what will actually print as well as the slug area, so you can continue to add information or modify information in the slug area. Once you choose the slug option, it will become the default preview mode when you click the preview button.
Printing and Exporting the Slug area
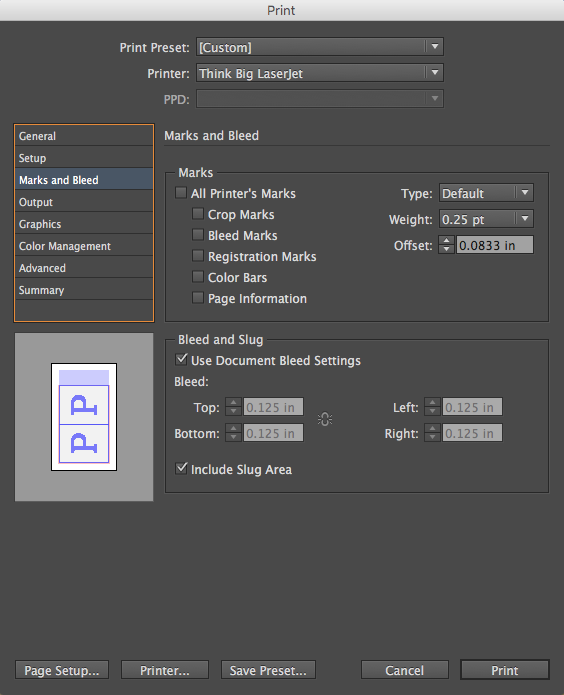
At some point you’ll want to include slug area information when you print to a desktop printer or when you export to a PDF file. Both of these output methods include an option for including the slug area. In the Print dialog box, you’ll find this option in the Marks and Bleed options. You’ll see a check box at the bottom of the dialog box to Include Slug Area. The preview area in the lower-left corner of the dialog box will show you the additional area that will be included when you print, so you’ll need to either scale down your print output or print on a larger piece of paper to fit the slug area.
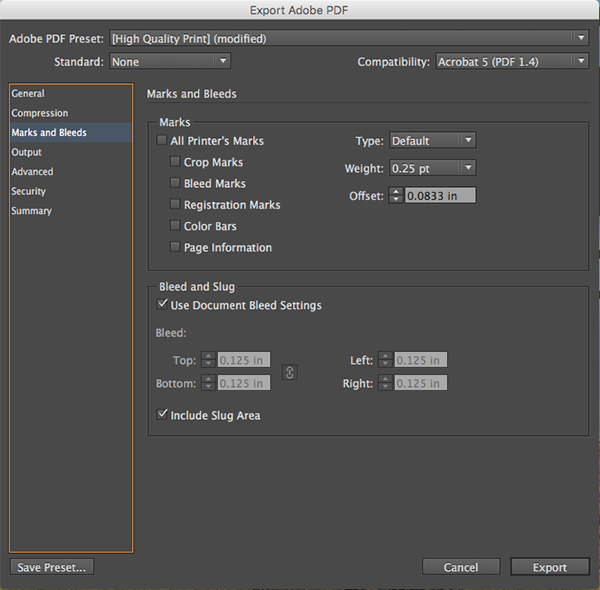
When Exporting to a PDF (Print), you’ll see the same check box in the Marks and Bleeds section of the Export Adobe PDF dialog box that allows you to include the slug area in the exported PDF file. Naturally, this will increase the page size of the PDF file, and it will also include any added slug information in the PDF as well.
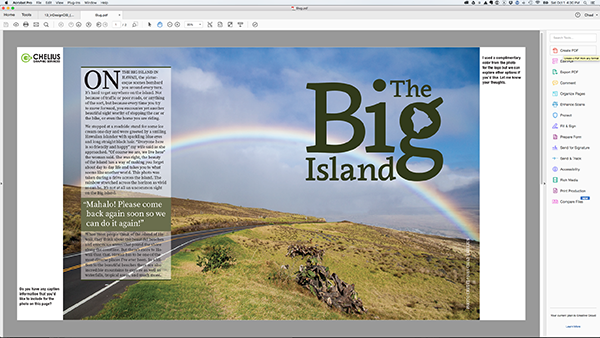
The final PDF opened in Adobe Acrobat.
Using the slug is a great way to convey notes and other information to a client, but you can adapt the slug for any number of uses and tailor it to your workflow. Once you try it, you’ll discover numerous ways that you can take advantage of InDesign’s slug area to fit your specific needs.
How have you used the slug area in your projects? Let us know in the comments!
I find it handy for leaving notes for printers/other designers who will eventually use the work I setup.
We used to give the printers notes in the slug area, mostly about how their sports team didn’t do so well at the weekend lol.
That’s awesome!
We’ve been using this practice for years, in our integrated publishing workflow. We include a yellow text box in the slug at the bottom, where author/editorial notes to production can be placed. also allows for tracking of when edits have been made, and by whom.
I use the slug for a job status bar. It has job number, client name, proof number, date etc. It get updated every time the file is worked on, and appears on the client PDF proofs. Great for version control.
Can you set up a slug area for just one page of a multi-page document? I want to use it as an approval area for manager sign off, but I only need to put it on the last page of a document.
You could create a master page that was just for your last page. This master page could have it’s own Slug area and include the approval area you are after. Just apply this master page to the last page of your document.
David: I’m not sure that would work. Have you tried it? I don’t think you can change the Bleed & Slug area of a single page, as that feature lives in File > Document Setup.
Amy: My guess is that the only way to do this would be changing it in Acrobat, or exporting the last page as a separate PDF (with the Slug area turned on when you export that one-page PDF), and then adding it to the other pages in Acrobat.
You can’t create a slug area for a single page, however you can only put content in the slug area for a single page and then the information would only appear on that page. The slug itself will still appear on all pages but the content will only be on the last page.
Yeah you’re right David