Aligning Text Where You Want It with Align On
A tip of the hat to Michael Brady, who asked a fascinating question on the InDesign listserv recently involving the horizontal alignment of some text. He didn’t want the text to be centered, or flush left or right… he wanted it aligned so that a particular character would sit at a particular position along the line. In fact, perhaps not even a particular character, but perhaps the space between two characters!
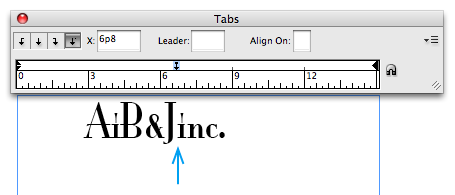
For example, what if we want to put the current text position (after the J) at the blue arrow?

You could easily adjust the left indent, but if the text changed at all, the spacing would be messed up. No, we want a robust method… we want a tab stop. You probably know that you can use an Align On tab stop to align any character to a position in the Tab panel. But what character would we choose here? We can’t use “i” because it shows up earlier in the paragraph. Instead, we need a hidden character to align to.
The trick is to insert a special invisible character — such as Type > Insert Special Character > Other > End Nested Style — where you want the tab stop to take you.

Then select that invisible character (for example, you can place the text cursor just to the right of it and press shift-left arrow) and copy it to the clipboard. Then, in the Align On field in the Tab panel, delete whatever is there (usually a period) and paste the invisible character in. You won’t see it, but it should still work. Just put a tab before your word and it’ll align on the invisible character.

Of course, as Bob Levine pointed out, a designer later coming to this project may be totally baffled as to how to achieved this effect. After all, if you later open the Tabs panel, it doesn’t appear like there’s anything special about that Decimal Align tab stop. How I wish Adobe would let us see and type codes in these kinds of fields (the same codes as the ones found in the Find/Change dialog box, for example).


Omg… that’s a trick – I love such things! Thanks a lot!
Martin
It wasn’t me who pointed it out, but one way to let a future designer know about it is to insert a note into the text frame with an explanation of what was done.
Notes: They’re not just for InCopy, anymore.
Still a very useful article. Thank you!