Auto-Reflowing Images in a Grid
Here’s a cool trick that I learned from Karin Söderlund at an InDesign conference a few years ago in Stockholm: Anchor graphics into a text frame to allow them to reflow. In other words, don’t just make a big grid of images on a page; make each graphic an anchored object. The benefits are quite amazing.
For example, here’s some images on a page, with captions:

In the above image, each graphic is grouped with a caption text frame and simply placed on the page. That makes it very hard to re-order them. I mean, can you imagine having to add a new image between the first and second frame, while keeping the others in order? Gah!
Here’s the same layout, but where each group is anchored into a text frame (each group has been assigned an object style to make placement and text wrap more consistent):

Suddenly, it becomes far easier to rearrange the items because each object (each group, that is) acts like a single character in a story. For example, here’s what it looks like in Story Editor:

To move one of the graphics, just select it with the Type tool and drag it to a new location in Story Editor (or copy and paste), or whatever. If you delete one, the rest all reflow into position. Or, you can add a new image easily by just inserting a new anchored object group into the proper place. Here, I’ve added a picture of a Zebra as the second image; note how all the other images reflow to make room:

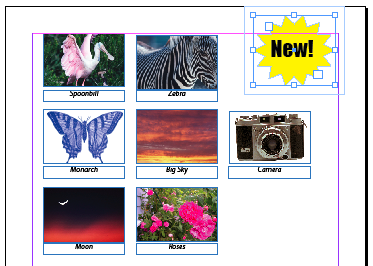
What’s even more astonishing about this technique is that it also lets you apply text wrap to these images. For example, here’s what happens when I put a starburst violator over the upper-right corner of the page:

Because we’re treating the images (or, in this case, the groups) as text, they reflow around the starburst easily and painlessly.
I wouldn’t use this technique for all my images, of course, but when I need a grid of images (or text blocks, or any other object) that may need to reflow, Karin’s technique is awesome.


Well, never thouhgt of using the story editor move images around. Great idea.
If only the story editor showed a thumbnail of the image?
Anyway, anchoring is the best option.
To be honest, the Story Editor is something I don’t frequent, but it has it’s purposes.
Talking about this type of workflow, folks, watch out !
In Bridge CS4 the InDesign Contcat Sheet script is not bundled anymore. It is very useful thanks to the metadata that you can add. So keep CS3 on your computer !
Any strange cross-overs elements regarding CS3 and CS4
Eugene…if you show both the story editor and the layout you can have your cake and eat it too.
This is even easier in CS4 by using the two-up view.
Branislav…that script is only bundled with the suite and I don’t have the suite yet to check. Are you using the suite or the standalone InDesign installation?
Wait a minute!!! I use the ID contact sheet script to preview a whole folder of images to clients etc… its a great time saver :(
I have a grid with text and anchored objects for a catalogue, very much like the example shown here, over multiple pages, only it was created as a date merge. Now new items need to be inserted on the page. Is there is easy way to do this so I don’t have to reshuffle everything by hand?
Robyn:
Did you ever get a response to your question? I am a beginner and having to do a similar project.
I’d like to know how to place images within texts as inline graphics, still being able to wrap text around it. Any tips?
Thanks for this info – This is exactly what I need but I can’t seem to work out the story editor part. I have anchored each text box to the correct image – and then I select all the objects (groups) and say “edit in story editor”, and it opens in individule story editors rather than the one – see image https://postimg.org/image/tjzq8vvbb/
Could anyone help with this?
Thanks
Marion
Marion: Yes, each story has its own story editor window. Oh, I see… it appears you have anchored the image into the text frames. In my example above, you need to group the image and the text frame, then anchor the group (which acts as a single object) into another text frame.