

Building a Shadow Sandwich

Within Photoshop, a shadow set to Multiply blend mode will darken what’s underneath it. The Multiply blend mode is sort of like what happens when you sandwich two slides together and hold them up to a light: The strengths of the colors in the slides are combined. (I confess I think of them as being added together, but, hey, they didn’t name it “Add,” so ‘Multiply’ it is.) As long as you’re playing in Photoshop, fine.
But when you place a Photoshop file into InDesign, the shadow knocks out what’s underneath, lightening the area rather than darkening it.
To see the effect, place a Photoshop image containing a shadow into InDesign, and then use the Separations preview (Window>Output>Separations Preview) to see what’s going on. Turn off the black separation, and you’ll see the gaping hole under the shadow (see image below). While this wouldn’t matter if the shadow fell on an empty area of the page, the anemia will be obvious when it falls over other page content.

What’s up with that?! While InDesign understands a lot about native, layered Photoshop files, it does not handle Photoshop blending modes correctly. It handles opacity correctly, but not blending modes.
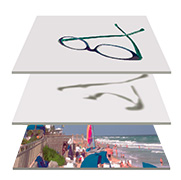
What can you do? Well, if you just want a plain old down-and-to-the-right drop shadow, create it in InDesign rather than Photoshop. InDesign handles its own shadows correctly. However, if you want a cast shadow (as you see under the glasses), you need to create that in Photoshop. But with a little planning, you can still make the shadow behave correctly when the image is placed in InDesign.
NOTE: The ‘GlasseZ’ logo is an Illustrator AI file, and you might notice that its shadow does not knock out what’s underneath. Illustrator shadows do behave correctly in InDesign, because InDesign and Illustrator share the same imaging model. Photoshop?s internal imaging model is a bit different, which is why we have to cheat.
The secret to happiness here is to build the shadow on a separate layer in Photoshop, and then use Object Layer Options in InDesign to handle things. As you can see in the image below, the glasses and the shadow are on separate layers. (Hey, I don’t like my food to touch…)

- Place the image in InDesign, then copy its frame to the Clipboard. You’re going to build a Shadow Sandwich. Using Object Layer Options (Object>Object Layer Options), turn off the top layer, leaving only the shadow layer visible. Select the shadow frame, and set it to Multiply blend mode in the Transparency palette. You’ll see immediately that the shadow looks more natural, darkening underlying objects.
- Now it’s time to complete the shadow sandwich. Remember that you copied the original image frame to the Clipboard, now, Edit>Paste in Place to plop it on top. Use Object Layer Options again, this time to turn off the shadow layer and leave only the top layer. Check the results with Separations Preview: you’ll see that the shadow no longer knocks out. Whoopee!
Here’s an exploded view of the Shadow Sandwich:
Sure, it’s a bit of effort, but it’s the only way to use Photoshop shadows in InDesign and image them correctly. Keep in mind that the limitations (and solution) apply to anything in a Photoshop file that uses a blending mode (not just shadows). Within a Photoshop file, everything’s fine. It’s when you want those blending modes to interact with what’s underneath in InDesign that you have to cheat.
Wonderful and useful tip! I’m so glad I read it. Thanks Claudia!
I imported a greyscale image psd file and set the opacity to 50% in Indesign CS2.
3 greyscale logo (black logo on white background) psd files on top of this greyscale image.
Once the logos where imported I changed the mode to multiply for all logos in Indesign CS2 so the background can be seen. I output for press quality in PDF, this look fine on screen but a proof comes back with pale blocks behind all 3 logos. I am not sure what I have done wrong here?
Please advise me.
Simon,
The printing device isn’t correctly interpreting transparency and overprint. Check out another post that will explain what’s going on. (https://creativepro.com/index.php?s=yucky&x=0&y=0)
Hint: it’s not YOU. It’s the limitations of the device.
Claudia,
I contacted my printer and explained what I did. They spotted a problem they should have fixed it in the first place and now it OK.
Ah HA! I told you it wasn’t you :-)
Glad it had a happy ending (and the printer has now learned something very useful, too).
can you separate shadow effects and rasterize that effect like in illustrator. if so, how is it done. thanks for taking my question
Randy,
I’m not sure I understand: Photoshop’s shadows are pixels (as in the Shadow Sandwich example), and InDesign’s shadows become pixels on the way out the door (when you print or export). What are you trying to accomplish?
Claudia, in Photoshop, you can apply a drop shadow (or other layer style) to a layer, then choose Layer > Layer Style > Create Layer. It separates the effect onto its own layer so you can make the “sandwich” you discuss in this post.
Perhaps Randy is asking about that. No, there’s no way to separate InDesign’s object effects into separate layers or objects or something like that. Oh well.
This is a great tip ? but one step was left out. You have to remember to change the the transparency of the top image back to Normal.
Dwayne,
Actually, since you copy the graphic to the Clipboard first, the Multiply blend mode isn’t applied to it; only the one that was “left behind” to accomplish the shadow has been set to Multiply. But it is good to check such things when you’re building such a construction.
Ah, my mistake and my apologies ? I should have followed your instructions more exactly. Thanks Claudia.
Thanks for the tutorial! Great little tip!
Thanks the author!
They have done really wonderful work here???
Thanks for the tutorial!
Very thanks :)
Claudia Thanks for the tutorial! the best :)
Muito bom,ótimo tutorial
Parabéns,o melhor tutorial que já vi
Glad it had a happy ending (and the printer has now learned something very useful, too)
muito bom
This shadow creation idea is great and I really got here more attractive idea. thank you
This is a great tip ? but one step was left out. You have to remember to change the the transparency of the top image back to Normal.
Parabéns,o melhor tutorial que já vi
This shadow process is very good and its very necessary resources for photo editing interest person
Useful tip! What do you think of changing the transparency of the image? Is it good?