

Copy all your linked images

Warning: This post gets a little tedious for a Monday morning (or whenever you’re reading this), but it contains some good stuff you need to know about the Links panel!
You probably know about the File > Package command that creates a copy of your InDesign file and all the linked images in a new folder. But sometimes this command is overkill. Perhaps you’re perfectly happy with where you’ve saved your InDesign file, but you just want to copy all your linked images to a new folder? Here’s how.
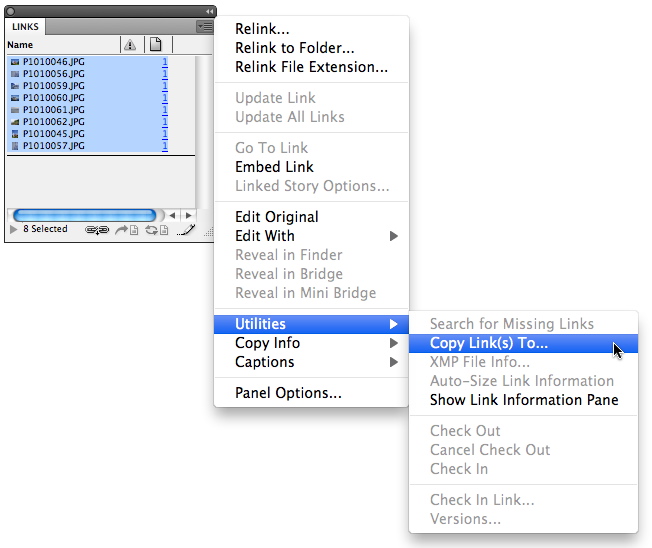
In the Links panel, select the linked images that you want to copy. Then, in the Links panel menu, choose “Copy Link(s) To” [CS3] or “Utilities > Copy Link(s) To” [CS4/5]. Choose a location for the linked files, and you’re done.
This is a really handy command, but here are some interesting caveats:
1. First of all, this command is very forgiving. Perhaps some of your placed images are already in a folder named “Links” alongside your InDesign file. But you’ve also placed a bunch of images in your layout from all over on your hard drive or network, and now you want to put a copy of those images in your Links folder also. You can go to your Links panel, and select ALL the linked images and choose the “Copy Link(s) To” command without any fear of images being duplicated or overwritten. Only the images that aren’t already in the specified folder will be copied there. The images that already reside in the target folder will be untouched.
2. When the images are all copied to the specified folder with this command, the path to the images is also updated to the new location. In other words, if the images were originally placed from a folder named “Stock images” but you copied them to a folder named “My Project”, InDesign updates the path to the images to specify the “My Project” folder. But BEWARE: At least in Mac CS4 and CS5, even though the path to the images will have changed in the InDesign file, InDesign doesn’t see that anything has been changed, so if you just hit Command-S to save or try to choose File > Save, you will see that the command is grayed out. So you will need to either do a Save As, or make at least one other change to your file before you can do a regular save.
3. Here is one other trick you can use: What if you want to make a copy of all your linked images, perhaps to send to a co-worker for a different project, without InDesign relinking to the newly copied images? Just follow the instructions above to “Copy Link(s) To”, and then when it’s finished, do a single File > Undo command. This will undo only the relinking, leaving the newly copied images in place, but leaving your InDesign file linking to the original images in their previous location.
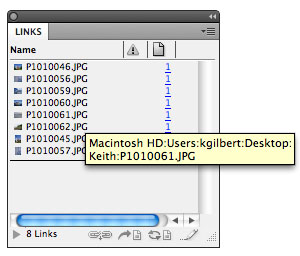
Remember, one quick way to view the full path to files in the Links panel is to hover over the filename in the Links panel. After a brief delay, you will see the full file path displayed.
SOOO helpful. Thanks so much. :)
Great recap of a very underutilized feature. When I show it to people they’re thrilled.
Another way to get those links for someone else is to browse to the InDesign file in Bridge and choose “Show Linked Files” (CS5/CS5.5 only)
From there you can just copy them to a new folder.
I use Copy Links action a lot. It’s very handy. I only package when I’m sending a file out. But I have a folder of stock images, and at the end of a project I’ll copy all the links to the InDesign folder.
An underhanded and taboo way of doing is is to Embed all the images. Then unembed them, and you will have the option to link back to the original files or to save them to a folder.
@Eugene: Watch the blog tomorrow morning for a post on embedding images!
@Keith: Great post, thanks! I love it when the fun tips are hidden in the “caveats.”
@David: I start my Holidays tomorrow… but I’ll keep an eye out :) Can’t wait for all the tips and tricks, do’s and don’ts etc. :)
Good post! One thing I’ve noticed is that if you’ve linked to another InDesign file, the pieces of that job (links within the link) won’t be transferred. So you might have to go individually grab those pieces if you need them in a new folder also.
@Phyllis, you’ve uncovered another “caveat”. When you place an InDesign file that contains linked images in another InDesign file, when you look in the Links panel you’ll see that the placed InDesign file has a black triangle to the left of the file name. If that triangle is pointing right (so the entry is “closed”) when you select all your linked files and choose the “Copy Link(s) To”, InDesign doesn’t consider the files that are linked to the placed InDesign file to be selected, so it doesn’t copy them. If you first flip open the entry by clicking on the triangle so it points down, then you can select the graphics that are linked to the placed InDesign file, and then they will be copied with the rest of the links.
I’ve never noticed this behavior before. Thanks for pointing out the problem!
@Keith — Thanks for that solution! Never even realized I could select the rest of the files like that. That’s a big help as I constantly need to copy over files (I tend to have ads and things scattered all over the place). Thanks!
If you hold down Ctrl (cmd on mac) you can expand every entry on that level when you click the triangle. You can also close all the entries in the Links panel this way too.
@Eugene: Thanks for the tip…I didn’t know that!
@Eugene Awesome! :-)
Thanks Keith, I alsways wanted to do that, but never knew how.
Another good reason to keep all of your links with the InDesign file is if you’re involved in some type of collaborative workflow.
I’m in the middle of a project with someone about 2,500 miles away. We’re using a dropbox folder for the project and every now and then one of us will forget to copy the links into that folder. This feature makes it pretty painless to fix rather than searching around for the right file and copying it manually.
I love learning about little things like this that we normally would not have noticed! Thanks for the tip… very useful in some situations!
Keith: In re
Have you filed a bug?
@John: I just filed this as a bug. Thanks.
Perfect post, exactly what I was looking for. Thank you very much.
You can use Long Path Tool for such issues, it works good, I will say.
So I opened ID Secrets to see if there is a script to do this.
Imagine my surprise to find a command!
Thanks Keith. You just saved me hours of manually checking all my links.
This is why I love internet, you can find answer from few years ago and it can still solved your problem.
Thanks Keith, it is extremely helpful.
This doesn’t work for me in CS6. Anyone else have a work around please? Need to quickly export over 177 images
Apologies for warming up an old entry.
I am trying to use the described feature to move around ID files plus resources between various locations (also on different machines, servers). Almost always I have to move several files that are related and often share some resources (images). For moving the files and resources, I would like to pool the resources in a single folder, mainly in order to avoid doublettes of large image files.
Following the description of the blog, I copy the links into a new folder (say: RES). I repeat that for every ID file. Unfortunately, ID creates doublettes at this point. If a file “Image.jpg” is already in the RES folder and I copy the link to “Image.jpg” from the second ID file, a new file “Image_1.jpg” will be created in RES. Also, the link within the second ID file will be pointing (correctly) to “Image_1.jpg”. All the while “Image” and “Image_1” are – bar the name – identical.
This is very unfortunate. Interestingly, the behavior is not consistent. Sometimes, the copied link will really be pointed to an already existing file in the RES folder. This happened til now only with EPS files, but – of course… – not with all of them.
Any advice on how I could achive my original goal of pooling resources? Is this a bug? Is it possible to change the behavior of the copy links function?
Thanks for any advice on this.
Can you do this from an InDesign Book? Thanks!