

Create a Flat-bottomed Stroke

In a forum post a few months ago, one of our readers wanted to create a stroke with just the bottom half of the stroke rounded. In the original forum post, I shared how to do this with a simple gradient.

Stroke with only two corners rounded
Note that the result, as shown above, works great against a white background. In an upcoming article, I’ll share an alternate solution that will produce a stroke with a transparent (not Paper-colored) bottom half, which is better if the stroke is going to be above an image.
I’d like to explain in more detail how I made this. I’m displaying the stroke on a colored background, so you can more easily see both halves of the stroke.
1. Make a thick stroke with rounded caps, and apply a gradient.
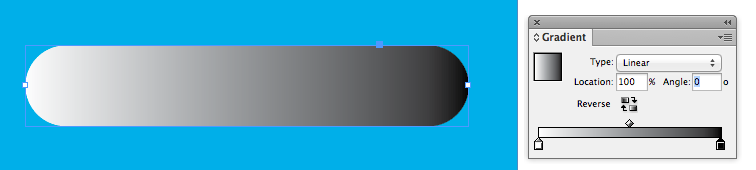
2. Change the rotation angle to 90 degrees.

3. Add two stops to the gradient.
Make the two left color stops white and the two right color stops blue. Changing colors of gradient stops can be a pain; I find the easiest way is to have both the color panel and the gradient panel side by side. After you’ve clicked on a gradient stop in the gradient panel, go to the color panel and adjust its values. Alternatively, you can drag swatches directly onto the gradient stops. For more tricks on using the gradient panel, check out this great article on using the gradient panel.

4. Move the second stop.
You can tell which stop is selected because the little triangle on top of the colored square will be black. (You can only select one stop at a time.) In the Location field, type 50%.
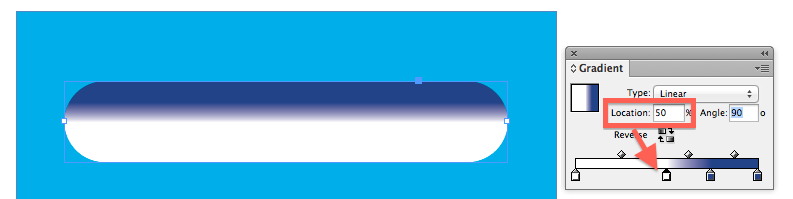
5. Move the Third Stop.
Now select the third stop and also set the location to 50%. Notice how blue two stop sits on top of the white stop. This creates a clean break in the color.

5. Reverse the Gradient if you like.
If you want the colors reversed, you can either reverse the gradient using the Reverse button (see below), or change the rotation angle to -90 degrees. Your choice.

You can see how this would work well with over a solid-colored background. But this technique could be problematic over a photographic background. In my next article, I’ll explain how to make a stroke with a completely invisible bottom half.
Too cool! I would never have thought of this.
Although creative, this method seems quite complex. I would simply daw a rectangle and set round corners for the top ones.
Igor, I agree, if all you want to make is a rectangle. But she’s making a stroke that can be applied to a rectangle … or a curved path, a text or image frame, an arrow, etc. (She’s just using a simple line fragment to better illustrate the steps.)
Again, for Dutch readers: variation on this theme mentioned in my blog from april 2011, hard gradients applied to fill.
https://fvdgeest-dtp.blogspot.nl/2011/04/speciaal-kleurverloop.html
Until we learn a little more on this, use Multiply on your rule against a photo or background and achieve the transparent effect.
@F vd Geest: That is a great article! I can’t read it, but the screenshots are great. Thanks for sharing.
@ Kelly Vaughn
Try the Bing translator https://www.bing.com/translator
Not perfect, but in English nonetheless
brilliant! shear genious!
Flat bottomed stroke, you make the InDesign go round.