Creating a Fixed Height Frame
J.C. wrote:
Do you know any methods in InDesign to fix a text frame height? In this instance we have a subtitles in our catalog that are simply a text frame filled with a color but we want to make all heights uniform without selecting each one individually.
Unfortunately, InDesign does not offer a way to set the height of a frame in an object style. (You can set the width, though it only works for text frames.) There are, however, several workarounds.
Use a Table Cell
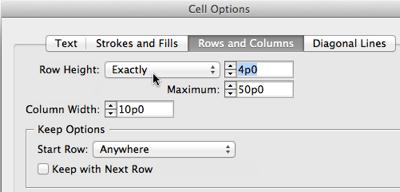
One way to set the height of a “frame” is to use a single-celled table cell — that is a table that is one column by one row. To set the height, you need to select the cell (or row) and set its height to Exactly (instead of “At Least”) in the Control panel or the Cell Options dialog box:

Unfortunately, you cannot save the Row Height information in a cell style, so there is no way to apply it (or change it) quickly. That is a huge oversight, in my opinion.
Use Auto-Size
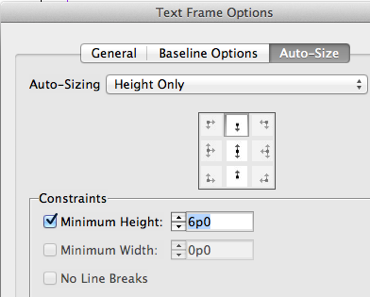
Another way to make a text frame automatically the right height is to use the Auto-Size feature (in CS6 or later). To do this, you select the frame, choose Object > Text Frame Options, and then choose the Auto-Size tab:

Note that you can also set this up in an object style, which means it’s really easy to apply and change at any time. However, unfortunately Auto-Size currently only allows you to set a minimum height for the frame. That means if you put too much text in the frame it will grow. (That is, after all, what the auto-size feature is primarily for.) We’re all hoping that a future version of InDesign will allow us to set a Maximum Height, too, which will help a lot!
Fake it with a Rule
Finally, you can fake the whole text fixed-height frame border thing with a a custom paragraph rule. For example, the light blue box around the subhead in this image:

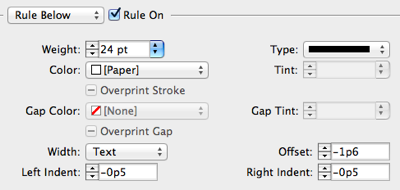
was created with with a Rule Above and a Rule Below with these settings:


As you can see, because the Width setting is set to Text, the border will extend to the right if the heading gets wider. However, it will never get taller? the subhead just sticks out the bottom, which would look terrible, but hey, it’s a fixed height “frame”! If you wanted a two-line box, you’d have to tweak the Weight and Offset values in the rules to make it work.
We talked a bit more about the whole rule above/below thing here, here, and here.


Set default anchored object: this can be an object style with its exact size set! (Set default insert anchored object settings, sekect object style and select height and width!).
Maybe not what is desired here but it can ge done in a way… ;-)
Could a fairly simple script be assigned to a keyboard shortcut? (I can only haltingly hack my way through something like that, but I’ll bet a true scripting pro could knock out something that would take just a line or two without breaking a sweat.)
If the text frames are already in place and J.C. only wants to check that they are all uniform height, do a find/change object:
Find Object Format: Fill: color
Change Object Format: Text Frame Auto Size Options: Dimension: 1, Has Minimum Height: Yes, Minimum Height Value: min height
If you’re sure only the boxes you want to change are that color, then hit Change All.