

Creating Custom Default Swatches

When you open InDesign you are greeted with a few default swatches, styles, and other things already pre-loaded into the panels. Unfortunately, the default swatches you get aren’t the most inspiring or useful set of colors you could have at your disposal. So let’s see how to change that default set for the better, and how to include swatches in a CC Library to make them even more handy throughout your workflow.
Swatches and Preferences
With no documents open, whatever settings you change in InDesign’s panels become the defaults for all new documents. That means existing documents will not be affected, and won’t have the new settings (including swatches), only your new documents will have them.
Note that resetting your preferences will cause the panels to be reset to their original defaults. This means you’ll lose any customized settings, including swatches.

You may need to reset your preferences from time to time if InDesign is acting wonky. And sometimes installing an update, a plug-in etc., can cause your panels to reset.
Creating Swatches
When creating custom swatches, I start by creating a new swatch for my rich black because that’s what I really want for lithographic printing for large blocky text over 18pt (as a guideline not a rule!), or for large areas of black ink coverage on a sheet. Note that there are many variations of rich black for different printing conditions. The only general rule is to not go above your ink limit. Don’t know your ink limit? Ask your printer! They can tell you the best rich black formula for their machines and the paper you’re printing on!
I deselect the “Name with Color Value” to access the Swatch Name box and give all my swatches descriptive names.
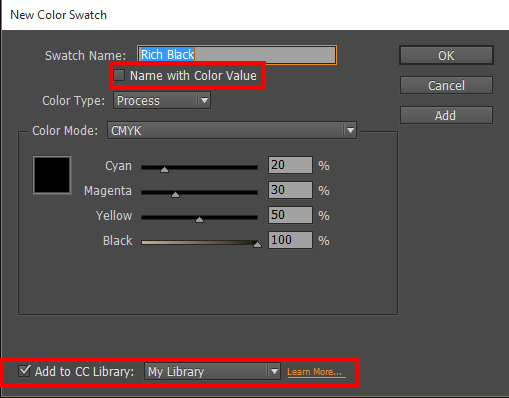
New to the Swatches dialog box is the option Add to CC Library. If you have more than one CC Library, you can choose the one you want from the popup menu. My one pet peeve about this feature is that it automatically switches you to the CC Libraries Panel, taking you away from the Swatches panel, which I find frustrating. So I usually turn this feature off and just add my frequently used swatches to the Swatches panel at first.
Saving Swatches Locally
Once you have created the desired swatches, save them locally in a swatch exchange (.ASE) file.

After you save the swatches you can then load them the very same way via the Load Swatches option in the panel menu. You can also load those swatches into Illustrator and Photoshop, using the same method. And you can even send your swatches to another person, by attaching the .ASE file to the email.
Saving Swatches to a CC Library
One of the things I appreciate about the latest version of InDesign is that you can now add swatches to your CC Libraries. What I don’t appreciate as much is that I can’t do this from the Swatches panel menu. Check out the screenshot above. There’s no option to add swatches to a library.
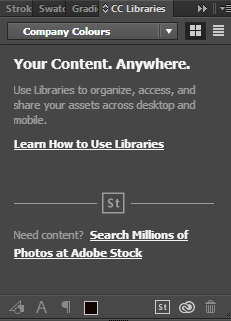
Instead, you have go to Window > CC Libraries then click the Arrow beside “My Library,” (you may have it called something else).

Then the option for “Create New Library” appears, so you can create a new library to store your Company Colors, for example.
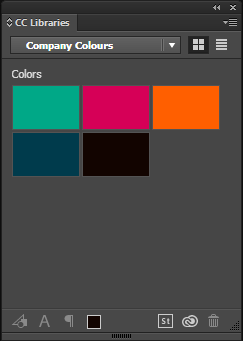
At this point, you can’t really do much with swatches in the CC Library Panel. For example, you can’t drag your swatches from the Swatches panel to the CC Libraries panel, which frustrates me because I live in a drag and drop world. But you can add swatches to a library via the buttons at the bottom of the CC libraries panel.

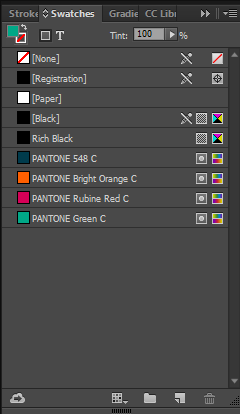
And there’s good news in the Swatches panel. There’s a little Cloud icon at the bottom of the panel in the CC 2015 version of InDesign.
Select the colors you want (holding Shift allows you to select colors in a range, holding CTRL/Command allows you to select colors that are not next to each other in the panel).

Click the Cloud Icon and they whiz through the air and onto the Cloud to live there.
Limitations of Swatches in CC Libraries
Currently, there is no way to get your swatches from the CC Libraries panel to your Swatches panel without having a document open. If you want to have swatches appear as defaults when you open InDesign, you’ll need to load your swatches via a swatch exchange file as noted above.
However, you may not need to load them at all if you just want them in a specific document, because you can apply swatches to objects in your layout directly from a CC Library. Just select the object and click the swatch in the library that you want to apply.
Benefits of Swatches in CC Libraries
One of the nice things about putting swatches in CC libraries, is how portable it makes them. Your CC Library travels with you whenever you’re connected. It’s always in the Cloud and if you work with a team using the same CC login, you can all have access to the CC Library for those critical times like when the company colors change.
Even better is that you can choose to share a library, via the Share Link option in the CC Libraries panel menu. I’ve made this one Public https://adobe.ly/1IQvxIy
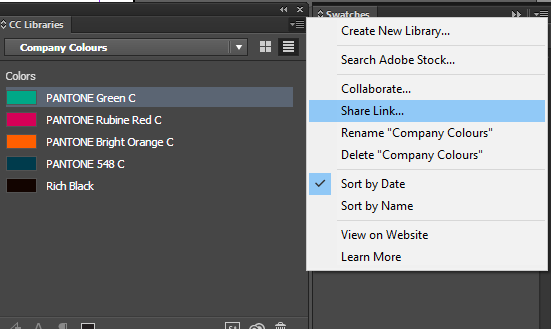
This means you can share your company colors with anyone in the world. You can update your company colors anytime—just be sure be sure to let your clients/designers/printers know that you’ve altered your colors. Remember, library items are not swatches, they are information stored in the Cloud, so changes to them won’t automatically show up in your InDesign documents.
Another benefit of swatches in CC libraries is how easy it is to use them in other applications. Go ahead and open Photoshop and Illustrator, then choose Window > CC Libraries, and find the Company Colors you created. It’s great to have important colors available in those apps without having to fiddle around with loading and saving swatch exchange files.
You can even log into your Creative Cloud account and go to My Libraries and look at your swatches there—very handy if you’re in a meeting and you can’t recall a specific color you need to discuss with a designer or printer!
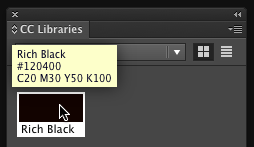
One thing that frustrates me a bit is that on the CC website you can’t see the breakdown of the color values at first. For example, with my rich black, I can just see the name “Rich Black” and a black square but no other information.

I have to click on the swatch to get the details, and even then I only see RGB and Hex values, not CMYK.

If this limitation bothers you, include the color breakdowns (or the Proper Pantone name) in your swatch naming convention, so that information will always be available.
And remember, you can see the color breakdown in InDesign if you move your cursor over a swatch in the CC Libraries panel.
How do you edit the ase file after making it?