

Tip of the Week: Drag and Drop Anchored Objects

This tip was sent to Tip of the Week email subscribers on December 17, 2015.

Sign up now and every week you’ll get a new InDesign Tip of the Week and Keyboard Shortcut of the Week, along with roundups of new articles at InDesignSecrets, plus exclusive deals sent right to your Inbox!
Just scroll all the way down to the bottom of this page, enter your email address, and click Go! We’ll take care of the rest. Now, on with the tip!
Maybe I’m weird, but the term “anchored object” in InDesign never made much sense to me. I know what it means, that the object is positioned in relation to a marker that you can insert or “anchor” in text. In most cases, this allows the object to move along with the text, and it’s wonderful for all kinds of layout uses. But in real life when you anchor something (a bolt, a ship, a retaining wall) you do so to stop it from moving altogether. So to me it seems like we should call these things “floating objects” in InDesign. I guess it’s just how you look at it. But I digress.
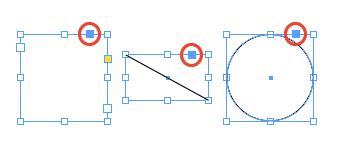
It appears in the same color as the layer the object is on. To anchor the object, simply drag and drop this square (officially known as the Anchored Object Control) to the spot in the text frame where you want to anchor it. Want to make the object Inline instead of Anchored? Hold Shift as you drag and drop.
Once the object is anchored, you can Option/Alt-click that little square (which now contains an anchor) as a shortcut to open the Anchored Object Options dialog box, where you can adjust the object’s position relative to the page, text frame, column, or anchor marker.
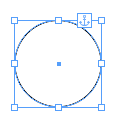

At any time you can drag the square to a different location in the text flow, or even to a different text frame altogether. You can also double-click the square to select the the text frame where the object is anchored.
If you never use anchored objects and consider all these little squares visual clutter, you can hide them by choosing View > Extras > Hide Anchored Object Control.
And the best:
You can also prepare an object style that inherits a specific anchored position.
So anchor your object as quickly as you can and then apply that special object style to get the special anchored position you saved with that object style.
Uwe
Excellent cool tip!!!!!