

Easier import of complex Excel spreadsheets

Imagine you have a large Excel spreadsheet, and you need to import sections of the spreadsheet into InDesign as separate tables. Rather than saving multiple copies of the spreadsheet, each containing the specific fragment you need, or laboriously copy and pasting into InDesign, there’s a better way.
When you choose File > Place and click the “Show Import Options” button, the dialog below appears. Normally, you’d have to use a “Cell Range” such as B6:F18 to designate which of the cells in the larger spreadsheet you want to import. But finding and remembering those coordinates can drive you batty.
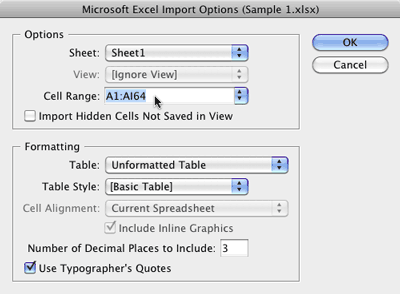
A better way is to use a “named range”. In Excel, just select the cells that you want to place into InDesign, and then choose Insert > Name > Define (Mac Excel 2008) or right-click and choose Name a Range (Windows Excel 2007). Then type a name for the range and click the OK button. You can have as many different named ranges as you want in a single spreadsheet.
Then, in InDesign, choose File > Place and click Show Import Options. In the “Cell Range” drop down list you will see each of your named ranges, ready to place in your layout.
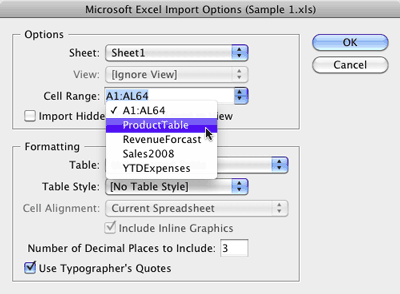
One caveat: InDesign can place spreadsheets saved in either the new .xlsx format, or the older .xls format. But named ranges will only appear in InDesign if you save the file in the older .xls format.
Great post! And definitely a time saver for most spreadsheets. In addition to using the Insert menu, you can name a selection in Excel also by just entering a name in the Name field of the Formula Bar at the top & hitting Return/Enter.
I just wish InDesign would support Name Ranges that are made up of non-consecutive row or columns. Those names don’t even appear in the Import Options dropdown menu.
Did you ever fix the non-consectutive coloumn name ranges to appear in Indesign Cell Range. I’m having the same problem. Don’t want to move the data on the spread sheet and I can’t hide it either.
That is really interesting.
Can you achieve a similar result by using views in Excel?
Fritz, Views are different than Ranges, but are also useful in InDesign.
For example, one of the things that “named views” are useful for in Excel is that you can hide certain rows/columns, and then save that as a view. Then, when you place the spreadsheet, you can either choose a named view or ignore the view. This can be used in conjunction with Named Ranges.
So for example, I could hide some rows in the middle of a spreadsheet, and then save that as a View. Then I could also create one or more named Ranges. Then I would unhide the rows before I save the file. Then when I place the spreadsheet, I can ignore the view if I want to see all the rows, or select the named view if I want the rows hidden. In addition, I can select a named Range of cells regardless of which view I’ve chosen.
This also provides a way to bring non-consecutive rows or columns into InDesign as Anne-Marie was asking for.
Wow … must try this out! Thanks Keith.
Great information!!!!
@Keith – I smell a followup blog post…
Thanks. I live on Excel spreadsheets. And just like the ink tip, every little bit helps.
Ed
Is there any way to change the name of the target range for an area of ‘place linked’ information once the link has been created?
@Steve H.: I don’t know of any way to change the name of the target range once a spreadsheet has been placed in InDesign with the “create links” preference chosen so that a link is created to the spreadsheet file. I think this could be done with a script though. Can you tell me a little bit more about what you are trying to accomplish?
We have a item we have placed with a target range of A1:B2. We want to replicate the item with a copy\paste and then change the target of the new item to A5:b6. Thanks.
Apparently I can only use my Excel Named Ranges for the first sheet in excel. This is a problem as i have a workbook with many sheets and different named ranges on each.
When i switch the sheet in the ID excel import options box none of my named ranges show up. They all show up when it is selected as the first sheet, but it takes that range from the first sheet then, not the sheet the range was actually designed for.
I have tried defining the ranges as both local to the sheet and global to the whole workbook in Excel but same story, apparently only named ranges for the first sheet actually work.
Makes importing tables super annoying when you have to manually put in the coordinates for the ranges. Is this a bug?
Any luck with this? I am having the same issue. All named ranges only show up for first sheet. All other sheets only show default option.
Seems that Excel import process (filter) in CS5 is not capable doing anything more complex than linking a coupel of named ranges from the first worksheet. Namely, it doesn’t support .xslm (macro-enabled) Excel 2007 – 2010 files, it doesn’t see named ranges in .xlsx (Excel 2007-2010 format), it replaces all linked ranges with the same range but from the first worksheet (.xls Excel 2003 format) from time to time. Sigh…
Don’t forget, you can link the files too (Preferences Panel), then if the data changes it can be updated automatically.
Unfortunately, any formatting you have done, is lost. However, if you have made table styles, it is easy to reapply.
@Olwen Bruce, if you lay-out the table with cell styles, and you place them in a linked text frame they will keep the style.
eg. drag a new text box, place the Excel table (make sure you have checked the ‘link documents’ box in prefs). Now cut the entire box, and paste them into the text-box that you want it on the page.
No idea why Adobe makes a run around…
The name ranges across multiple worksheets are still supported if you save the file down to an .xls format, but not in .xlsx.
In .xlsx it lists all name ranges under the first worksheet when you go through your place options, which obviously won’t work. *very sad face*
I am hoping that this is a bug and Adobe will be fixing it?
I have study to some contents in indesign. Really get knowledge.
Thanks
Why are the formulas I have in my xlsx dokument not visible when placed in InDesign?
@Rene: InDesign should import the “final” numbers, but the formulas themselves are not active in InDesign. If you need formulas in InDesign (to add up numbers in a table, for example), take a look at Active Tables: https://www.dtptools.com/product.asp?id=atid
Is it possible to place multiple sheets in one Excel file one go and then have the tables auto flow through multiple text boxes?
thanks!
Hi, is there a way to create labels using this technique so there is one master page and index the list to make each name appear on a separate page? (hopefully that makes sense)!
Just checked, and it appears that Adobe fixed the xlsx problem in InDesign CC… I made a named range (in Mac Excel 2011), saved it as xlsx, and the named range appears in InDesign CC’s show import options dialog box. Yay for progress.
My named range is only appearing in the xls file not the xlsx one. Im also using Mac Excel 2011 and a current version of InDesign CC. Cant figure out why its not showing for me.
In CS6 if you can’t see defined name ranges in a .xlsx check the below:
– Name ranges when defined in a document must have no spaces, or special characters the only thing ALLOWED is an underscore _
– Sheet names must not have and special characters or spaces
– ALLOWED are underscores_ or full stops .
– If you use a fullstop . then add another numer after it, it thinks the range has some become a number so you can not add any letters after a full stop For eg P1.L1 will not work P1.1 will work
_ Underscores work in all instances, just remember to take out any spacing
The tables I need to import are large and many: hundreds, with fields going up to 120 x AR in Excel. But over 50 x F the formatting disappears. OSX 6.8, Excel 2004, CS5. I used to be able to do much larger but can’t remember how – cut and paste I think! Wth only 50 x F I have a nightmare on hand! Help!!
Charles
PS Love the podcasts!
I have alot f Certificates and i want to creat them by indesign …….. i hear that there are very simle way to make that …………. use # then take the name from field from Exel table……….as soon as any one know about this way please help me :)
Is there a way to have a master spreadsheet lets says has 10 coloumns in. Columns A:G is always wanted displayed data, then H is a price list 1, I=price list 2 and J=Price list 3.
I’ve Saved excel with 3 Define Names. Name 1 to include Columns A:H so all the data and Price list 1, Name 2 to include Columns A:G & I so all and the data and Price list 2, Name 3 to include Columns A:G & J so all and the data and Price list 3. However with the break between Coloumns for Name 2 and Name 3 these do not appear in my Cell Range when placing into Indesign.
Is there are way to solve this. I’ve tried Hide Columns, Which works for price 3 if Columns H&I are hidden, but them this removes the data from the hidden coloumns when placing Cell Range Name 1 or 2.
I know this is long winded, hope you’re still following.
I’d like just to have the one excel file, but I have a sinking feeling I’m going to need three.
Has anyone got the answer, its now officially killed my brain.
I have spent HOURS trying to update an InDesign document that I created originally in 2010 and update a few times a year. I tried to copy from Excel and paste into InDesign6 and it would not work no matter what I tried. So I went back to a really old version that would open in CS5 and VOILA! It works. All of the formatting, etc. is perfect.
Is it possible to adjust the cell range of a table that has already been placed in ID? For example, I have formatted the placed table with cell styles but added a new column in excel. Can I adjust the range to include this new column without replacing the table?
Absolutely. Just adjust the name range area in the excel and update the link in indesign. To save time with formatting at the same time as you add the new column in excel add a new column to the table in indesign.
I am importing Excel tables in InDesign and in Excel I have defined numbering format as x.xxx,xx (for example 1.000,00$) but when I import that table into InDesign, for some reason I get next format x,xxx.xx (or 1,000.00$). How can I keep my original numbering format?
Hi.
I have been using the process described in this article and it has been working beautifully. One problem that I haven’t been able to resolve is how to maintain superscript formatting of select characters within a cell when importing to InDesign. I am using table styles and cell styles which works well for the entire cell, but not specific characters within it.
If you know how to do this I would love to hear about it. Thanks.
Hi,
If you have not solved this: inside your cell style you have to connect it to a paragraph style. Then it workes just fine.
solved my last question using grep styles as seen here:
https://creativepro.com/auto-format-superscript-and-subscript-numbers-using-grep-styles.php
thanks david!
Help! I’ve followed the instructions exactly but the named range doesn’t appear when I try to place into InDesign. Any ideas?
InDesign CC and Excel for Mac 2015
Hi,
I work on PC, but when importing, there is a small box to tick off when the explorer shows up: “show import options”, maybe you have someting similar.
I hope this is still alive.
I have a large indesign file (catalog with pricelist) with 400~ tables that is all linked to one massive spread (Canadian prices). Is there anyway to remap the indesign file to link up in the exact same way to another spreadsheet (US) without having to place each individual table via cell range? Currently indesign can’t seem to do that via relink – it kept asking me to punch in individual cell ranges for each table again.
Hi Kay,
If you duplicate the file and change the filename and prices format and leave the name ranges the same it will work. Just remap the link to the ew file and uncheck show import options.
Some major things Adobe should add, is to see linked cell range in link panel. Now when someone changes cell range or sheet. The link is broken and all work needs to be done. Remembering what the cell range or sheet name was is ridiculous.
Giving the error of what is missing, than you can fix the link more easier
I have Indesign Cc 2018 and excel 2010, I try everything bu it is not work. Can you help me I need this function urgent. Thank you.
You mean linkage is not working? not very clear whats not working for you.
Check in preferences> file handling> make links for files near the bottom.
Indesign preferences are some sort weird, they are per file. They should split this in document settings. I i want to make link from files, just do that always when i check it ;)
https://creativepro.com/wp-content/uploads/2010/04/named_range_21-300×220.gif
I can not see Names of named Ranges in Excel like it is shows abowe.
I found another issue. When you want to just a single cell as header and use Cell Range it wont show. It will only show when 2 or more cells are set. Thats really to bad, now we need to do a lot of manual work and find the proper cell range numbers…. pfff..
hi keith, i tried ur method but the number didnt appear in my indesign. its just blank without numbers.