

Eliminating the White Box Effect

One of the most common complaints of designers or print service providers when previewing and printing transparency from InDesign is that a transparency effect like a drop shadow doesn’t display or print correctly. Instead, a white box appears behind the transparency effect.
When you probe into how the transparency effect was created, there is usually one common element: The designer is applying the transparency effect so it interacts with spot colors. The illustration below shows text with a drop shadow placed over a blue frame. The background frame above is colored as a Pantone color; the one below was colored CMYK.

Whenever transparency is used in InDesign, it must be flattened for printing. Printers (and the PostScript language used for printing) don’t understand transparency. So if you were to take the example shown above and export it to PDF using one of the two PDF/X PDF presets, Acrobat 4 compatibility is automatically selected, and the PDF is flattened.
Many print service providers prefer receiving files with transparency preflattened, and that’s what these presets do.
If you then open the PDF in Acrobat and Reader, this is what you will initially see?what I call the “white box effect.”

So what are you going to do? One option is to not use spot colors when there are transparency interactions. We can see that that worked above. But you can use spot colors if you turn on overprinting. In Acrobat 6 or 7 Professional, choose Advanced > Overprint Preview. In Adobe Reader 7, you can also turn on overprinting in Page Display Preferences. Then you’ll see the transparency effect the way that was intended (see below):

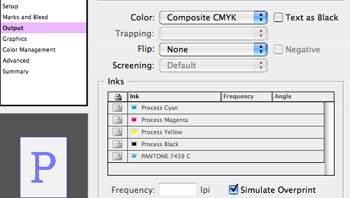
This means that in order to print properly, overprinting must be turned on. This is the only way that the transparency flattener in InDesign (and the other Adobe Creative Suite applications) can properly render transparency mixed with spot colors. If you’re printing a proof on a printer which doesn’t understand overprinting, you can turn on the Simulate Overprint option. In InDesign, this is found on the Output panel when you select one of the composite printing options (below):
If you’re sending your file to a print service provider, be sure to tell them to turn on overprinting on their RIP when printing your job. Many service providers by default have this option turned off, but to print with spot colors and transparency, it must be turned on. This is the only way you’ll eliminate the white boxes!
Fantastic post, Steve. I’m e-mailing the URL to this story to about ten different clients who’ve asked me about this very issue in the past couple months. While I explained the same thing to them, the visuals help quite a bit! :-0
By the way, David and I talked about this very topic (transparency with spot colors and the need to pay attention to overprint settings) last month in InDesignSecrets Podcast 022.
The white box effect is one of the reason, and maybe the main reason, why unaware operators in service bureaus and printing houses said how ID is a bad software, and why ID in some markets had so many setbacks…
There are 4 majors settings to do in Acrobat 7 Professional for any person working with PDFs in a graphic/prepress environment, and those who attended my “InDesign at prepress stage” session in London know how important they are :
1. Acrobat’s Preferences > Page Display > Enable Display Trim, Page, Bleed boxes
2. Acrobat’s Preferences > Page Display > Overprint Preview
3. Acrobat’s Preferences > Color Management > choose the appropriate output profile, especially important for European users where they should select Europe Prepress 2 or a better ISO setting
4. Deactivate in the Advanced menu > Use Local fonts : this is one of the ways to check if the PDF has all fonts embedded and does not rely on a font installed on the System.
If a printer or a service bureau says that you are wrong when you are suggesting them to do that, they can order a training session to a major InDesign or Acrobat expert. The printer is as ignorant as I am in how to build a nuclear power plant…
Enjoy the weekend, enjoy the silence.
Branislav, I’m shocked that you don’t know how to build a nuclear power plant ;-)
Is it another challenge from me to you ? ;-)
A great way to tempt your print provider to honour overprints is to use the verification wedge for their renderers available from Global Graphics – https://www.globalgraphics.com/products/pdfx/testimonials.html
As many people are aware – PDF/X PDFs are only half of the equation, it’s the rendering of file which is equally important …
Cheers!
Jon
My printer says this method doesn’t work. I asked them to switch overprinting on, on their RIP ? they say it still creates white boxes. Any idea what’s going on??? I am being plagued by this white box / drop shadow / spot colour problem and the only thing the printer can suggest is separations … which is a pain.
The problem is probably some quirk in their RIP, or in their understanding of working with transparency. You might look around for a different printer.
Thank you for such a great help.
However, I am still troubled by the whole issues about flattening and transparency/blending mode.
I thought flattening will transform spot color to cmyk. My printer said flatten the layer with transparency to avoid the problem and using spot color won’t work since flattening will change it to process colors. So I thought…in order to keep the spot color, I have to not flatten which is risky. Is this true or not? If this is true, should I only supply indd. file to the printer and not PDF?
In Illustrator there is a flattening tool (Flatten Transparency) and I was wondering if this is the only case that will transform spot to process. And actually flattening at the last minute by saving as PDF will not treat the colors the same way…? Is there also a such tool in InDesign also?
One last question, would there be nothing to worry about if I use only process colors in InDesin and send either PDF or indd. file to printer?
I think I asked too many questions…T_T
Johana,
You and your printer need some better sources of information. Spot colors are not converted to process when flattened if flattening is appled correctly. And the Flatten Transparency is NOT a good tool to use, in general.
Here are two good resources: For designers there is a Designer’s Guide about transparency:
https://www.adobe.com/products/creativesuite/pdfs/dgt.pdf
Here is one for print service providers:
https://media.studio.adobe.com/linked_content/en/acs2bgtransparency/acs2bgtransparency.pdf
Thank you so much for the sources.
I will read them carefully and prepare myself better.
I’ve only seen the white box problem when a designer imported PDFs into picture boxes within an InDesign document. A friend told me this is not a good picture format to use. Would it then have been better for this designer to have converted the PDFs to TIFFs in Photoshop, or can the same white box workarounds described above be applied to imported PDFs
[…] Steve Werner has posted an excellent solution to the Dreaded White Box (DWB) syndrome, wherein you see white boxes around shadows and other transparency effects interacting with spot color content. The answer, as Steve points out, is for your print service provider to turn on PostScript Overprint at the RIP. (And, for correct viewing in Acrobat, turn on Overprint Preview.) […]
Thank you for this fix!!!
No more white box induced migraines and aggravation for me! Woohoo!!
Wow, it’s like finding an Office Depot Easy Button. Thanks for the info.
My printer has problems RIPing PDFs containing fonts, so before I create a PDF for him, I make a copy of the file (add “ol” to the name), select all, select ungroup (fonts won’t outline if grouped), convert all the type to outlines, then go to “Find Font” to make sure there are no fonts left in the file. After I check to see nothing has swapped position (it does that sometimes when outlining), I now — thanks to this new advice — select all the spot swatches together, double-click on one of them and change color type to cmyk. Doing this I’ve eliminated font and transparency problems due to spot colors. It’s a bit more work than I’d do with another printer, but he’s considerably cheaper, does good work and does it quickly so I’d be crazy to complain.
Great tip. One possible problem — when printing color composite, generally you want overprinting turned off (it’s usually user error when creating files) so by turning on simulate overprint in the pdf print options it does fix the white box problem but it will also print those overprint areas that you don’t actually want. If there was a way to do a global ‘remove all overprints’ and then print the simulated overprints to fix white box problems I think that would work.
I’m so confused… I see all of these fixes for a huge problem that I have, but, all of the fixes assume that I am printing directly from the pdf to my plate maker, which I am not doing. It first goes through an imposition software, that seems not to care about transparency. Does anyone have a solution?
Helen,
The first thing is: Do you really need spot color objects? If you’re not really printing in spot color, convert your spot colors to process, and none of this is an issue.
first of all, your info was a real eye opener! But I have a question:
If I rasturize an entire image in illustrator, (including spot colors AND CMYK colors) will it automatically eliminate the spot colors and have the document only be made up of CMYK?
Rachel,
Why would you want to rasterize an entire Illustrator graphic? You’d lose the quality of the vector elements.
If you did want to do that, you could choose File > Export > Adobe PSD or open in Photoshop. I’ve never wanted to do that so I don’t know what would happen to the spot colors.
thanks for your answer. But my document has a lot of effects and I thought that in order to keep everything intact, i have to rasturize it.
I already sent it to the printer and I am waiting for his response- do you think I should resend it unrasturized?
My problem is similar. Maybe you have an answer? I build almost all of my Indesign files with Processs coated Pantone colors (CMYK) and when I export the file with eps images with clipping paths on placed on a color filled background to High Quality Print PDFs. They look fine on screen and print fine on ink jet printers. However when I print to color copier printers or laser color printers I get a color shift from the space around the eps image. The space around the original eps image prints as a shade of the color fill behind it. Any reason why this is happening with CMYK files and colors?
Steve,
Thanks I have gotten rid of the white box but now my background color has changed from yellow to tan what happened?
Mel,
I am having the same problem. When I print to the color laserjet in my office i get this horrible “Box Color Shift” around all of my placed images. Any info on this subject would be greatly appreceiated
Overprinting might work if the shadow is a dark color (black on blue), but what if the shadow is a lighter color, simulating a glow? I have a 2-color job (black and a purple spot color) with a purple-and-black logo on top of a purple field. If I overprint, the white shadows will disappear, which is almost as bad as the “white box syndrome”.
Also, since I’m stripping a PDF, I can’t “simulate overprint” anyway.
I am wrestling with a customers file and this problem and I have tried everything. I am a print provider prepress, and this must be something I can fix. There are no spots, just an imported eps with transparency built in that will NOT work. Not out of ID or out of an exported pdf.
White boxes are now gone, but are replaced with a transparency box over the spot color, not as obnoxious as the white box, but still apparent. Spot colors are definitely needed as well as shadows.
Regarding #26; me too! (I had placed an eps in InDesign, and added an InDesign drop shadow to the artwork. The eps artwork lay above an InDesign generated color gradient background.) Taking the steps described above produced a great on-screen pdf without the white box. Hooray! It also produced a 15 mbs file however which isn’t particularly big but it refused to print on my color printer. It finally printed on my b&w Xante but I can detect a difference in tonality between the eps bounding box (the formerly white box) and the rest of the gradient background. Put another way, the gradient looks like it’s 3% lighter behind the shadow’s bounding box verses the rest of the gradient.
To make my deadline I’m going to do it the good ‘ol Photoshop bitmap way, but for the future can you give me some idea what I’m doing wrong
Does anyone know if this weird glitch was ever formally fixed in CS3?
Seems if it’s so common of a problem, we shouldn’t have to jump through hoops just to get a final that looks like it does on the screen.
This is all fin and dandy when printing from acrobat (with simulate overprint on) which DOES work but I am printing from InDesign CS3 and I want to print “leave colors unchanged” to preserve the spots but then the simulate overprint box is grayed out. It only becomes available when I change the color mode to RGB or CMYK which defeats the spot colors. I need to preserve the spots because our xerox docucolor 6060 uses a special spot color look up table that we have edited to match our clients corporate colors. When I send as CMYK it bypases the spot color lookup table.
John,
I’m afraid I don’t know why the Simulate Overprint checkbox would be grayed when printing composite to your Xerox Docucolor 6060. I have no way to test that. It doesn’t happen to me on the printers I have available.
John – the only way that I’ve found is to take the value from the RIP for your custom spot and use that for a second color in ID, only make that one process. The RIP outputs them slightly different, but usually you will be close enough that it doesn’t matter. Just try not to use spot and process right next to each other…
During the production process when I am printing out pages for review and sending screen PDF’s to the client I create a new swatch that is a process version of my spot color and use this for all graphics that would get this spot color. So, for all my rounds of internal and client proofing, the spot color doesn’t “get in my way” Just before release of the final file, I delete this process color and swap it with the spot color.
Every month I have several documents with spot colors. This workaround works for me.
I always leave a big note in the pasteboard with instructions to swap swatch – just in case I’m not the one who releases the file.
I am seeing another kind of white box effect on ID files made into PDF?s. These are very thin lines, either white or off-white that either surround the edges of frames or are occasionally not associated with frames. These are not transparency related as far as I can tell, as they seem to happen with all kinds of images imported into ID. Turning off flattening does not help.
Anyone else seen these?
Thanks,
John
The indesign secrets simulate overprint worked for me after getting a major headache from the white blocks! Thank you!
Amen!
Thank you – very useful info here. This made my day.
Interesting discussion on this issue, while I rarely print using pdf’s I do get this same effect printing directly from ID to postscript 3 on a Xeroxdocucolor 252. I noticed in your example above that this may be related to postcscript’s inability to deal with transparency. Using the simulate overprint check box eliminates some but not all of the effect. Any thoughts??
I’m not getting the white box effect, but I am getting a thin white outline showing up in the PDF around framed objects that have a drop shadow and I cannot get rid of it!
Anyone who has ever had problems printing transparency should also read this post about the APPE.
tdexpress: The thin white hairlines that sometimes appear are often just screen artifacts. If you can zoom in on them without them getting bigger, then it should just appear on screen in Acrobat. If they get bigger when you zoom in, then they really are “there” (that’s rare).
We are using cs3 and trying to change color in a file that was received. I am new to InDesign (no real training yet). We can open the file but we can’t figure out how to change the Pantone color. Can anyone help?
CLC, I encourage you to check out some of the training options before you go too much farther. Sounds like you need a good book about InDesign, or perhaps watch the movies at lynda.com (you can get a free one-week trial at lynda.com/IDsecrets).
We were solving this problem by turn off this “Smooth LineArt” option in the Page Display menu in the preferences setting in Acrobat.
Thank you!
Thiyagu
David, is that 1 week trial offer for lynda.com still valid? I used a 24-hour trial the other week but didn’t get to download all the videos I wanted…
For those that have had the same problem as me, ie printing a color document in B&W and getting the dreaded white boxes AFTER printing (not on screen like this article refers to), here is a fix I’ve found:
After exporting your file to pdf, open the pdf and open the print dialog box. At the bottom left of the dialog box, there is an ‘advanced’ button. Click on it and go to Transparency Flattening. Here you will find a Raster/Vector Balance Slider. Slide it all the way to
Raster (ie left) and click ok, then print your document.
Your document should print like it looks on screen!!
Humphrey, there is an even easier way: Just turn on the Print as Image checkbox in the Advanced print dialog box. (In InDesign it’s called Print as Bitmap.)
Yes David, that is much easier, thank you. But I just realised I have another problem now. I tested my theory on a machine that just has reader on it and noticed the advanced button doesn’t have the Raster/Vector slider (the print as image box you suggested is there). I assume the Raster/Vector slider is an Acrobat Pr0fessional feature??? This isn’t a problem for me but I will be forwarding my document onto my client who only has reader and they will forward the flyer onto their clients. Surely I’m not expected to tell my client to tell their customers that if they want to print it in b&w they should print it as an image??? I must be exporting it wrong. Can you or anybody shed some light? Ps I’m fairly new to indesign and this flattening transparencies thing is pretty frustrating. I’ve tried all options in all lists when exporting but nothing seems to work when printing a colour doc in b&w. What am I doing wrong??????
I found this document: https://creativepro.com/files/story_images/20080428.pdf which seems to have been exported in 1.6 (Acrobat 7.x) and it prints in b&w fine. Again, WHAT AM I DOING WRONG???? Any help would be much appreciated!
Ok…here goes… For those that care, I think I ‘ve solved my own problem.
If I go to Edit>Transparency Flattener Presets and create a new preset based on Hi Res or Med Res or Low Res (it doesn’t matter which because later you can repeat this for the other 2), when the ‘Transparency Flattener Present Options’ box pops up for the new preset, adjust the slider all the way to the left to Rasters. Then save your new preset.
When exporting choose PDF/X-1a 2001 preset, click on Advanced and choose your newly created preset from the drop down list for ‘Transparency Flattener’, (save this preset for later use), then click export.
Upside:
Now I can print in b&W and color and all transparencies print perfectly (tested on machine with adobe reader, not pro). Therefore I can send the file to my client and they can forward it to their customers with no fear of printing the dreaded white boxes.
Downside:
Because you’re rasterizing the whole doc, the file size is larger than normal, ID actually warns you (Hey I can live with that!!…until someone shows me a better way).
David or anybody else, can you come up with an easier way to fix my problem or have I solved it?
Well, if you’re just going to rasterize the whole thing to show to a client, you might consider just exporting each page as a JPEG image instead (using file > export). You’d get much smaller files. Or you could rasterize, but use higher compression (lower quality) settings when making your PDF file.
I get white boxes behind Photoshop eps files when printing- SOMETIMES. That is what is troublesome. I can print the same document, to the same printer and get different results each time. With diffent images having white boxes. Indesigns solution is to use PSD files not EPS files. WHY? This has never been an issue in the past and I work with thousands of images each day. (Catalogs)
Also, the eps files placed have high transparency flattener set, like recommended.. and do not have any effects applied to them (no drop shadows or filters, they are cmyk)
Hey guys, I have the same problem with the white boxes.
By clicking on overprint preview it is solved…but could anyone please check the file.So when I start arguing with the guys at the printing place to know what to tell them…
here is the link for downloading my file…
Lots of thanks in advance…
reg
Karam
Karam, I’m sorry, but we can’t really check people’s files. The best thing to do is to get them to upgrade to the free Acrobat 9 Reader so that they don’t have this Overprint Preview problem anymore.
Acrobat 9 has “automatic overprint detection” so that people can see what it’s supposed to look like, even without turning on OP themselves.
Hey Steve,
Thank you so much for this post. I was getting the white box instead of the transparent background, I checked every setting in the picture box and in Adobe Acrobat, it was driving me nuts! Never occurred to me that it was related to spot colors.
Many thanks!
when printing houses for sale i go to print them and there is a white box blocking the picture
Thank you!! Thank you!! Saved the day.
[…] at the moment with the latest postscript so you may see a white box beneath these elements see here for some tips. posted under […]
Great tip — a super timesaver for an annoying problem!!
Hey there, I have this problem with the white box in InDesign. I don’t even have to print yet, I already see the white boxes on my screen. I really dont want this. I think it has something to do with the way I use pictures in photoshop… I have to ‘free’ the pictures or something, in order to copy-paste them to ID? (Please help a desperate person in Holland :-)
did you ever “free” your pictures?
It works!! After eons of trouble shooting – FINALLY – a post that helps! Whenever I tried to print a PDF file of my InDesign files (that used spot colors and drop shadows) I received the dreaded boxed objects. It was a pain on my tuckess! The Acrobat Professional 7.0 PDFs looked fine on screen, but printed boxes whenever drop shadows were involved. This time I saved them as PDF/X 1a files and clicked the simulate overprint feature AND converted all spot inks to CMYK process. When I brought those PDFs to Stinkos (uh, I mean, Kinkos) … voila! No more yucky boxes. THANKS A MLLION!!!!
Seriously, I am SUPER thankful for this post. THANK YOU! THANK YOU! THANK YOU!
I’ll make the end printer print my native files – but at least I can print out a professional proof for my client – and email them pdf proofs that will print accurately on their colour copier. Yah!
so i am printing in a new paper a b/w ad. I am using a psd file for transparency in InDesign ( no color is used in the psd or indesign files besides percentages of black ).
When i print a sample of this ad it looks perfect on a b/w printer, when i printed on a color printer I get a redish box over the psd images. I am afraid when this ad is in the newspaper ( which is a b/w ad ) that this color will be overlayed on top still . But I am also thinking that the only reason this looked like this on a color printer was because it is an RGB printer which does not contain black . Any insight so I do not have to worry ?
When exporting a CS4 InDesign file to a PDF my graphics disappear and there is a thin white outline around the imported PSD files. Does anyone have any suggestions on what to do?
@ Tracey, Why not post this question in the forum where it will get more attention? Let us know what settings you’re using for export.
Hi Tracey I’m getting the same image but only on first and last page,,did you resolve?
Hi – when the article says the problem is almost always related to spot colours and transparencies, what about the other times? I have no spot colours – all my images are CMYK and no spot colours are used anywhere in the file. I’m exporting from InDesign CS5 to pdf and I get the lighter boxes around my images when printing (both me on my office printer and the guy at the printshop). What else could be the problem?
I’m using Acrobat 4 Compatibility (the printer says I ‘haven’t flattened properly’, so I assume he has an old RIP) and the high resolution flattener preset. The images are a mixture of psds and pngs (both types have the boxes).
many thanks
@userware1: I wonder if your problem isn’t a “white box” effect but rather the “yucky box” effect that Claudia wrote about here: https://creativepro.com/eliminating-ydb-yucky-discolored-box-syndrome.php
Just choosing Acrobat 4 compatibility may not be it; make sure you’re using the PDF/X1-a preset for those old clunker printers.
great post, thanks a lot
I was exporting jpgs, eps, png, n all, but wanted a solution for white patches with pdf.
Thanks again
In Photoshop, regardless whether I’m using CMYK, RGB, or Grayscale mode, I get the white box effect from just using black as the only color. In earlier versions of InDesign, I could place the file as an eps or Photoshop file and retain the transparency. But not in CS6.
I’m printing books with many B&W illustrations. Right now, it looks like I will have to eliminate all previous work that involved black lines overprinting backgrounds with gradations of any sort. These include hundreds of advertisements from past years.
To clarify what I said in the previous post, I’m using Photoshop to create artwork for placement into InDesign. The artwork typically consists of photo images intermixed with line art, for advertisements. These are used on InDesign layouts, for books printed in B&W, and that’s where the problem arises.
I have to show proofs to the sponsors; so I need results consistent between my desktop printers and the commercial printer’s offset presses.
I submit the books to the printer as PDF files. I was able to do achieve proper results without difficulty in CS3. But CS6 is causing a variety of issues, and this one is especially troublesome because of the volume of ads involved.
Thanks, if you can help.
I don’t recall any significant changes like this between CS3 and CS6. You’re saying that in CS3, you could place an image that had both solid black line art areas AND grayscale areas and you’d get different effects in different parts of the image (some parts transparent and some not)? That doesn’t make sense to me. You could set the Effect to Multiply, I suppose, but that’s not really the same thing.
thanks for the nice tips.. I knew that I need to turn on overprint preview to see it correctly in illustrator or in acrobat how ever nitro pdf doesn’t support any over printings there is no such option to check…all my concern is :-we can see the drop shadow blending result as we want to see when the overprinting preview is turned on.. understood !!! but will it print correctly in the postscript printer from the pdf which was saved while the overprint preview was on ??????? please advice thanks in advance
actually I end up on this page looking for the answer about the white line around the images when flattened.. which is very annoying and useless of course… I read somewhere I wouldn’t print though, but the problem is it did in my laser printer even with the overprints on I still see them!!!! I am using few victor shapes with the drop shadows and different color on the background…all cmyk colors please help
I still can’t get the extra boxes to disappear when I PDF my indesign file to upload on our website. (40 page document) It looks fine on the PDF screen, but the when I click on it on the web page, there are extra shawdows and boxes around things. Help! My Simulate overprint box won’t even light up to check and try.
Hi Steve, Great post. Do you know how you can get around this issue when bringing artwork into Photoshop? I’ve tried everything I can think of, but every method seems to ignore overprint settings when moving into Photoshop.
When I follow the instructions above, the only way to get “simulate overprint” is to choose the color to be “composite cmyk” which doesn’t include the spots in the final output. Everything is converted to cmyk.
I am experiencing difficulties with printing a new brochure template with 4 color process + 4 spots. We print our literature on a Xerox iGen 4. The Xerox folks want the spots to remain (per Adobe’s suggestion) in the files I send so that we can tweak the spots to match spot inks as closely as possible. There is all kinds of transparency used in the design and I’m ending up with the horrid “white shapes” (where an item with transparency overlaps a spot color.)
I’m on InDesign CC 2014.2. I would warmly welcome any ideas, thoughts or suggestions!
Thanks for the help with the white box. After 2 hours on a chat with Adobe their representative, he told me I would have to contact my Konica supplier for the answer; it was now fixable by InDesign. Your solution worked and it was fixable through InDesign. So much for Adobe support knowledge! Thanks so much.
Thank You, it really helped me! But…. :)
When I crop the page in Adobe Acrobat I get the boxes back.
It is not a problem, after cropping I do not need it for print.
Regards
Cem
That is a very good tip particularly to those fresh to the blogosphere.
Brief but very precise information… Many thanks for sharing this one.
A must read article!
But we have to make an vital distinction: a factor is
to sell a t-shirt applying 1 of the tons no cost services exactly where you upload your graphic and get the tee printed and shipped to
the client.
I’m the only one in the whole studio who keeps on getting pdfs with white boxes. I have been suffering with trashing preferences twice a day for the last months: it keeps coming back, stays ok for a couple of hours. Updated to 2018, checked “do not import previous settings” on all available windows. Loaded our studios pdf settings from scratch. (Nobody but me has an issue). There MUST be something on the pdf-render-engine level that keeps inserting errors. When checking with Bridge 2018 for the color settings my OLD settings were still there, although I had clicked every box NOT TO. Besides reformatting my whole system I am at my wit’s end. (help.)
I was at my wit’s end too! This is what I’ve done and it seems to eliminate the printed ‘ghosting’ around transparent areas of Photoshop images placed in Indesign:
– On your Indesign document’s master page, create a new layer and make it the top-most layer
– Call this new layer something like ‘Transparent Box’
– Create a new box that covers most of the page that has no fill or line
– Create the PDF as per normal
– Print