

Flattening Fun

If the global economic meltdown has your pockets feeling empty, here’s a fun way to pick up some spare change with InDesign. Make a bet with one of your geek friends that you can use InDesign CS3 to change a low-res RGB graphic into a high-res CMYK version, merely by exporting a PDF.
Now, to be perfectly clear: the point of this exercise is just for fun, and to learn a few things about what happens when you flatten transparency. There are plenty of other ways to change the resolution or color space of placed graphics (e.g. export to JPEG or EPS, print to PostScript, etc). I’m not recommending you add this technique to your prepress workflow.
Here’s the trick to show your friend. First, find a low-res RGB graphic. Anything under 96 ppi will do. Here’s one.

Place it into a new InDesign CS3 document. Note that I put a blue background in the frame just so you can see the logo better.
Next, if the graphic doesn’t already have transparency, give it some: change its opacity to 99.9%, give it a blend mode other than Normal, yadda yadda yadda.
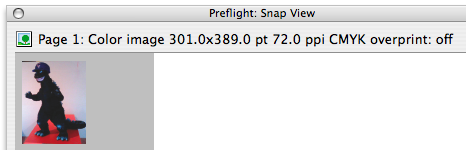
Last, export a PDF, applying the PDF/X-1a:2001 standard. Ta da! Your low-res RGB is now a high-res CMYK. To prove it, open the PDF in Acrobat and use the Preflight command to list all images.
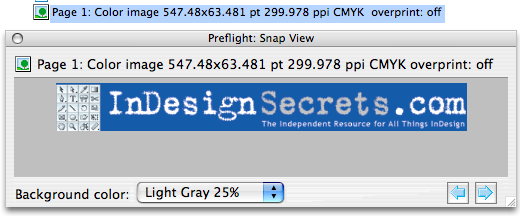
What was 72 ppi, RGB is now 300 ppi, CMYK. Collect your cash, and or beverage.
But wait, your friend is a geek too. She rightly says that the PDF/X-1a:2001 PDF settings convert colors to the destination color space, so of course your graphic will be CMYK.
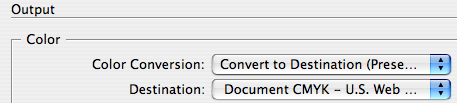
You reply, “OK. Change it to No Color Conversion.”

Export another PDF. Ta da-again!. The graphic is still high-res CMYK.
Not exactly what you might expect from a setting called “No Color Conversion.”
So how did this happen? A good magician never reveals his secrets, but I’m a pretty lousy magician. Three things conspire to change the graphic. First, the PDF/X-1a settings have a Compatibility level of Acrobat 4 (PDF 1.3), which means transparency will be flattened during PDF export.
![]()
Second, the X-1a settings use the [High Resolution] Transparency Flattener Preset. The [High Resolution] preset uses a Gradient and Mesh Resolution of 300 ppi.
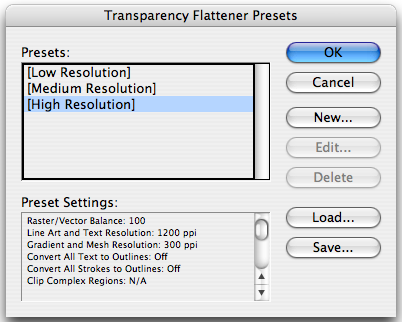
Third, in CS3, Gradient and Mesh resolution is applied to flattened graphics by themselves when they fall below 96 ppi effective resolution. Your graphic can be just sitting there, minding its own transparent business, and the flattener will come along and upsample it. The same trick won’t work in CS4, which does away with upsampling in unmixed regions.
OK, so now we know why our logo became high-res, but why was it converted to CMYK when we specifically asked for No Color Conversion? Answer: the Transparency Blend Space, which is by default, set to CMYK.

In fact, anything on the spread would be converted to CMYK, whether or not it interacted with transparency. To illustrate, I’ll add another low-res RGB graphic. Say, this one, which I like to call Cubzilla.

The Flattener Preview indicates that Cubzilla will not be affected by flattening.
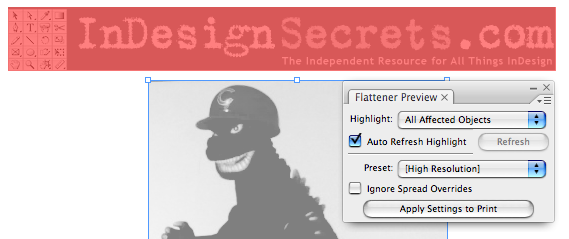
And yet, he is converted to CMYK in the PDF. I’d call that “affected.”
Unlike the logo, Cubzilla is not upsampled, because he doesn’t interact with transparency. Still with me?
The situation gets more interesting when you have a mix of resolutions and transparency. Say we scale Cubzilla down, so he’s 225 ppi, and lower his opacity to blend him with the logo. Now we have a region where 72 ppi mixes with 225 ppi. During flattening, the highest resolution wins, and the region is rasterized at 225 ppi.
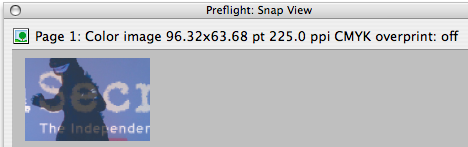
The upsampling still happens to the other regions at the Gradient and Mesh resolution, 300 ppi.

The moral of the story is this: When you invoke the flattener, it will do what it must to rasterize certain regions, and that may include upsampling and changing the color space of graphics. In most cases, you can avoid the upsampling by keeping a consistent effective resolution for your graphics that matches your Gradient and Mesh resolution.
Caveat Flattener.
Now watch me pull a rabbit outta my hat. (Aw, that trick never works).
Wow, Mike, I think you’re quite the mad scientist-magician! Thanks, your post is both very educational and amusing — hey, I’d go so far as to say it’s groovy, man.
Very cool.
For people following along, Mike, how about a quick explanation of how you got the image to appear in the Snap View window in Acrobat? The feature’s kind of buried.
Also, though I know you said “Use the Preflight command to list all images” … easier said than done for most carbon-based life forms. ;-) I know a lot of users will be firing up Acrobat looking for the “list all images” button.
(I used the Single Check button in the Preflight dialog box, selected Page Description > Bitmap Images, clicked Analyze, then twirled open the Images category in the results list to inspect and show in Snap View. Not sure if that’s the best/fastest way.)
Klaus-
Thanks for the comp-liment, man! ;)
Anne-Marie-
You’re right, I kind of breezed past that bit of explanation. I also purposely didn’t mention the whole bit about what flavor of CMYK InDesign was converting the graphics to. I already felt like I was teetering on the brink of madness. Hint: it’s not necessarily the CMYK in your Color Settings. Maybe I’ll do a part 2 and go into the color management details.
The Acrobat preflight process could also be a post by itself. Here goes…
I used Acrobat 8 on a Mac to analyze the PDFs.
I went to Advanced > Print Production > Preflight.
In the Preflight window, in the Profiles tab, I twirled open PDF Analysis, and double-clicked on List All Images.
To get Acrobat to highlight the images, I checked Show Selected Page Object in Snap View at the bottom of the results window. That opens a separate Snap View window.
In the Snap View window, I clicked on the light blue arrows in the bottom right corner to see resolution and color space of the graphics.
I don’t know if this is the “fastest” route. I kinda hope it isn’t, if you know what I mean.
I tried making a droplet automate the process, but it didn’t list all the info I needed.
What I used to do years ago is that I placed on a master page a transparent 300 ppp PSD file on top of everything so that everything was converted to 300 ppp but versions before InDesign CS3 did a different job in the way they flattened and thus the trick was not always easy to use. Since InDesign CS3 the flattening engine behaves differently and thus this trick is more easier to apply.
The upscale trick is a cool thing – and also dangerous. If someone places a low res image and it goes through the flattener then the image won’t be flagged as lo-res by preflighting.
The problem is that InDesign generally sucks at upscaling images.
So what do you get here when you’ve finished upscaling; a workable image that will print well or an image that still has 72dpi badness and prints bad but a larger file size?
I think I remember posting about this before somewhere too?
It looks to me that the image will be 300dpi while preserving all the the 72dpi “badness” or pixel shapes. I’m not sure what the point is here, although I’ve sussed out the meaning of the verb “to twirl”.
I’m late to this thread (cool idea though) but it raises a question for me. Is this why a two page layout can balloon to a 4MB pdf even when using the “smallest filesize” setting)?
I designed an order form using EPS files and some lo-res JPEGs knowing that it would be emailed. I also used a stroked box with a 4″ directional feather as the backgrond for page one. I’m guessing that the transparency of the feather is what keeps the filesize so large (only a few hundred K smaller than the “high quality print” setting.
Just wondering.
Thx
-C
Very cool. I share David’s comments and wonder how they would print. From the PDF, export the image as a JPEG. Open in Photoshop. While the resolution is 300 dpi – at least in the file I tested, the image retains the 72 dpi badness. I suppose the ultimate test would be printing the PDF file.