

Fun with InDesign libraries

![]() We’ve all been there before. Situations where you’re working on long documents like big reports, magazines or better yet, catalogues, and you realise you have to reuse graphic elements in your layout. So what do you do? You design your element and duplicate it to use on other pages, changing and tweaking it a little bit as you go along. And along the way you know that it would just have been easier to have started out with a fresh copy of that object every time instead. InDesign libraries allow you to store and reuse graphic elements throughout your layout, whether they’re text frames, linked graphics or groups of objects. Here are a few interesting uses and tips for working with library items.
We’ve all been there before. Situations where you’re working on long documents like big reports, magazines or better yet, catalogues, and you realise you have to reuse graphic elements in your layout. So what do you do? You design your element and duplicate it to use on other pages, changing and tweaking it a little bit as you go along. And along the way you know that it would just have been easier to have started out with a fresh copy of that object every time instead. InDesign libraries allow you to store and reuse graphic elements throughout your layout, whether they’re text frames, linked graphics or groups of objects. Here are a few interesting uses and tips for working with library items.
A few handy library applications
The price tag
Price tags are a classic example when it comes to libraries. They usually consist of a collection of objects that represent the price or promotion of an item in your work. And you need those individual items to look exactly the same throughout your catalogue. Maybe you have different coloured versions, or promotional versions. Just keep a dummy version of your price tags in a separate library and you can start spreading them through your layout. The only thing you have to do is change the actual number.

You can add as many price tag versions as you need.

Making barred prices look the same is often time consuming so a library helps.
Table structures or review boxes
Also quite common are mini templates of complete layout elements that frequently reoccur in your work. Say you have a magazine that does music album reviews. Why not end your article with a “verdict” box that holds a few predefined text frames that are ready to go? And you can add these as separate versions, choosing the one you need from your library as you go along.
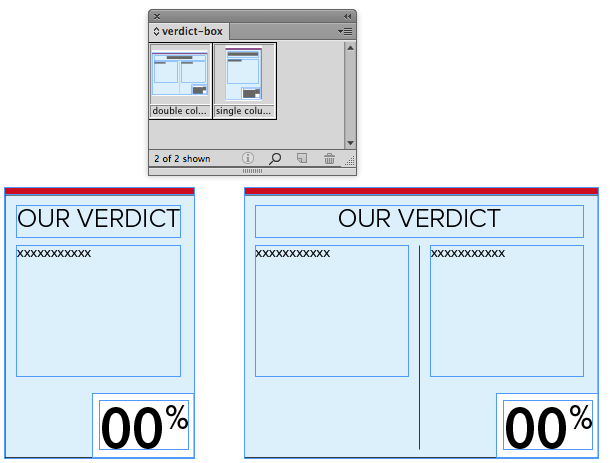
Choose between a one or two column layout.
Let’s talk tables. Editing individual rows, columns and cells require a lot of manual labor. And this is time that you’d rather spend doing actual design work. So decide on a few table designs and keep them close in your library. This way you can drag out a fresh copy anytime you need it and start inputting text or pasting in numbers from Excel.
Tip: I noticed that it’s usually easier to remove rows or columns than it is to add them, so make sure you add more than enough rows and columns before you save them in your library. That way you only have to remove the ones you don’t need at the end.
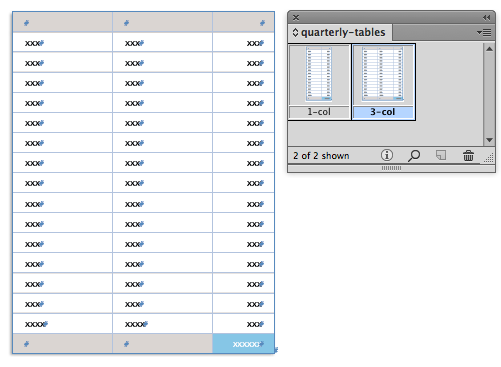
Make sure the tables are long enough before you save them.
Logo alignment
This technique might not be as well known as the previous ones. When you’re dealing with a clients corporate identity it’s important to respect the logo placement guidelines. Meaning that some logo’s need to have a minimum safe distance from the page border or from other elements. Again this can be a time-consuming process where you have to keep track of the distance between the logo and other elements. Try this instead: drag out a few perfectly designed graphic frames following the corporate guidelines. These measurements are usually applied as percentages e.g. a logo that needs to keep at least 50% of its height away from the outer edge of a page. If you set these things up before you drag the logo to a library you’ll also save these safe zones in the item. Meaning you can just drag out the logo when needed knowing you’ll always have the “padding” you need around it. Plus it doesn’t matter how big you scale the logo afterwards because the padding will just grow with it.
This logo has been perfectly aligned following the corporate guidelines.
How to start with a library
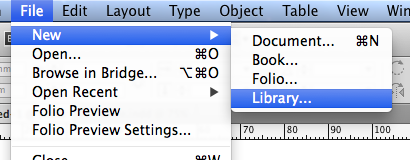
Setting up a library is very easy to do. First you choose File > New > Library… and save your library on your hard drive. Be sure to give it a good descriptive name since that’s gonna act as the panel name inside of InDesign. Once you’ve saved it you’ll see your library item appear on screen as a new panel.
Adding items to a library is very simple
- Click and drag items to the library to add them as untitled objects.
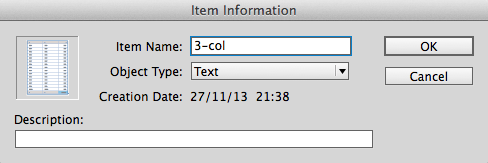
- ALT/OPT click and drag items to the library to name them as you add these. The Item Information window that becomes available also allows you to set the object type and an object description. You can set up these criteria to later quickly search for specific items or rearrange your library items in the panel based on these criteria. Personally I’d love to be able to add object types of my own to this list for specific jobs but unfortunately these options haven’t been updated since the stone age. So I know what I’ll be asking for Christmas this year.
To place items from a library onto the page is just as easy:
- Click and drag items from your library to your page to place them on the cursor position.
- Select the item in the library, click the library panel menu and choose Place Item(s) to place the item on the same co-ordinates from where you originally added them to the library.
A few extra library tips:
- Unfortunately there is no link between the placed library item and the original instance that’s still sitting in the library. It doesn’t work like Symbols inside of Adobe Illustrator. This means that updating already placed items globally is a pain. So make sure you apply the necessary text- and object styles to your items before you save them in the library. This way you can still edit the styles after having placed them on the page. It’s not perfect but it’s better than nothing.
- Usually you’re not the only person working on large layout jobs so there’s a good chance that your colleagues need to work with the same library. Once a library on a shared drive has been opened it locks itself meaning nobody else can open it anymore. To overcome this you can use the following procedure:
On a Mac: it’s pretty easy to share a library file on a server with other Mac users. Simply select the library.indl file in the Finder and use the shortcut CMD+I to open the info window. There you click the Locked button to lock the file. This means that you cannot add new items to the library, nor can you edit existing ones. But it does allow other network users to open up the same library file. This works because InDesign is just opening up a copy of that file when you double click it. I know that not being able to edit the existing library might sound like a pain but its sometimes better than having 5 different versions among users.
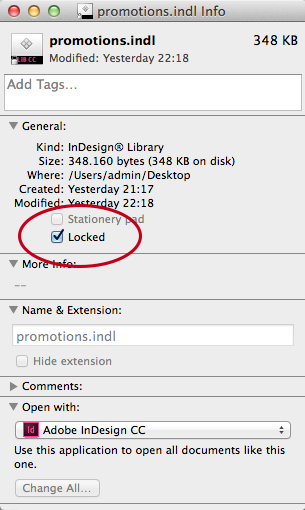
On a PC: the locked file trick doesn’t work for PCs unfortunately. On a PC you have to open the library.indl file by using the actual Open command inside of InDesign. There you select the library and choose “Copy” from the bottom options to open a copy of the file.

- If you have activated the “Paste Remembers Layers” option from the Layers panel menu, then the actual layer will also be saved in the library. This means that this original layer will automatically be added to your document when you place your library items.
- Items with linked graphics in them will keep this link when being placed on your page. This means that you still need the original links as the images don’t get embedded into the library, only the reference to the image so be careful.
- Libraries are external files that have to be opened manually to have them available in InDesign. But because they are stored as panels you can dock them in your interface and then save that configuration as a custom workspace. That way InDesign will open up all these external library files when you switch to that workspace, so no more manual looking for your files and just let InDesign do all the work for you.
Dock and customize your libraries in your interface.
Good stuff, Bart. I think people overlook these little things. The locked folder can actually be a positive since it prevents unauthorized changes. If you do need to allow more than one user to change them though, you use folders of snippets.
That’s true! Plus if you are using folders of snippets it’s always nice to preview them using Adobe Bridge.
I forgot I wrote this a couple years ago: https://creativepro.com/the-joy-of-snippets.php
Please can you sort out your break in words as thi
s makes it very h
ard to read
Sean,
Try viewing with Chrome or Safari. I’ve only seen this glitch when using Firefox.
LTM
Still very annoying on Firefox (I only have Firefox installed on my locked work computer…)
Interesting. We have noticed that Firefox is definitely showing its age and causing some problems with our site. We’ll have our developers look at it, but there’s only so much they can do.
The CSS for article contains “word-break: break-all” which is defined as: “Lines may break between any two letters”
https://www.w3schools.com/cssref/css3_pr_word-break.asp
If I set word-break to “normal” in the Inspector, everything works fine in Firefox.
Thanks for the insight Bart. Excellent step by step instructions.
When creating items containing numerals, I was taught use 8 as it’s often the widest. That way you can be sure everything else will fit.
Ah Libraries –
Mostly I have been using them for when someone decides that the whole page layout MUST change. Then MUST change again. Then MUST change again. Then MUST change again.
Then MUST go back to version X.
I simply create a library – add the content of the page into the library. Start again. I can easily go back different versions.
Most handy for pages containing photographs that have captions. The days of moving things to the Pasteboard has gotten too crowded!!! I needed more space. Libraries offer that space. I can shift images with captions into a library and move them back when they decide they MUST go back in. No more looking for that pesky pasteboard item – or accidentally deleting a blank page with items on the pasteboard!
One thing though, for the company logo and the safe zones.
Surely it would be better to use a Text Wrap and input the distances there?
I don’t like floaty boxes in my documents.
Hi Eugene,
The text wrap option will only help you out if you want to keep your logo away from text, but it doesn’t work if you need to keep your logo away from images, frames, margins or page edges.
So the grouped frames only act as a portable guide sort of speak for easy positioning anywhere in your layout.
Love the tip about the logo alignment – that exactly matches my company’s logo guidelines and will work brilliantly. Thanks!!
Personally – I find it easier than having random boxes on the page.
But whatever works.
A couple more uses for library that people tend to overlook :
Swatch import – extremely handy when you need to import common corporate swatches with set values – create a set of graphic frames filled with the swatches (and if needed use their strokes to double your fun) and drag them from the library to a new document – Voila, instant swatch load. Just delete what you just imported, the swatches will remain.
Styles import – same trick with any type of styles – paragraph, character, object, tables, cells… Any formatting applied to a library item is remembered and, *if missing from the target document*, loaded in the relevant panels. I find this far easier than the loading options from the panel menus, if somewhat less precise.
A nifty trick based on the two above : did you know that if you load a library item formatted with a named style or swatch into a document *already containing a swatch/style with the EXACT SAME name*, the library item will adopt the values of the settings in the document, even if different from its own ? I use it all the time to make libraries more versatile.
Example : I color some stuff with a swatch name “main color”, set to 70% black, then upload it all to my library. Then, in my document, I create a swatch named “main color” set to, say, 100% M 100% Y for some punchy orange. I import my library item, and magic – it tints it all orange where it was defined as “main color” ! If in a different document “main color” is set to 100% Cyan, then the item will look blue, and so on. Anything colored without swatch links or with different swatches will be untouched. Same with styles, which can make one library item VERY reusable and versatile.
Hi Quentin,
Thanks for the extra tips! I was aware of these things but didn’t really think about putting these in the article too. But anyway they are great, thanks for sharing!
Thanks for the article because I thought that Library of InDesign were dead, because Bridge (with MiniBridge) is a very good tool to do all this and more.
Snippets are brilliants too and linked anchored objects are very useful for me.
But Quentin tricks are very interesting indeed to load default parameters.
Bravo.
A question, really. Is there a place where all the object type choices in the InDesign libraries are defined? Those such as “Text” seem self explanatory, but it would be nice to know exactly what is meant by, for example,”Geometry” and “Structure.”
Thanks —
Actually I found a way to make even those library items updatable. Put your graphics in an indesign doc, save it then place it into another document and drag the placed link into the library. Use as you would normally. They should be seen as linked files. Then you can edit the linked file and all the instances will be updated in your document. Just tested and it works. And even though the item preview in the library won’t update the file is updated. The only thing is that you cannot edit the contents when placed, so this trick would only work for graphics you use often but they don’t need to be edited.
Nice article. Pardon me if I missed it, but is there a way to edit a library item – similar to a symbol in illustrator or flash – to globally change the instances across multiple pages?
You must have skipped right over it-this is covered in the first paragraph after “A few extra library tips.” Unfortunately, the answer is NO.
Thank you. Wish Adobe would include this – would be most helpful for UX Design.
I am developing a library of branded assets. The .indl file will be available for multiple users to download and save to their own servers. Unfortunately, this means I need to embed all linked files before creating the library item. Now the .indl file is huge. Any suggestions of reducing the file size?
PUZZLE: We have a library with small filler ads in it. The fonts in the ads keep reverting to T1 fonts that are not available on our systems. We’ve tried replacing the font, then replacing the library item. It always reverts back to a T1 version of the font when it is dragged into the template though. What would cause this and how can I fix it? (Outside of using the find font panel and replacing all T1 fonts once work is complete on the file.)
Thanks for any help/insight into this puzzle!
I think I figured it out (in case anyone else runs into this): The type in the ad was not assigned a paragraph style. Once I assigned a paragraph style, the font (and graph style) were kept when I moved the ad in and out of the library. I hope this is helpful to someone else!
Thanks for the fantastic article on libraries!
I am so surprised there is no place on the web that shares Premade Adobe Indesign Libraries. (.indl files) Someone must have thought of this long ago. If there is such a place please point the way. I use CS4.
Is there any way to combine multiple libraries in the single master library file.
InDesign CC 2017
What are Subsets in Library, how to assign items under them.
Thanks
Is there a way to put multiple elements into a library all at once? For instance, I have a layered document with various logos on each layer. Can I export all the placed elements for all the different layers all at once to create a Logo Library? Thanks!
Can a template be saved inside either a CClibrary or an Indesign Library?