

What the heck’s the difference between Rectangle Frame and Rectangle tools?

I get this all the time when I teach InDesign Level 1. Why are there two ways to draw a rectangle? What’s the difference?
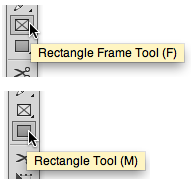
The two tools as they appear in the Tools panel
In addition to the two tools to draw rectangles, there are two tools to draw Ellipses and Polygons.
Differences in Appearance
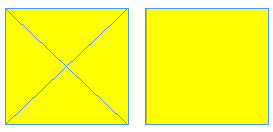
First thing you will notice is what the rectangles look like on the page.

A rectangle drawn with the Rectangle Frame tool

A rectangle drawn with the Rectangle tool
One of the rectangles (drawn with the Rectangle Frame tool) has a big “X” drawn through it. That is the symbol that mechanical layouts (cardboards used in the distant past to layout pages) would use to indicate that an image would go in that area. The X would be drawn with a non-reproducing blue pencil.
The other rectangle has no X.
So one difference is you can use the Rectangle Frame tool as a placeholder for images. And it tells the next person looking at the file that “an image goes here.”
Differences in Content
There’s another difference in how InDesign treats the two types of rectangles. The one with the X has content described as “Graphic.” The one without the X has content described as “Unassigned.” Go to Object > Content and you can see these two choices.
This means that you can change the content of a Graphic frame to Unassigned with a simple click.
Uses for Unassigned frames
Why would someone deliberately choose an Unassigned frame? One important reason is to add a color or stroke to an area without a humongous X cluttering up their layout.
An unassigned frame is much more subtle in applying color or a stroke to a layout.
I know so many designers who can’t stand all the X’s on their layouts and are constantly switching to preview to see it less cluttered. Sure it looks cluttered. They’ve got tons of Graphic frames with big X’s on the page. This is a technique left over from using QuarkXPress which does have an equivalent to the Unassigned frame, but doesn’t give it a separate tool.
Differences in Defaults
One other difference is the defaults for the frames.
Look at the two frames in the Preview mode. Whoops! Where’s the Graphic frame?

In the Preview mode the default setting for Graphic frames shows Fill: None, Stroke: None.
The default for Unassigned frames is Fill: None, Stroke: black.
Graphic frames have a default of no fill or stroke. And there’s no way to set the default to anything else. They are drawn with those settings.
But Unassigned frames can have any default setting you want—strokes, fills, corner settings, effects—the whole shebang.
Putting stuff into Unassigned frames
Now, here’s where InDesign starts to blow my mind. Once you have an Unassigned frame on the page, you can select it and use it as the frame to hold a placed image. You can also click with a loaded cursor to insert the image into the frame.

The curves around the cursor indicate that the image will be inserted into the unassigned frame.
Even more mind-blowing, you can click with the Type tool to convert the Unassigned frame into a Text frame or import text into a selected Unassigned frame.
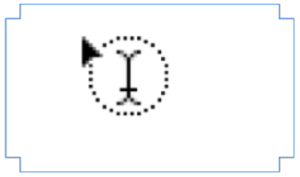
The curves around the cursor indicate that the frame is about to be converted into a Text frame.
Similarly, you can convert a Graphic frame into a Text frame.
There’s more…
There’s even more to the defaults and settings for these frames. check out this article: InDesign’s Three Kinds of Frames: Text, Graphic, and Unassigned.
Another difference between graphic and unassigned frames: if you click inside an an unassigned text frame that has no color fill, you cannot drag it; graphic frames can be dragged even when filled with “[None]”. Because of this, whenever I create an invisible frame for text wrapping I prefer to use a graphic frame; it’s much easier to select and move.
Thanks for this! I’ve always wondered about those boxes and if there was a way to convert a text frame to a graphic frame. It’s so annoying to me to have a text frame without any text because the document will think a font is being used in it.
Thanks Beth
kinda funny: Used to work pre-press for many years. “Xs” helped me spot problems or arrange customer layouts. Now as a designer it drives me nuts..go figure
It constantly drives me batty that people don’t know the difference, and it’s so distracting to open a file with these annoying Xs all over the place! I think it’s a holdover from Quark, where the only choice in tools is rectangle text box and rectangle picture box (although you can change the latter to unassigned after it’s created). Would be nice if there was a script to convert all empty rectangle frames to rectangles.
I agree Richard. It’s one of the reasons I wrote the post.
And I thank you wholeheartedly, Sandee! I’m convinced that most users think that’s just the way they look. Now, what about all the extraneous and overused guides!? I rarely use them myself anymore since Smart Guides came along. I like my files to look as much like the finished product as possible.
Richard,
Have you investigated the View Threshold for Guides. It basically allows you to set guides so that you only see them at a certain magnification or higher.
The default is 5% which means you always see them. But if you change that to 200%, you won’t see them when you zoom lower than 200%.
Try this. Choose Cmd/Ctrl-Opt/Alt-G which selects all the guides on a spread.
Go to Layout > Ruler Guides and change the view threshold for those guides. And then watch what happens when you zoom in or out.
The is a similar feature in XP, but it’s not as easy to invoke or change the settings for.
Very helpful, thank you
Funny story. Gary Cosimini (Adobe bigdog back in the days leading up to InDesign) and I were having lunch in Boston the week InDesign was released. I was on the team that tested the app for a couple of years before it was released.
I asked Gary at the lunch, “Why are there two rectangle tools in InDesign.” He thought for a moment and answered, “Because Quark has two rectangle tools.”
We both laughed and finished our lunches.
Kevin,
Your story is funny, if Gary had been correct. But he wasn’t.
At that time, Quark did have two tools for creating rectangles. But they were not like the two tools that InDesign had (and still has).
Quark had a rectangle shape tool for creating text boxes and another rectangle shape tool for creating picture boxes.
Yes, that’s two tools, but they are not the same as the confusion of Rectangle tool and Rectangle Frame tool in InDesign.
I would hate to think that the reason InDesign has the confusion was that Gary didn’t know what Quark actually had.
You sir are a defender of truth! Long live QuarkXPress!
Thanks, Sandee.
I don’t think too much gets by Gary. Maybe the smartest guy I’ve met.
I’m sure it was just a funny comment during a lunch with colleague. But I think there’s definitely some truth to the idea that much of what was included in K2 (InDesign) was meant to make the transition easier for QuarkXPress users.
It was a very fun time. So much new software being created. I’ll never forget opening up the first beta for InDesign and thinking, “Wow! This is it.”
I agree that Gary is one of the smartest guys I’ve met in or outside of Adobe.
I also agree that much of what went into ID was in response to Quark. But there are so many things that are straight out of Pagemaker. (Remember, the ID team was based in Seattle and many of them had worked for Aldus.)
Things that are straight from Pagemaker:
Cursor for placing an image before we got the image preview. That little paintbrush is pure Pagemaker.
The icons for Autoflow and Semi-autoflow text onto pages.
And I think the command to “Paste Into”
For sure. In the early days, I used to describe it as having “most of what Quark has, most of what Pagemaker has and most everything else you’ve been wanting.”
I remember training 98 designers in Phoenix the week InDesign came out. It was fascinating. None of them had any idea, really, what it was. Two guys came in – remember, this was still in the 20th century, and wired a network so that each participant had their own eMac (I think it was an eMac), to work on during the class.
I asked, at the end of the class, “How many of you think you’ll be moving from QuarkXPress and PageMaker to InDesign?”
Every hand in the room went up.
Thanks for this primer – but here is what I’d like to figure out, why can I sometimes see the X in a frame and other times not… wait wait, it isn’t because some are rectangle tools and some are rectangle frame tools.
Let me say, I am not a ID power user. I use it once a year for a project and then go back to my databases.
I use ID to layout books using the book tool. I have each chapter as a separate file within the book. In some of my chapters, I can see the image frame with the X, but other times, even when I know it is an image frame I can’t see the X. I can however see it in the page frame preview.
I don’t mind the Xs at all. They help me see what I’m working though.
Can you help me to see all my Xs?
Thanks
Jeff
It’s a good puzzle. It sounds like something is blocking the view.
Can you try selecting each item and moving it to see what’s in front of what.
Yeah, I thought that and selected and moved all around to no success.
And my apologies for the multiple spellers on my original – that was really bad.
Hey i have never seen a more boring string of comments with the most boring topic. +1 for actually knowing this stuff but seriously. Come on you guys. Just… Come on , im seriouse .
Guero, rofl! This is scintillating stuff man!
One thing i noticed and is somehow weird. When drawing with the rectangle tool you cant fill it with white. you can do black and than 0%, but white [paper] doesnt show. However when you convert a rectangle frame tool drawn object to unassigned you can fill it with white???
But can I include a photo in my design without using a rectangle o a rectangle frame? I think so, and you?
OK, so it’s now 2016 and 3 years 1 month since the post was written, so maybe things have changed. I’ve read the article and comments and still don’t have a clue what the difference is between the 2 rectangle types.
Whether I’m using the RF or the R, I can still place images in them. I can create an unssigned frame with the RF tool, but on both rectangle types I can assign them however I want until I put an image or text into them, and then they are locked to that type.
I can add and remove stroke and fill to both rectangles.
So the differences as I understand it are: one has a cross in it and some different defaults. Why on earth can’t we have one tool and a shortcut key to switch between frame and unassigned??
Still having 2 frames is weird, i still use X like i was thought at school. X references image place holders. But sometimes i skip now and than.
But this article said something about mind-blowing and how you can place an image in an unassigned frame. You can do that with both so that not something special. The special thing is that you can either place an image or text in this frame. BUt when its an image frame you can place text or visa versa. So that seems to be the only real difference