

Here’s What We Love about InDesign CS6

 Time stoppeth for no man, or InDesign user, apparently, as Adobe today rolls out their announcement of InDesign CS6. Everyone knew CS6 was coming (Adobe said it would be released the first half of this year), and we at InDesignSecrets have all been using beta versions for a while — but until today we haven’t been able to discuss the features publicly. Now, let the floodgates open!
There are many features in InDesign CS6 to get excited about: the phenomenal ability create PDF form fields; the almost magical way you can set up objects on your page to move around when the page size changes; the option to export grayscale PDF files. There are also features that will make you scratch your head until you get used to them. For example, the Content Conveyor tools require some work to understand, but we’re convinced that some users will find this one of the most valuable features in the program.
All in all, there are dozens of new features in CS6. Until it is officially released we can’t really “review” the program as a whole, but what we can do is give you a good overview of what to expect and what you’ll want to pay attention to when CS6 shows up on your doorstep.
By the way, one of the biggest changes in CS6 is the availability of the Adobe Creative Cloud, which among other things, allows you to get access to all Adobe Creative Suite applications for a relatively modest monthly fee. We’ll be covering that in more detail in a later post. — The Editors
Creating Interactive Forms
PDF forms fields (checkboxes, text entry fields, and so on) have been a long requested feature and have finally been added to InDesign CS6. The easiest way to try out the new form fields is to switch to the Interactive for PDF workspace. While you are in this workspace, there is a new library panel available under the window menu called “Sample Buttons and Forms”.
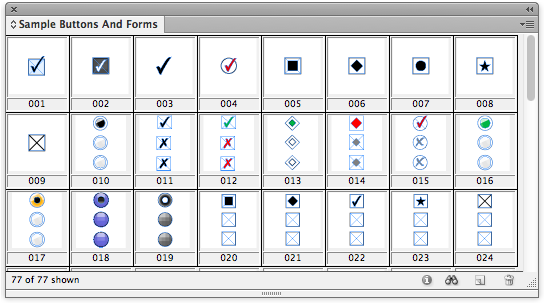
After dragging out these sample form fields into your layout you can edit them with the Buttons and Froms panel (formerly the Button Panel). From here you can modify their attributes like their description, font size, read only and more. If you prefer to create form fields from scratch you can convert any InDesign object into a text field, check box, combo box, radio button, or signature field. If you would like to test your form you will need to export your layout to an interactive PDF since the preview panel has been renamed to the more accurate SWF preview panel.

One could argue that PDF Forms are in CS6 mainly due to Tony Harmer’s ignite session at last years PepCon where he beautifully crafted a poem pleading with Adobe to add PDF forms. This just goes to show that if you really want a feature added to InDesign, pleading your case to the InDesign Team (preferably in iambic pentameter) is. — fritz
Alternate Layouts
There are several new features in CS6 that are intended to take same of the drudgery out of repurposing content for different page sizes or for output to a variety of devices with different screen sizes, resolutions, and aspect ratios.
The new Alternate Layout feature helps you create two or more layouts in a single InDesign file. For example, you could have a facing pages layout for a 6×9 inch book, a 5×5 inch book, and a 7×8 inch book all in a single InDesign file. One advantage of having the layouts in a single file is that you can use three other new features (Liquid Layout, Linked Objects, and the Content Collector/Content Placer) to help keep your content current in all your versions. — KG

Liquid Layout
Liquid Layout is intended to help reduce the amount of work it takes to reformat pages, or portions of pages, for different sizes and aspect ratios. (See this post for a sneak peak Adobe presented last October.) It’s ideal for quickly adapting layouts between multiple sizes of tablet screens, or creating a series of ads at different sizes, or even for reformatting a book into a different trim size. There is some configuration and setup involved, so it is particularly beneficial for template-driven, repetitive workflows.
To use liquid layout, you apply one of five different “rules” to page items that specify how these objects should react (move or resize) when you change the page dimensions. You test these rules by temporarily tugging on the page edges with the Page tool. Once you have the rules established, then you either permanently change the page size with the Page tool and the Control bar, or create an Alternate Layout with a new page size, telling InDesign to apply your liquid layout rules as the alternate layout is created. — KG
Linked Content
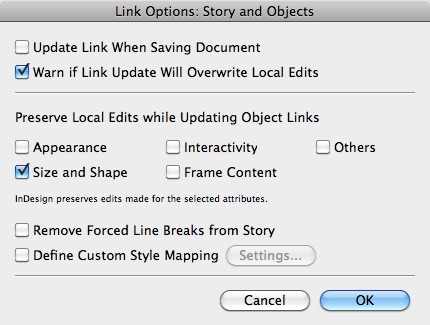
The Linked Content feature was introduced in CS5.5, but taken a lot further in CS6. This feature allows you to have “parent” content that is linked to “child” content that can appear in several places in a single document, or spread across several documents. When the parent content is edited, you are given the option to update the content in all the other locations.
This is a pretty simple concept. But the complexity increases when you edit the content or appearance of some of the child text or one of the child objects. When the parent text or object is later edited, what should happen to the edits that you made to the child text or objects? Some of these local edits can be preserved, and some will be stripped out when the parent text or object is edited, depending on the settings in the Link Options dialog box. — KG
Content Collector/Content Placer tools
Continuing with the theme of making it easier to reuse content, the new Content Collector and Content Placer tools aim to make it easier to quickly copy content between page, alternate layouts, or documents.

When you choose either of these tools, a new interface element called the Content Conveyor appears on the screen.

At its simplest, these tools and the conveyor behave like copy and paste, but you get an unlimited number of “clipboards”. In other words, you can “collect” a dozen different objects from one location, and then “place” them one by one in another location. The way that the tools and the conveyor work together makes it very quick and efficient to collect and place lots of different page objects. — KG
On-object Link Status and Control
Since linked content is a lot more important in CS6, the application gives you a more obvious way to tell when a story or an object is out-of-date. By default, a linked story or object shows an on-object Link Badge. (If you don’t want to see it, turn it off in View > Extras > Show/Hide Link Badge.)
![]()
If the story or object becomes out-of-date because its parent has changed its text or appearance, you’ll see a warning triangle. Double-clicking will update the link. Option/Alt-clicking takes you to the Links panel. -Steve
![]()
Primary Text Frame
You can designate a text frame on the master page as the Primary Text Frame. (This replaces the Master Text Frame from earlier versions which never really worked the way you wanted to.)

When you apply a different master page to your layout page, the story in the Primary Text Frame flows into the Primary Text Frame, following its shape and location from the new master page. And you no longer need to override a Primary Text Frame before adding text. This will eliminate a constant source of confusion for newcomers. -Steve
Text Frames that Auto-Size
The end to text frame oversets? Debuting as a new tab in the Text Frame Options dialog box, the Auto-Size controls lets you set a text frame to automatically resize itself based on the amount of text it has, dynamically moving frame edges to fit as you edit the contents. You can specify that the auto-sizing is restricted to Height Only, Width Only, or both; choose which side(s) are allowed to move and which should stay locked down, and set a minimum height and width. Auto-Size settings can be included in an Object Style, too. Think of all those sidebars, captions, and pull-quotes that you never have to worry about oversetting or manually closing up empty space as you edit the text! Very easy to get spoiled by this one. -AMC
Flexible Columns
It’s a fact that long lines of text are more difficult to read than shorter ones. This is most evident in newspapers. While InDesign has long had the ability to set number of columns and the widths of those columns in a text frame, changing those attributes meant manually opening the Text Frame Options dialog box and setting those numbers.
Wouldn’t it be great if, as you changed the size of the frame, the widths of the columns adjusted? Now they can. Just set the default width for a column and should you need to adjust the width of the frame the column widths will adjust accordingly. This ties in nicely to alternate and liquid layouts where you could have a portrait and landscape orientation in one file. — Bob

Improved EPUB 2 Export, new EPUB 3 Export
A new dropdown menu in the EPUB Export Options dialog box gives you a choice of export formats: EPUB 2.01, EPUB 3, and an enticingly-named “EPUB 3 with Layout.”

First let’s get that EPUB 3.0 with Layout one out of the way: As with a few other new commands in InDesign CS6, this option is more of a promise than a working feature. Choosing it results in a warning that it’s an “experimental” format they’re working on, aimed toward “adaptation of layouts across different mobile devices,” (so the “layout” in the name does not mean a fixed-layout EPUB), and currently only “specific Adobe viewer technologies” will work with this format, but these viewers are not named and aren’t available (yet). In other words, move on, nothing to see here folks, but we’ll let you know.
New features in EPUB 2.01 (and EPUB 3.0) are more gratifying. First, there’s the existence of the EPUB 3.0 option itself. When you choose it, you’re able to do EPUB 3-only things like create an EPUB with vertical Japanese text and placed HTML and Adobe Edge animations (which use HTML5 and CSS3), and include links to one or more external Javascript files. Exporting a document to EPUB 3.0 results in a valid EPUB 3.0 eBook, including the requisite new TOC.xhtml file and a fall-back TOC.ncx file for EPUB 2.x reading engines. Now all we need is an EPUB reader or device that understands EPUB 3, and we’re all set.

Adobe has added new features and improved the mark-up for EPUB projects in general. You now have much more flexibility when splitting a layout into multiple XHTML files in the EPUB because you can tag one or more paragraph styles to Split Document whenever you export it to EPUB. Tables retain their cell styles (they get converted to CSS) along with column width and minimum row height information. Anchored and inline text frames now retain settings like fill color, border style and width, padding (text insets) and margins for text wrap. You can link to multiple custom CSS files instead of just one. -AMC
Grayscale Preview and Grayscale PDF Export
You can preview a color file in Grayscale on the screen, and then export to a grayscale PDF right from InDesign. It’s pretty simple, but it’s something that many users have been asking for for a decade. — KG
Align to Key Object
This control, which has previously only been in Illustrator, now makes its debut in InDesign. It allows you to choose which object in your selection you want your other objects to align with. To tell InDesign which object in a multiple selection is the key object, just click it. Its selection border gets an extra hit of pixels, making it easy to spot in a crowd. — KG

The Little Things
User Interface tweaks: INDESIGN HAS STOPPED YELLING AT US ALL BY DEFAULT. Whew! Panel names and workspaces are now displayed in Title Case instead of ALLCAPS. Also, there are more subtle tweaks: You can collapse panels back into the dock by clicking on their names, just like we used to do in CS4. Also, panels have a gripper bar at the bottom for resizing, close buttons are now xs instead of circles, and anchored object controls now match the layer of the frame they’re attached to. -Mike

Placeholder text language options: When you select the Type > Fill with Placeholder Text, hold Command/Ctrl to select from a list of nine languages for the placeholder text, including Roman, Greek, Hebrew, Arabic, Japanese, Korean, and Chinese. But sadly, no bacon ipsum, Elvish, or Klingon yet. –Mike
Split Window: The Split Window icon, located in the far bottom right of each document window does one simple thing-it splits the window into two separate views. This provides a quick, straightforward way to see two different views of your layout at once. You can zoom in on the page in one view, and see the entire page in the other view. Or, you can work on a master page in one view and see page six in the second view. Or, view your horizontal-orientation tablet layout in one view, and the vertical-orientation alternate layout in the other view. — KG
Complex Calculations in Dialog Boxes and Panels: You can now enter something like 45/6*79 and InDesign will calculate the correct answer. –Mike
Digital Publishing workspace: The “Interactive” workspace has been updated to “Digital Publishing,” which includes the the Liquid Layout panel and the DPS Folio Builder panel. You will still need to download the latest DPS tools separately; once you do, then this workspace will also contain the Folio Producer panel. –Mike
Export to PNG (with transparency): You can export a selection, a page range, or a document to PNG. –Mike
Extension Manager Sets: You can create and manage sets of extensions through the CS6 Extension Manager just like the old feature of plug-in sets. -Mike
Hunspell Dictionary default: For most languages, the Hunspell open source dictionaries are now the default dictionaries for spelling and hyphenation. These are the same dictionaries used by Mac OS X, OpenOffice, and browsers like Chrome and Firefox. -Mike
Accurate screen sizing: Break out your old pica rulers and hold them up to the screen. InDesign CS6 does a much better job of matching on screen sizes to real life. -Mike
Keeps with Spans and Splits: Simply put, the keeps functions for paragraphs (Keep with Next, Keep lines together, etc.) now work on paragraphs that are set to span columns or split. Even though we’re classifying it under “little things,” we’ve been informed that getting this to work was actually quite the programming challenge, involving hundreds of hours. Huzzahs to the software engineers! -Mike
Recent Fonts List: You can now display a list of up to 50 recently-used fonts in the Control, Character, and Glyphs panels, and at the top of the installed fonts list in the Type > Font menu. -Mike
Save as IDML: While the process of downsaving via IDML hasn’t changed, the folks at Adobe have tried to take some of the mystery out of process by adding IDML to the options in the Save As dialog box, and including a message about how the downsaving process works. -Mike
PANTONE PLUS SERIES color swatch libraries: The PANTONE libraries included with InDesign have been updated with the new PANTONE PLUS SERIES colors. – KG
Name Ranges in XLSX files: A bug prevented named ranges in Excel 2007 and later from displaying in the place dialog. The only way to place named ranges was to save it back to XLS. This bug has been fixed in CS6.-Bob
Export to Interactive As Pages: InDesign CS5 and 5.5 insisted that when you choose File > Export > PDF (Interactive), you would always export spreads. You can now choose between exporting pages or spreads. The default is spreads. -Steve
Package files includes overlay assets: With CS5 and CS5.5 anything used only in an overlay such as an HTML page or an audio controller image was ignored in the package process. CS6 creates an Overlay Assets folder for these objects. –Bob
For More Information
Of course, this short article only scratches the surface of each of these features. If you want to go deeper, check out:
- Issue 47 of InDesign Magazine. This not only has a great roundup of CS6 features by Mike Rankin, but also includes great InDepth features about Alternate Layouts and Liquid Layout by Claudia McCue and Pariah Burke. Subscribers will get this issue immediately; it sometimes takes a handful of days to get it available for non-subscribers.
- Adobe TV has a ton of movies ready to play on all the CS6 products. [Sorry, public link to come ASAP.]
- Anne-Marie’s InDesign CS6 New Features videos on lynda.com are now available. There are lots more InDesign CS6 video titles coming up there, we’ll add them here as they go live.
And, of course, we’ll be covering CS6 for months to come here at InDesignSecrets. Be sure to check back periodically for the newest info. Of course, we won’t forget about users of CS5 and earlier- we know that not everyone can upgrade right away.
AWESOME!!! All I can say right now!
Thank you for the preview!
Márcio Guerra
Linked content looks cool, Alternate layout will become more and more handy, On Object Link Status is awesome (why has nobody thought of that before?!), Align to Key Object is about time but very welcome, Recent Fonts is freaking awesome, but Creating forms in InDesign? ABSOLUTELY FREAKING AWESOME!!!!!!!!!!!! POUR ME MORE CHAMPAGNE!!!!!!
Endnotes?
Awesome! I was lazy with cs5 and 5.5, but with cs6 i’m gonna study and master all apps i can! #nerdpowerIsBack
Thank you guys!
:)
“Export to PNG (with transparency): You can export a selection, a page range, or a document to PNG.”
At last!
Nice and Im with Scott as this is an upgrade for me and hope that one of the features will be endnotes
Good job as always, see you soon!
Some nice improvements, but where are my endnotes? It is becoming a sad joke that InDesign does footnotes (though they could do with improvement too), but not endnotes. Any recommendations for a plugin to do endnotes?
Adobe is increasingly jumping on the tablet bandwagon, while they’re neglecting features that would actually be useful.
The InDesign team should perhaps take a look at Illustrator CS6. Lots of long-requested improvements and small features that save a big amount of time.
I love the idea of the alternate layouts feature except . . . . if it meant having lots of different sets of object/paragraph/character styles wouldn’t that get rather awkward and cumbersome? It seems like I’d be better off just making libraries of stuff and keeping my variations as separate InD files to minimize the styles headache.
Some great stuff here!
But please do tell all about improvements to Footnotes, please :)
Looking very good indeed :)
Just need to get my clients to upgrade from CS3 & CS4 :(
Data Merge? No news?
@Scott and others: No, there are no improvements/changes with footnotes, endnotes, tables, indexing, or many other long document features that people have requested.
If you don’t see it in the list above, it probably isn’t changed in CS6.
“You can export a selection, a page range, or a document to PNG.”
WOW!
Finally feature ALAP plugin (InPrint) did nine years ago (2003!). My wish comes true!
Sorry! InPrint could select a portion of an InDesign page to either print or save to disk, but there was no PNG in file formats. There was only: HTML, EPS, Adobe PDF, TIF, INDD (!) and JPEG.
Wow! No improvements at all? Can’t even span columns with footnotes? That’s bitterly disappointing if so.
To the folks disappointed about footnotes and endnotes: if you haven’t already done so, check out Peter Kahrel’s scripts. They may solve some of your problems.
https://www.kahrel.plus.com/indesign/footnotes.html
A warning about subscriptions?
Adobe have just told me that subscription versions of InDesign 5.5 will be upgraded to CS6 whether users like it or not – which will cause problems if files need to be shared with people who have not yet upgraded (in my case, because my clients use CS5.5, and I am not in a position to dictate what their upgrade policy should be.
As with all InDesign upgrades, files worked on in CS6 will be incompatible with earlier versions (unless you use the contentious ‘Save as IDML’ route).
Standalone versions of CS5.5 are still available – but probably only for another couple of weeks.
Mike, it’s wonderful that Peter Kahrel has taken the time to address Footnote issues. Given the amount of scripts he has compiled on the subject, it’s clearly an issue that Adobe should be addressing. Not just for footnotes, but their whole array of long document features. It’s very disappointing.
John Goldsmid: “Adobe have just told me that subscription versions of InDesign 5.5 will be upgraded to CS6 whether users like it or not”
That’s counter to my understanding, both from discussions with Adobe folks about the subscription model, as well as counter to my technical understanding of how the subscription is implemented — the subscription version cannot upgrade itself, it is software actually installed on your machine; at best it could choose to stop recognizing your subscription/adobe ID/serial number.
Can you please give a more formal citation? Exactly who at Adobe told you precisely what?
(It may be the case that new subscribers may be unable to subscribe to CS5.5.; that’s a very different statement, and one that may still cause some worry for large sites, but I have no information about that.)
@ John Goldsmid, thanks for the tip…I have the same issue providing files to clients (and printers as well) and the backwards compatible issue in 5.5 to 5.0 is not ideal. Was hoping the new release that we wouldn’t see that behavior…very disappointing.
@John Hawkinson – I called the Adobe UK sales number this morning and asked them to clarify what the situation would be, and was told that anyone using subscription software would be upgraded automatically.
I hope I have been misinformed, but if not, it does introduces a new set of upgrade issues which I thought it might be helpful to flag up.
I’d be only too happy to find out that I’m wrong though :)
You mentioned text frames that auto size.
One of things, though it’s tiny, that has bugged me, is the shortcut to make a large frame snap to the size of the text (ctr + alt + C) doesn’t work on a frame that has more than one column.
Maybe this is a little bit anal, but I like to keep my indesign document clean. No text frames that are larger than it’s content, no extra guides, or clutter on my PB…. the list could go on.
In short does the auto sizing text frames work when you have columns applied?
Thanks for the list. I’ve read about photoshop 6 but not indesign yet. I’ve been waiting.
Dave-
Yes, Auto-Size works with multi-column frames. It also works with threaded frames and non-rectangular frames.
I loved the updates, but still waiting for some implementation on paragraph styles. Will be wonderful to style some paragraph that match some specific criteria like GREP for caractere styles.
Let’s wait, maybe CS7.
Hello! where are EndNotes! And what happened to full Unicode support???????
Looks like someone forget ID was also made for long documents… Such digital times…
ID is not only for tablet contents, flyers, adverts, pdf with interactive forms etc etc.
Gents. There are still many people who make books!
(books are those items with lot of paper sheets)
We don’t need tabs, skin, newer’n’better interface nor content collector when making books… All this fancy stuff is simple strange when some vital things are still not implemented.
PS
Nice User Interface tweaks: INDESIGN HAS STOPPED YELLING AT US ALL BY DEFAULT.
Thanks God! Finally! But why?!
Using all caps by ID programmers is shame for typography/design application… Who introduced it? What will be next? Ribbons?
‘? the keeps functions for paragraphs ? now work on paragraphs that are set to span columns or split ? we?ve been informed that getting this to work was actually quite the programming challenge, involving hundreds of hours.’
Was the threading bug fixed as well?
more details please Lindsey?
Threading bug: In InDesign CS 5.x, when the reference number pointing to a footnote occurs very close to the top or bottom of a frame, the thread will often jump the frame. I understand that Adobe’s engineers identified the problems with the code that were the cause some time ago.
LTM: Sounds pretty subtle. If you can post a link to a file demonstrating the problem, someone should be able to tell you if its fixed in CS6. (Maybe this would be easier on the forums? Maybe not.)
Hi Lindsey-
The bug to which you are referring could be triggered 3 different ways. In most scenarios, it has been fixed.
Stan – I (and am sure many, many others) totally agree with your comments. Those of us using InDesign for the production of books and long documentation seem to have been ignored in this upgrade.
It would be awesome if someone came up with some long document plugins – for footnotes, advanced TOCs, Indexes etc.
Clearly by creating plugins it shows Adobe that people want these things.
1. Interactive Forms – that was a Poem and great work by Marijan to create a Script to make Forms from InDesign
2. Linked Content – sounds an awful lot like Power Headers by InTools
3. Text Frames that autosize – was a Plugin if I remember correctly
Seems new:
1. Alternate layouts – not sure how this work – if you change one thing one layout is changed in the other (like an image or text – or is this just a fancy new Form of a Book Panel?)
2. Content Collector – A fancy Copy and Paste, and a lot of folks have failed to see why this has been added? Another tool I probably won’t use – It will go to the Tool Grave along with the GAP TOOL.
(Don’t suppose there was any improvement on the Gap Tool?)
3. On Object Link Status and Control – they added a Node to the Frame, something else to clutter up the layout – YAY – also might just block out that corner node when trying to resize!
4. Grayscale Preview and Grayscale PDF Export – 10 Years waiting for this! It’s new but long overdue.
5. Export to PNG: Can’t wait to try this out. I hope it’s as good as it sounds. But I have a slight feeling I will still be making PDFs and making the PNG from Photoshop.
Improvements
1. Liquid Layout – seems to be an “Improvement” to Layout Adjustment, doesn’t really LOOK like a new feature at all.
2. Primary Text Frame – not new at all – they finally made the Master Text Frame work properly – and renamed it. also should perhaps be in my list of bug fixes
3. Flexible Columns – I can see some uses, but you still can’t have 2 columns with 2 different widths, can you?
4. Improved ePub2 Export (with a promise of ePub3) – to be expected that they make this better. Wish the program came with an ePub editor that when you export you can quickly use a WYSIWIG to fix issues.
5. Align to Key Object – something taken from Illustrator – fail to see any significant importance here or why it was added?
6. Placeholder text language options: It’s a good option, but long overdue. People have been scouring the internet for a decade looking up Lorem Ipsum text.
7. Recent Font Lists: I hope this is a preference.
8. Save As IDML: Finally cleared up the confusion surrounding Saving Back. But I queue there will be 100’s of posts when CS6 is released with users asking how to backsave to CS5.5 or earlier. It’s a given. And something Adobe needs to find a way to address.
9. Split Window: Another button added that already does the same function as another button – fail to see why this was added?
10. Hunspell Dictionary Default: Handy- not amazing – perhaps should be in bug fixes too?
11. Digital Publishing Workspace: They made a workspace, I bet it doesn’t have all the “Correct” tools that are required, like many of their preset workspaces.
The Little Things – AKA Bug (not working as intended) Fixes
1. They removed ALL CAPS in favour of Title Caps – great… one has to wonder why ALL CAPS was used in the first place…
2. Complex Calculations in Dialog Boxes: Something Quark has been able to do for a while. I wonder if it still crashes when you do 12pt x 10mm/4em though?
3. Accurate Screen Resizing: Seems like they fixed a bug
4. Export to Interactive Spreads: Another Bug Fix where the Spreads were always on.
5. Package Files Includes Overlay Assets: Seems like a bug or oversight that was fixed.
Keeps with Spans and Splits – an annoying bug – but I’m glad they fixed it. Not really caring about how many hours it took them to their job though (I kid, I’m impressed they devoted time to fix this)
Extension Manager Sets: I have no idea what these are?
Pantone Plus Series: Easily downloadable and installable from the web already. It’s nice it’s included, not really surprised.
I remember hand writing material and ink drawing material and submitting it to a printer for assembly and plating. How far we’ve come that we can complain about short comings in a new program that automates so many things ? before we even have the program.
I feel people have the right to feel agrieved in finding out that features they require to be updated have not been updated, and some going back as early as 2005, such as Footnotes, have not been improved since then, that’s version CS2, we’ve now gone through CS3, CS3.5, CS4, CS5, CS5.5 and now CS6 – that’s 6 (six) versions.
Yeh, darn tooting I’m annoyed.
The Link Badge that we talk about above (“on-object link control”) is one of the little things that has grown to be one of my most-beloved new features in CS6. I agree with Eugene that frame border clutter can get ridiculous, but after thorough testing, this one has made the cut for me. :D (And my default setting is to Hide the Content Grabber and the Live Corners control icons.)
Although it was added I think to help with the whole Linked Objects routine — tracking the update status of text frames synced from other layouts — the badge appears on*every* object that’s linked to an outside file, like all your placed pictures. So even if you’re not using Linked Objects you’ll see and appreciate the Link Badge.
I mean, it’s really nice to look at a spread and tell at a glance if everything is up to date or not (instead of having to open the Links panel and seeing if any out of date images are on the spread you’re looking at). Also love being able to click on the out of date icon on the frame to immediately update the image.
no footnotes or endnotes. grrrrr. i think adobe wants people to stop using footnotes or endnotes and so become more stupid. this way they’ll be more of their shining and useless products
So – out of the “top” category – how many have been implemented and which ones?
https://indesign.uservoice.com/forums/114445-adobe-indesign-wishlist/filters/top
I think it’s worth stressing that you can choose to show or hide the Link Badge (I know the original post said this). So if you think the frame adornments are too busy, turn them off.
I’m not sure how I feel about the uservoice voting (mixed opinions!), but I do think that this tool for measuring user input came along a bit too late in the development cycle to really be felt for CS6. FWIW.
But these are the sort of things constantly being talked about on Adobes own forums for “Feature Requests”. I have never seen a “Feature Request” for “Multiple Layouts”. And I am on the Adobe Forums daily, and the forums here, and on several other InDesign forums/graphic design forums.
The closest to Multiple Layouts was the ability to go from A4 to A5 size.
These are things I’ve seen requested for an AGE. And one of the top things that was requested, the Interactive Forms from within InDesign, that has been addressed in CS6.
I’ve definitely seen many requests about Footnotes in tables made to work. And many requests for “colouring the background of a pargraph” or “vertical column lines” and many many others.
The same thing happened around CS4 – I think. They added the ability to export to Flash. There was not ONE request on the Feature Request forum for the ability to output Flash from InDesign – yet there are several references to updating long document features.
And my point about the Adornments is they are always on or off. Yeh you can choose this, but surely a a key combo when active on a frame would be preferable, no?
And to add to that, I bet they are on by default, a new user to InDesign is greeted with several adornments around frames. This happened with the introduction of the “Donut” that infuriated so many people.
There has to be a line drawn and better options available for things like this.
I do agree, they are nice, but is it becoming to invasive to the layout?
I can totally understand the frustration felt by long document creators. All of the long document tools could use some work. But to understand why Adobe focuses time/money/effort on other things, you have to ask where is the greatest potential for growth? It’s in digital publishing and mobile. So we get features intended to make it easier to adapt layouts for different screen sizes. If you saw yesterday’s CS6 launch event, you saw InDesign in the context of Adobe’s overall vision for the Creative Suite and CreativeCloud. “Design for Mobile” was one of the main themes of CS6, not just InDesign. Of course this isn’t going to help you today with your specific long document problems, but at least maybe it explains why things like endnotes never seem to get the attention we wish they would.
I’m doing the long documents session at PePCon. If we can get someone from Adobe in the room, we can do a show of hands to see how many people want endnotes, etc. If everyone raises their hands, I bet that would leave an impression. Then again, if the crowd is twice as big next door in the session on creating templates for EPUB and DPS, that would leave an impression too.
@Jamie: ‘The bug to which you are referring could be triggered 3 different ways. In most scenarios, it has been fixed.’
Certainly glad to to hear this as it has cost me many hours of work.
@John H.: Jamie has been following this with Adobe.
LTM
Eugene: “I have never seen a ?Feature Request? for ?Multiple Layouts?
…
And my point about the Adornments is they are always on or off. Yeh you can choose this, but surely a a key combo when active on a frame would be preferable, no?”
I should note, for the record, I’m a newspaper person and am thus not a target for most of the new features. But I’m not grumpy or unhappy about them (and I am happy about the large number of bugfixes in CS6).
Feature requests are not popularity contests; they are carefully balanced between what is popular and what is thought to be important and what is doable. And people do not do a good job of assessing how important their requests are — sometimes a lot of people ask for some truly bad idea. So the PMs have a lot of work to sort through that.
Alternate Layouts and Liquid Layout are internally-generated features, and it’s strongly connected to Adobe’s strategic decision to market to tablets and up-and-coming devices. I don’t think you can begrudge Adobe their strategic direction to take the product into what they perceive as important new markets. Maybe they’re wrong, maybe they’re right, but it’s totally legit for them to put resources into things that users haven’t asked for, as part of anticipating users needs. Again, a balancing act.
You say “surely.” I don’t know whether adornments that appear in the presence of a key combination or on hovering over a frame are a good idea or not, but I know that they are definitely not a “sure” thing. Very little else in InDesign works that way, and it’s pretty well acknowledged that UIs that involve hovering over and waiting for tooltips are bad ones.
You can certainly assign a key to Show/Hide Link Badge if you like, just like anything else. And of course, they will appear and disappear with Preview Mode (W).
I’m not sure if I correctly understood your suggestion about how a key combination would work, but it definitely doesn’t sound to me like it’s obvious right. Maybe it’s good, maybe it isn’t. Ideally one should prototype it and test it… Do you have an example of another piece of software (or part of InDesign) that works that way?
@Ranjan: There are a few language things that we didn’t mention in the article actually. There is support for Indic scripts and Adobe is now handling the ME version (right to left scripts) themselves. But in general, I think ID has “”full Unicode support,” no?
@Eugene: I agree that you have a right to be annoyed at what Adobe did or didn’t add, but many of your assumptions (in your long list above) are incorrect. You get InDesign Magazine, right? Read through the CS6 articles there to get a better sense of these tools. And, ultimately, before discarding the tools entirely, I encourage you to wait ’til you have CS6 in your hands to try it yourself.
Ultimately, CS6 does not have many features that help long document creators. I think Mike’s idea is great: let’s all let Adobe know that CS7 needs to be THE tool that finally brings relief to long-doc creators.
I’ll be looking to use cs6 mainly for large responsive web design projects, and was wondering if you noticed any preferences or options to have items snap to the pixel grid? Would love to have everything nice and crisp when viewed at 100%.
As one of the long-document creators, the only thing I REALLY care about is whether Adobe has fixed their cross-referencing feature. Although it works pretty well within a single document, cross-references between documents creates such a huge performance hit that it is almost unusable for multi-chapter books.
I know from direct experience that multi-document cross-referencing was broken when introduced in CS4 and remained broken in CS5. I understand from others that it is still broken in CS5.5. Have they bothered to fix it in CS6?
I just want to say that “Align to Key Object” is a great little improvement. I use it all the time in Illustrator because it allows me to control exactly where the aligned items end up, first time, every time. It is one of those little things that just makes life easier day to day.
That said, I will probably hold off on getting CS6 until I have more digital work. For now, my fingers remain ink stained (metaphorically speaking).
I am curious if an annoying thing which appears when inserting pages in ID CS5 is still present in InDesign CS6. If I insert 10 pages for example in an InDesign document, the program automatically jumps at the last inserted page. Although I insert 10 pages and I need to work on first inserted page, not on the last.
Hi
Gorgeous new features have been joined to CS6 and I’d like it. Does anybody know ME ??(Middle Eastern) versions will released at the same time with regular (English and the ?other Latin languages) versions or not? I couldn’t find any matter about ME CS6 on Adobe website versions when release. Would you mind to help me??
Thanks a lot
Masoud ?
@Cip
You are in luck! It just so happens I filed a bug on this very thing during the beta, and it has been fixed for CS6.
@Mike – while I agree that Adobe is perfectly right in developing tools of the Mobile market, I have no issue with that. But the mobile market wasn’t so big in 2005, 2006, 2007 (introduction of Kindle), 2008, 2009 (introduction of iPad).
I don’t know why they can’t develop both aspects of the programme? While their concentration on the mobile market is commendable, it’s leaving a lot of other people duly frustrated.
@David – It is definitely assumptions. I’ll take your advice and wait to see it in action myself. But so far I’m not really impressed with the enhancements. If my assumptions are incorrect then I apologise.
I’ve read InDesign Magazine (which arrived in my Inbox after my post – sigh) and many of my questions and assumptions have been put straight.
Alternate Layouts and Liquid Layouts seem pretty cool.
It definitely opens up a world of possibilities. And not just for mobile.
I can envisage using Alternate Layouts for the purpose of versioning. Where I can copy the layout to another document, and have access to the original (for content) and keep 2 versions of alternate versions in the same document.
Seems like it would be an efficient use. Plus the Content Carousel would come in handy for moving items between versions.
I haven’t tried it – as I don’t have CS6, but I do assume that would possible.
Or even the fact of creating A2, A3, A4, A5 posters/flyers for the same event. Having alt versions for print would be handy to update each within the same document.
Previously it was doable with Page Resizing, but was a bit clunky. I reckon Alternate Layouts could be a better option.
Liquid Layout and Alternate Layouts alone are worth investing into the new version – can’t wait for it to come out. You are very lucky to test-drive beta version.
@Jesse, I suggest not even thinking about InDesign for web design unless all you’re doing is mockups.
As much as I enjoy working with InDesign, Dreamweaver is the proper tool for that and they’ve made some great improvements in responsive web design there.
@Masoud: As David wrote earlier in the comments (https://goo.gl/4Cy80): “…Adobe is now handling the ME version (right to left scripts) themselves.”
Mike wrote: ‘I?m doing the long documents session at PePCon. If we can get someone from Adobe in the room, we can do a show of hands to see how many people want endnotes, etc. ? Then again, if the crowd is twice as big next door in the session on creating templates for EPUB and DPS, that would leave an impression too.’
It strikes me that many of the improvements that those working on long documents would like to see would aid in strengthening the semantic structure of our publications: for example, footnotes, endnotes and xrefs are links, which are at the heart of HTML. Better and easier control of the semantic structure of .indd documents would be a great help in producing digital documents. It might be worth recasting requests for improvements to long-document features as more general requests for better control of semantic structure.
After just wasting a couple of hours trying to sort out some endnotes in a report layout I decided to check to see if Quark 9 has better long-document support. It doesn’t seem to offer much that would help me. However, I’ve never even considered going back to Quark before this point; the good will that InDesign had built up, for me, in the early years has completely evaporated at this point.
This isn’t about web/mobile/tablet publishing vs. print, for me. Are the documents that Adobe is so eager for us to publish to tablets never going to involve endnotes, tables with footnotes in them, etc?
And how are these documents going to be published? The standards for EPubs are pretty immature, and the infrastructure for using them more so (try reading an EPub on a desktop, or dealing with different interpretations of a file on different mobile readers). Similarly InDesign’s support for EPubs, which was so highly touted when 5.5 was released, is clunky at best. DPS sounds like a terrible idea for most people (although I don’t quite understand the technology/code underlying it so I could be wrong): spending time designing for a single technological format, of which there’s basically one or two hardware implementations right now. Does it sound suspiciously like a way for Adobe to re-Flash tablets to anyone else?
Are these fledgeling formats really worth the attention given them? In practical, day-to-day terms, I’d say no. In terms of being able to write good advertising copy for CS6, maybe. Although I might just be grumpy after losing so much time dealing with endnotes :)
Here’s a nice response from Adobe on the CS6 forms feature! Looking forward to using this…
For the rest of us, don’t forget Tomaxxi’s great free form script.
I’ve been thinking about the endnotes issue, and would propose some assumed thinking on Adobe’s part.
Perhaps their crystal ball gazing tells them that the traditional way of consuming books that entail long documents is going to change.
Think about how DPS has already changed design for magazines, then imagine how it will change design, and ultimately the long document requirements for textbooks and scientific papers. Thing about every time you see a reference number in the flow of text, then imagine the reader simply tapping the number (a region assigned during the design process) and the reference pops up over the top of the page – something like a hotspot.
So essentially, we may see the end of endnotes and footnotes before long. I could be completely wrong, but as an avid reader of modern history, I would dearly love to be able to see the reference immediately as an overlay, than have to scoot to the back of the book or the end of chapter to find the reference, which would ultimately be buried amongst hundreds of others.
So I’d put my money on Adobe already knowing that this is how readers will expect to consume their content in the future, and would bet they invest in that vain.
Case in point – the Australian Federal Govt has issued a directive that by the end of 2014, all textbooks must be available on tablet. They have made statements to the effect that students should not be expected to carry around 30-40lbs of books, as opposed to a reasonably light tablet that can carry a huge amount of content.
What does this spell for traditional book printers and sellers….who knows, but I’m willing to bet they are already feeling the pinch, albeit a small one.
Fraser, can you see the difference between “we don’t use footnotes because our client doesn’t want them” and “we don’t use footnotes because the software we are using doesn’t support them properly”?
Case in point — my clients do request footnotes, and sometimes the first one should be a ‘*’ note followed by consecutive numbered ones (which may or may not be inside a table).
So I can tell them I can’t do that because InDesign is primarily targeting tablets, following Australian Govt rules.
IMVHO Adobe should split ID into two diff. applications: one for mobile, electronic, tablets, lcd, e-ink etc devices and 2nd for traditional paper/long docs.
Those two “technologies” are so close each other as www and let’s say pdf.
My 2 ¢…
Can anyone in the know tell if they’ve added any more animation possibilities/styles/fx in their “interactive” pdf options? They’ve added these only recently (CS 5 or 5.5), but I hoped them to become a little but more flexible still? without having to go into flash?
superb post.. its very different design..
its new to me and thanks for sharing this useful information with us..
Just wondered if the auto size text frame feature works with Incopy. For instance, if the feature is applied to a text frame in Indesign, when an Incopy user edits text, will the frame auto size when overset?
Judy I was excited to test that out too. BUT no, the frame doesn’t resize in InCopy, it oversets. When the ID user updates the story, it *does* resize there, but what good is that if the writer can’t judge copyfit and can’t tell (there’s no visual cue) if a frame has been set to auto-size or not?
So I think my recommendation would be to not turn on that option for shared InCopy stories.
A simple solution – add another node to the frame if it’s been automatically resized :D
@TS and Fraser
Endnote, footnotes, footnotes to tables, sidenotes, citations, reference and so on are instances of information subsidiary to the main text that needs an unobtrusive reference in the text and ready display?below, to the side, or at the end of the text or as pop-ups. As such, many publications, printed and digital will have them and they are not going away.
Let me give two examples how improvements wanted by those setting print books coincide with those producing digital publications.
[1] Notes to tables: both streams of publication need this.
[2] Many of us want to be able to set endnotes for print. Export to EPUB now places footnotes either together at the end of the document or each right below the paragraph in which it is referenced. If one is setting a book with several chapters, each in a separate file, all footnotes in the book cannot be exported to one location at the end of the publication. Digital publication needs endnotes as much as print.
LTM
@Jongware
I’m assuming you had your tongue planted firmly in your cheek.
The point I was making is this:
Currently, clients want documents done a certain way – maybe an analogy such as once upon a time, writing cheques was the norm, whereas today, very few people (in Australia) even own a chequebook, let alone write checks. They have been replaced my EFT or direct deposit etc.
In the same way, traditional books will be overrun by ePubs and digimags etc – it will take a while, but no so far off into the future that Adobe might hedge it’s development bets so that it doesn’t cure an ailment that will become extinct.
The reference to the Aust Gov was merely highlighting how change is upon some of us whether we want it or not. Adobe is simply pinning itself to outcomes that keep it relevant, without completely losing sight of the past.
But Fraser, my point is certainly not that Adobe should simply forget about tablets and abandon all developments for future devices.
There are present demands for footnotes and endnotes, not “past”, as you say. Adobe does completely ignore these, and has been ignoring them since CS2 — when footnotes were introduced, and haven’t changed one bit since then, way before anyone was playing with their iPad.
(Come to that, I daresay that footnotes in books will keep on working long after you had to swap your iPad for the newest latest electronic fad and had to buy all of your ‘e-books’ again.)
Why oh why won’t Adobe do something about long documents: endnotes, ToCs, indices, cross refs and, most annoying of all, the disappearance of all text from a frame on a page if that page includes footnotes (not always, just sometimes). And the weird things that happen if you share book files with someone else and the master pages get screwed up? If I were a long document, I’d feel discriminated against!
@Ann — You wrote: ‘Why oh why won?t Adobe do something about ? most annoying of all, the disappearance of all text from a frame on a page if that page includes footnotes
?’
I think this is what I call the threading bug (and I agree, it’s most annoying). Jamie Mckee wrote above: ‘The bug to which you are referring could be triggered 3 different ways. In most scenarios, it has been fixed.’
LTM
In CS6 can you group two objects on two different layers, and have them stay on the layer they were on?
@Sheri: No, that is not in CS6. But I did see that dtp tools has a plug-in that sort of helps keep objects “grouped” across layers: https://www.dtptools.com/product.asp?id=pgid
Hey, I just found out something awesome about CS6: A very hidden feature! When you jump to 100%, the screen measurement is far more accurate than it has ever been. Adobe has always assumed that you had a 72 dpi screen (which is crazy)… now it actually asks the monitor what the resolution is. It’s not perfect, but it does a pretty good job on my Mac.
This is one of my new favorite CS6 features! No more need for special scripts.
David,
Acrobat and Reader have had the ability for a while (since version 8 at least) to specify the on-screen DPI to be used. There’s no reason this feature shouldn’t be “perfect.” If InDesign can’t precisely determine the size of the screen, it ought to allow a simple preference setting, like Acrobat.
I am so excited about these new features! Finally, built-in support for forms without having to use LiveCyle, new liquid layout controls, and improved export to EPUB. Thanks for covering all of this and I linked to this article in the InDesign User Group SF blog at: https://www.idugsf.com/2012/05/liquid-layout-forms-and-epub3-in-cs6/
Can CS6 export comment enabled PDFs with their default view settings already set to save me the round trip through Acrobat Pro? Or am I missing a trick in CS5 already?
Regards,
Pete
Pete: Short answer is no.
I’m pretty sure that InDesign depends on a limited set of features that its PDF generation library exposes, and that library does not have any support for PDF features that require cryptography, which includes enabling reader comments, and also enabling form-filling-out.
At the moment, the library, maintained by the Acrobat team, doesn’t support letting other programs (like InDesign) perform those functions. But clearly there’s a demand for them, especially with respect to forms. We know the ID team decided to try to add forms support fairly late in the release cycle, so it’s reasonable to expect they will be lobbying the Acrobat team to give them access to more functions in PDF files. If that happens for forms, perhaps reader comments will come along for free.
For clarity, in CS6 you can design form fields in InDesign, but you still need to open the PDF in Acrobat and enable forms. So you absolutely save on the design, but still need to flip the switch in Acrobat Pro.
@ Peter, @ John,
I agree that exporting PDFs enabled for commenting directly from InDesign is a feature to be desired. I would also welcome integration of Acrobat’s and Reader’s commenting into ID along the lines of DTP Tools Annotations , so comments could be imported into InDesign. I’d be happy to have them show up in Story Editor rather than layout view. Having this feature would compete with InCopy, I suppose, but in organisations where the authors are analysts of one sort or another first and writers second, the likelihood of their using InCopy is close to nil.
LTM
Does anyone happen to know whether Adobe have adopted the newest features in Mac OS X, in particular delta saves and file versions? I’m not holding my breath, since this would probably not work across the different platforms, but there sure have been situations in the past where I wish I had had the possibility to roll a document back to a previous version…
“Keeps with Spans and Splits: Simply put, the keeps functions for paragraphs (Keep with Next, Keep lines together, etc.) now work on paragraphs that are set to span columns or split.”
Huzzah! This has been driving me nuts. :)
The form field function is still very limited. You can’t set default text values, fonts or colors in the text fields from inside ID CS6 — all options that I need to use every time I create a form field. (and I make a lot of those). So, this only saves a little time for me. I still have to go into Acrobat pro to fix all of these other settings, set up user permissions and resave the PDF. This was kind of a letdown for me when I tried the eval version. Oh, and the worst part – you can’t export a form PDF as CMYK. My client needs user-end editable options for coupons and ads (e.g. changing expiration dates and store addresses). So this puts the nail in the coffin for that feature for me. This PDF form feature WAS the big selling point for me, but no more. Oh well, lets hope they expand on this feature in the next version. Until then, I hold off on upgrading.
Wow.
If only it had Illustrator build it ;)
I’ve been holding out buying an update for years as endnotes and indexing would definitely make the jump worth it for me. What an oversight by Adobe. One would think they would find it embarrassing that their program can’t do what a simple word processor can.
The new form editing option was one of the reasons we upgraded. I can’t believe how limited it is – You’d expect to be able to choose the text field font, after all its one of the basic setting in acrobat form editing and a requirement for every designer – be it web, or print. What a half baked solution. They really shouldn’t have bothered.
@proton, @Scott Falkner, @Bjarni Wark, @Asbjørn, @David Blatner, @Mike Rankin, @Ranjan Sen, @David Hillel, @Ann Camilla, @Jongware, @Lindsey Thomas Martin, @Fraser Crozier, @TS
We HAVE to do something about Adobe ignoring this MUCH NEEDED part of InDesign (endnotes and long doc support). They are all into their fancy little “cool things” for digital publishing but don’t they care for all of us who need to take care of business?
What can be done to get their attention?
I’m willing to knock on their door in person…
The InDesign team will be doing an open-ended “Talk Back to Adobe” session over lunch on Tuesday at our Print + ePublishing Conference in San Francisco next week. That would be an excellent time to bring this up. If you can’t go, I’m sure others who are going will bring this up.
I can’t go that quick… :-(
I hope somebody will make SURE that the point is firmly driven home!
Ok, seems I misunderstood David when he said ??Adobe is now handling the ME version (right to left scripts) themselves.? Seems like he didn’t mean that the regular version will have ME support, no, it doesn’t, it’s just that Adobe itself will sell the ME version of ID and not Winsoft. So we still gotta wait for that release.
ALTERNATIVE LAYOUT
But we can’t export from the DATA MERGE the pages separated ? when I create a datamerged document with my 2 layouts, is created 1 new document with both pages 1 above 1. Crap that huh? Adobe don’t upgrade the datamerge feature, forcing us to buy expensive third-party plugins.
@LGFN
The descriptions on Adobe’s website are not clear but it sounds to me to as if they have exposed the World-Ready Composer, which was added under the hood in CS4 and supports Indic and RtL languages; and have also taken over selling the ME version of ID, which provides much fuller support for RtL languages. For some years, In-Tools has offered World Tools, a plug-in giving access to World-Ready Composer; Winsoft, who have been selling (and coding, I believe) InDesign ME for many years, have a similar plug-in, ScribeDOOR. My guess is that the regular version of InDesign 6 will offer support for RtL languages that is similar to the plug-ins but that, if you publish mainly in a RtL language, you should buy the ME version, which Adobe now sells directly.
There is information, now more of historical than practical value, in a blog post from 2009 by Thomas Phinney.
LTM
ScribeDoor link
Earlier this week, I heard the project manager for ID CS6 give a demo at Seattle’s ID UG. As a long-document creator, I was quite impressed. Many of the new features may be intended for magazines going digital, but they should work quite well for book taking that same path. The real hitch is no longer that ID can’t create EPUB 3, it’s that Apple and Amazon are still playing their silly proprietary format game.
Those who, like me, want ID to do endnotes, might learn from how PDF forms got included. With the ID project manager present at a ID user conference, someone asked all those who want forms built into ID and all 600-or-so present raised their hands. That was enough to get the project rolling. I strongly suspect it’ll be a big selling point, particularly in business circles.
I’d add these suggestions:
1. Keep with previous paragraph. It’d be very handy for laying out poetry and for any document where there are special tweaks to the last paragraph.
2. Search backward. I don’t know how many times I’ve been going through a document deciding which search term gets replaced and, as a glaze settles over my eyes, not change something that should be changed. But, alas, there’s no way to go backward and, with hundreds of terms, going around again is a pain.
3. Keep entered values in original format. ID converts all entered values into one format (i.e. picas, inches etc.). I don’t care what ID is doing behind the scenes, but I wish values we enter would continue to display in the value they’re entered. When I enter in picas, I don’t want it to become some quirky inches number.
4. Document specific and project specific dictionaries so words used for one project don’t pollute the spell-checking for another. There should be some way to make Hunspell do this.
5. Text import that understands Markdown coding (i.e. *italic*). It’s becoming increasingly common and writing in text editors beats the socks off writing in Word. It’d also be a way to bypass all the hassles of Word import.
6. Adobe’s ID team is near the north end of Seattle’s Lake Union and Amazon’s headquarters are at the south end of that same small lake. It’d be great if the two would work together so that ID has a top quality export to Amazon’s KF8 format. It’d be to the advantage of both.
@Mike: There’s a huge divide between the north and south ends of lake union! :)
One note: IDcs5.5 already has “keep with previous paragraph” in the Keep Options dialog box. They snuck that in there at some point.
@ Mike Perry re #5 Markdown
I with you on the usefulness of Markdown and, more so, MultiMarkdown, which I have been exploring as a mark-up language for prepping edited files that can go directly to EPUB and also into ID for typesetting. So, add my vote for text import of Markdown and MultiMarkdown.
In the mean time, MultiMarkdown Composer will export (Multi)Markdown to (X)HTML. For import of HTML into ID, see FramedWeb from Rorohiko.
LTM
InDesign is such a broad program, and it must be a challenge for the programmers to decide exactly which features are needed for which squeaky-wheel users. Some way of placing supplemental cross-refs/endnotes has been needed by MANY people for awhile. But consider that some things that are mentioned above as new features–yet haven’t elicited a reaction here–may also be very welcome to other users who do different things with the program.
I for one am THRILLED that a recent fonts list has been “introduced” and every long document user should be as well. This feature was first used by Adobe way back in the dark ages of ATM Deluxe on the Mac but was then abandoned when OS X was introduced well over a decade ago. I’ve unsuccessfully petitioned both font manager vendors and Adobe over the years to re-implement this feature (maybe Adobe finally listened?). It puts the group of fonts you’re actually working with always at the top or bottom the font popup list–depending on which way the popup pops up in the control panel.
For a textbook designer like me, who sets up typesetting templates for books that utilize hundreds of stylecodes yet may employ just a handful of font families, this will save hours of popup scrolling over the course of a project. And no, I don’t want to type out which of 3 active Helveticas I want into the control panel field, nor which of the dozens of style subtypes I want into the next field. The popups are still faster when the stylecodes haven’t been made yet.
It won’t matter how many idiotic MSWord font auto activations happen when client source docs are opened. I will no longer get annoyed at an editor who has a dusty never-used font in her email signature because she wants to stand out from the crowd that gets activated and added to my font list. I will no longer need to wade through all those miserable extraneous fonts to select the few used in my project. I will just have to choose a typeface family the first time after the program opens, then it goes on the “recent” list. For me, this alone is worth the upgrade. It probably seems like a weird little thing to some of you, but it definitely makes me do a happy dance. Just depends on your workflow–like all of these new features. Somewhere, others are doing happy dances too for their new favorite feature. Thank you Adobe! (But do endnotes next please….)
I dont see anything earth shattering in CS6. Frankly was the content conveyor such a big thing? Not in my opinon. What did they do with the links panel? Nothing. How many times do you have broken links on linked images etc. Can they add some additional functionality to help heep those links together or find missing links? apparently not. The liquid layout thing may have some use for certain users. Data merge as mentioned in another post hasnt been improved in many releases. Most of the “improvements” are finding problems where there were none, or just niche things for certain users. Is there ever anything done to make the program run faster? Or anything involving speed? Nope as always on these upgrades.
If you have 5.0 or 5.5 Indesign I see no need to upgrade for the majority of users.
@robertw, I think the Content Conveyor becomes a big thing when you actually understand and use it. It’s hard to explain and the current demos are weak, but in a high-speed environment where laid-out items have to be reused over several documents of different sizes and layouts (creating a set of mag and newspaper ads, catalog and associated brochures or product sheets), it’s a significant item. Any time you need to bring content from multiple pages in one document into one or more pages in another, the Content Conveyor saves production time.
Liquid layouts, similarly, are huge for the many designers who work on product identity programs, ad campaigns and the like, where the call can come to recreate an existing ad in five more sizes on a tight deadline. Used in conjunction with linked content across documents, it has the potential to save many hours over the course of a work week.
Although to my mind InDesign runs plenty fast, in that I never have to wait for it to do something, the dominant consideration is how quickly and with how few steps you can get from concept to finished layout. That isn’t so much program speed as working efficiently, and the new tools add much to the efficiencies introduced in CS5 and 5.5. It will be great when ID is fully “decarbonized” and we have a 64-bit version, but there’s plenty here to keep me very happy.
@Robertw, there is a way to keep all missing links together, which has been there at least as far back as cS5, just click on the header row above the icons and that organises them all by their status.
Also when you are replacing a missing link check that you have the “Search for Missing Links in This Folder” box ticked and it will automatically find other missing links in the same folder.
I have to replace missing links all the time, but 90% of the time it is because of others poor file organisation, if you have your system sorted it shouldn’t be a regular problem.
I’m late to the game in reading this post, and haven’t read through all the comments here, but am heartened to at least see such vehement defense of footnotes here. Add my voice to the crowd of long document designers: it’s indefensible that Adobe hasn’t addressed footnote limitations in CS6.
@Anne-Marie: Not only was the talkback session great, but I had a rare treat and the great pleasure of talking with Chris Kitchener and Doug Waterfall (two of the nicest people you ever want to meet) for about 3 hours. The conversation was highly productive on both sides, and my follow-up email to Chris and Doug was well received and appreciated. Chris wrote me this, which speaks volumes about how best to let them know what we need:
Just started using InDesign CS6 today. Disappointed there is no ability to group color swatches. Or did I miss it?
Have used David’s trick of creating a “division” swatch but was hoping for a group “tool” similar to Paragraph and Character styles.
Also opening panels seems painfully slow.
@Terryclifton: Nope, no way to group color swatches yet. Not sure why opening panels would be slow. Often, it takes longer the first time you do something in ID (because in many cases, each feature in ID is actually a little program that has to launch in the background).
There are big pluses and some minuses in the new release.
Plus: Being able to turn on soft proofing while creating a grayscale newspaper ad using full-color assets, so what I see is really what I will get is a big time saver.
Plus: Mini Bridge promises to be quite useful, finally, in its new position.
Plus: A book panel now opens ON TOP of the Welcome pane, instead of hiding behind it, which was one of my early feature requests. Little things make a difference!
Plus: Bridge now has a context menu item for “Place…” with your choice of program, another of my early FRs.
Plus: The content conveyor rocks when I have multiple items to place across multiple ads and they’re not all going in at the same size.
Minus: It’s a teeth-gritting moment when you discover that hitting Esc drops an item from the place gun AND the content conveyor.
Minus: The fact that “Fill Frame Proportionally” now automatically centers an image is a royal pain in the you-know-where. That has to be an error that slipped in late, because I don’t recall it during prerelease and 9 times out of 10 it’s not what I want (and the “Center” icon is only a click away when I do need it).
Minus: The new font picker is painfully slow to use, which more than offsets the gain of “recently used fonts.” They are usually off the screen at the top of the list, requiring big mouse movements and sl-o-o-ow scrolling to reach.
We win some, and we lose some. I’ll be pitching heavily for better long doc/book features next time out. I already got some traction with my passionate pitch for an option to migrate all preferences, kbsc’s and workspaces to a new version.
RE: Pantone + swatch libraries… If your books are the older versions, you can copy over the older swatch libraries; they’re found in the application folder and then Presets/Swatch Libraries.
(For myself, I noticed that process coated SWOP #190-1 is not represented in the + library — at least not under the same name!)
@Mike and Lindsey: Markdown, and its derived brethren, is used so far to generate HTML. The document model of HTML is different from InDesign’s, so it’s not (um) preferable to write a one-to-one conversion tool, as it would be bursting at the seams with “local overrides”. Think Italics inside a code fragment inside a bold header.
(Which makes me wonder about how FramedWeb does with this.)
In the mean, I had a little fun writing a Markdown interpreter for InDesign in Javascript — as far as reasonably possible. It doesn’t do too bad on the Markdown documents I could find, and I even had some time left to stuff in a few extras!
You can read all about it on my web site.
Looks like when exporting a Indesign file to a SWF / HTML file the readers still have no option to zoom in or out whilst in a web browser which is very frustrating.
Does anyone know anyway of getting round this that doesn’t involve weeks of coding or buying some very expensive plugin?
When you say, “And you no longer need to override a Primary Text Frame before adding text,” I thought you were describing something new: that I could type directly into a Master text from when it was used on a page, without overriding the text frame. It doesn’t seem to work that way. I still must override to begin typing (from scratch). I could always plea text into the frame without overriding?still can. What did you mean, really?
Rick, it is something new and it does work as described.
1. Create a new doc, making sure to enable “Primary Text Frame” in the New document dialog box.
2. Click inside page 1 and start typing.
You may have been caught by a subtlety: Master pages can have one or more “regular” master page text frames — and these will need to be overridden as usual on the doc pages — but now they can ALSO have a Primary text frame — and this does not have to be overridden. On the master page, a new icon appears below the In Port for text frames; if it has an arrow in it, it’s a Primary text frame.
The only way to add “regular” master page text frames is by hand-editing the master page; you can’t put them there via the New Document dialog box. Or if you’ve converted an older file to CS6, I’d assume its master page text frames remain “regular” master page text frames.
Thank you!
The arrow made the difference!
Amazing product, CS6 has changed the landscape
https://tv.adobe.com/watch/cs6-creative-cloud-feature-tour-for-design/getting-started-with-the-new-liquid-layout-and-alternate-layout-features-in-indesign-cs6/?sdid=JUMNA
“Keeps with Spans and Splits:”…Hallelujah! I had to check once I read this…keep options with tables and text outside the tables works now!
This will save me many hours of monotonous checking as things reflow. I’ve gleefully removed the column breaks I resorted to to force tables to keep with following text…Thank you!
I’ve been struggling to align a re-recording dialog for this video I shot at school and a friend suggested I try the new Audition CS6 from Adobe with this new ADR tool – https://tv.adobe.com/watch/cs6-creative-cloud-feature-tour-for-video/how-to-use-auto-speech-alignment-in-audition/?sdid=JUMNF I have to say it’s made my life so much easier. You can get the demo from here – https://www.adobe.com/in/downloads/?sdid=JUMTN and trust me, it’ll save you a lot of time.
Photoshop – Working with vector-based shape layers
Vector-based shape layers now behave very much like vector shapes in Illustrator, InDesign, and other Adobe applications. Learn how to apply fills, including None, as well as solid, gradient, and dashed strokes. Plus, you have stacking and alignment controls, as well as the option to snap the edges to the pixel grid.
https://tv.adobe.com/watch/learn-photoshop-cs6/working-with-vector-based-shape-layers/
Photoshop – Previewing shadows and reflections
3D has been altogether revamped in Photoshop CS6. One of the best enhancements is the program’s ability to preview shadows and reflections before you render the scene, particularly those cast onto the ground plane. You can even drag a shadow to change the angle of a light.
https://tv.adobe.com/watch/learn-photoshop-cs6/previewing-shadows-and-reflections/
@Siddartha and @Resha: I don’t understand why you’re mentioning Photoshop and Audition. It’s nice that they have those features, but this is an InDesign discussion! :)
To the person who admonished us to be grateful: I too remember the bad old days.
However, here?s why we feel ripped off:
The publishing industry is so interlinked, that if one person somewhere in the long chain upgrades, everybody else has to upgrade, whether they can afford to or not. The world of commerce (including publishing) is now all about ?outsourcing?, not only offshore, but to previously laid-off staff, who now, as ?freelancers?, have to buy their own computers and software upgrades.
It is extremely galling to fork out for upgrade after upgrade and simply find the same old bugs that sour your life.
When I upgraded to CS4, they actually sent me an email asking if they could shadow my work, to see how I use InDEsign. Of course I agreed and was soooo chuffed, believing that all the stuff that drive me mad would be noticed and resolved. Nope. I?m now on CS6 and up against the same annoying bugs that drive me mad.
That?s why we feel ripped off.
Exporting as an e-brochure can only be done as an swf file in CS5. I’ve heard that in CS6 there is an option to export as HTML5. Is that correct?
@Gary: Nope.
@Robertw
I agree with Stix Hart about Links problem. InDesign is smart enough to find links automatically if the document is placed beside the Links folder. All linked images should be in the Links folder (and not in any other sub-folders in Links folder).
Form fields limitations: I would prefer to use Acrobat Pro for forms until Adobe can come out with full features in InDesign including calculations.
I used to work for a print magazine doing design and layout and I always hated my writers for making last minute changes. Whether it was due to copy checks or copy fitting, it?s just pissing off to rework the layout, specially if the copy is linked to another page. I?m so glad this new feature in InDesign – https://tv.adobe.com/watch/cs6-creative-cloud-feature-tour-for-design/linked-content-liquid-layout-in-indesign-cs6/?sdid=JYNWX has been created. Every designer will be dancing! I bought online from here – https://shop.adobe.com/ to test out its effectiveness with my blog and I have to admit, even the whole liquid and adaptive layouts stuff is pure gold!
Wondering if any of you out there have been using the new forms options in InDesign CS6. I have been working on some forms and created a bunch of text fields for people to fill in. What I discovered was that when I exported and tried to put text in the fields in Adobe Acrobat Reader, it wouldn’t save the form (it will let you print but not save). The filled out form can be saved in the full version of Adobe Acrobat, but with Reader I am having difficulties. On Adobe’s website, they say that filling in fields and saving is possible in Reader, the document just needs to be “rights enabled”. I am having a difficult time figuring out how to export my PDF from InDesign CS6 so that it is rights enabled. Has anyone run into this before? How do I remedy this?
@Kelly: Yes, InDesign does not, by itself, enable Reader rights. You need to do that in Acrobat Pro. In Acrobat 9, you choose Advanced > Extend Features in Acrobat Reader. In Acrobat X, I think it’s part of the Save As process.
After much investigation and experimentation I found that what you have listed does solve my issue. You have to create an Interactive PDF in InDesign. Then open the PDF in Acrobat Pro and File> Save As > Reader Extended PDF > Enable Additional Features! That’s it! Too bad it can’t be done directly from InDesign, but this process isn’t too bad, at least I know how now!
Hi, I’m wondering if anyone else has noticed the awful “dragging/repositioning of items” functionality that seems to have gotten worse in CS6? Say you have an item selected and you want to drag it to an exact area onscreen, zoomed way in, it used to be that it would dim and you could do that. Now, not only can you not see where you’re dragging it to because there’s no pointer of object feedback, but everything seems to be snapping to an invisible grid. This is with all of the snapping, smart guides etc turned off. HELP.
@Jamie: I’m not sure if this is what you’re talking about, but try opening Preferences and, in the Interface pane, set the Live Screen Drawing to Delayed.
What I would like to ask:
The last software I purchased was Web preium cs3.3. I have had a daughter since then. I am getting back into web design again now.. Became a Certified Internet Webmaster in 2010.
I have seem a web hosting package that includes dreamweavwer cs5.5 within it. However I have a few wonders? Most of my other software is cs3.3 – Is this going to cause issues?
Is dreamweaver cs5.5 backwards compatible.. ie can I use flash, firworks cs3.3 etc along with dreamweaver cs5.5?
This will be a big decision in which package I will choose. If its going to cause integration issues and coding issues then I shall just forget the package that includes dreamweaver and stay with my webpremium cs3.3 … Backwards software is better than update dreamweaver no others right?
@Debs: I’m sorry, but I’m not sure if this is really the best forum for you. it sounds like you’re asking about Dreamweaver, but we focus on InDesign here.
Hi David, Steve and Mike.
I have a question about Indesign CS6:
Does anyone know if there a feature than enables the export of an indesign document into a format that is similar to the Amazon Book preview format? I like it how you can read the first chapter of a book and click on the corner of edge of the page to turn it. I want it to work so that people can for example read a free book, a sample chapter without the ability to copy text.
So it needs to be a read only document that can be embedded into a website? I have been able to export an Indesign document to a SWF format (Flash) which looks great, (like a book where you can click on the curled-up corner to turn a page), but it doesn’t display on Mac devices (iphones, iPads etc..)
Thanks in advance
Hi guys, yes loving CS6. Totally agree it would be amazing to have Illustrator built into Indesign. The increase in efficiency is amazing!
ok great. But have they done anything to improve footnotes? how about endnotes?
i wish you can have severa footnote formats. say one style is numbered and another style is lettered.
also. you have to have a continuous text frame for footnotes to work sequentially. a new text frame means footnotes start at one again.
footnotes to work inside tables as well. you can’t just put footnotes in tables in cs5.
for master pages, it would be nice to have an option to use 2 or more master pages on a page. that way, you have less master page styles. this is besise the ability to base one master page from another master page.
master page can be layered on a page. say if your content in page 1 is layer 1, you can assign layer 2 to the master page on page 1. that way, if you have a full spread image and still wants to show page numbers or elements inside the master page, they can be shown, without having to use effects to the image just to reveal the contents of the master page.
thanks for the tut
Did I miss a reference to a table footnote workaround in all of these comments? Has anyone successfully placed a footnote reference in a table? TIA
@Daniel: Nope.
Hi,
Please someone let me know to design the following needs.
I am designing a flipbook and saved it with swf extension.
1. I need a text box where I should be able to input the desired page number.
2. On entering after the input is given, I must go to the desired page directly.
@Sruthi: I don’t think you could do that with InDesign. You’d probably need to do it in Flash Pro. But another idea is to create the flipbook, then use a tool like eDocker:
https://www.edocker.fi/index.php/en
or
https://creativepro.com/forum/general-indesign-topics/page-flips-on-facing-pages-book
@David: Thank u soo much David.. I ll try that……
can someone tell me how to create a Search field for use in an app produced with InDesign?
thanks
@aswan: I don’t think that’s possible in a DPS app at this time.
thank you david – same answer for in an epub made in ID CS6 ?
Talking about the footnotes formatting we use to have in some books layout, we design, more than eight or ten footnotes in one page wich takes a lot of white spaces in the bottom of the page.
So if its possible to allow us to split the footnote raws up to tow or three colomns, preserving the automatic footnotes flowing in the text.
Thax for regarding this message.
Sincerely yours
Majed A. M.
Art directing manager
Dbouk int. for printing & general trading L.T.D.
Lebanon – Beirut
000961 70 743117
00961 70 416922
I like InDesign CS6, there are several new and I did not know from the reviews above, but it was very helpful.
by the way is there anyone here who can help me trouble finding a complete ebook InDesign CS6?
thanks
Hi,
I love the new easy ability to export to PDF form with editable text fields.
Does anyone know how to predefine the formatting for the text that will be entered in that box in the pdf? The only thing I see you can control is the point size.
Thanks in advance,
Joe
If only we could import svg files and have them be editable without jumping through a lot of hoops.
New to CS6 and struggling with primary text frames. There seems to be an anomaly: if I have a document with two facing master pages, I can only designate ONE PRIMARY FRAME FOR THE WHOLE SPREAD. But if I make a new document with ‘Primary Text Frames’ turned on, I get one for each page! But there seems no way with an existing document of making both master pages have primary frames. Consequently the text flow is only on the recto or verso, and the other blank. Or I have to start again with a new doc and turn on primary frames. Anyone else encountered this? Assume just me being dumb. Thanks.
@Belmondo: This does work for me okay. I make a new facing pages document without primary text frame; I go to master page A, draw one frame on the left and one on the right. Then choose Selection tool, click on the one on the left and then click on the primary text frame adornment/icon in upper-left corner (when it is a primary text frame it has little black arrows). Then I select the one on the right and do the same thing. No?
Thanks David. When I do exactly as you describe, I can only assign one or other as a primary frame ? so when I’ve assigned the right one, the left is now back to being a normal frame.
However, I do now seem to be able to make it work, by threading the two frames on the master pages. I tried this previously, but was holding shift when I placed the text, to auto-flow it, which didn’t work: if I shift-clicked on the first frame on page 1, all subsequent r-h pages were threaded, left ones blank. Not sure why. Now I’m placing it without shift, and everything flows beautifully.
best site for indesign en general thanks for all the tips keep the good work
Hello All!
I was hoping to see a feature to enable expanding and contracting content. So for example, if I were writing a step-by-step guide to document a process, I can hide the details underneath each step and the user can click the heading to show or hide the content underneath. It’s roumored that Word 2013 has this functionality, but I’d rather use InDesign.
I was wondering why the Font preview list is so long. I does not let me see the little pick a font window. Is there a way to minimize it? In previour versions the list was more compact
Are the greyscale PDFs actually grey (using only black ink) or are they that 4c black nonsense?
I really like the new CS6 and was looking forward to using it. I now work on a machine that has CS3 also and thought I’d be able to transfer everything over. Unfortunately I’m having the same issue here with a document.
Mr. Blatner is there anyway to take a bunch of lines pasted into a text box and change them to one color? Right now I’m having to do each one by hand and of course my supervisor just ran off and quit so the experienced InDesign user is gone.
Now I’m left holding the work load with extremely low pay. My Example: Text______ Text 1523 ______
This is a very long/large form and while I can change the text and numbers by highlighting them I can do nothing but select each little line and change it’s color manually. This is not my file but one I was left to “deal with”. Any ideas on how to approach this would be much appreciated.
Considering what I deal with in CS3 I’ll gladly take CS6 any day over it!
@Sandra, bring up the Ink Manager. There’s lots of tutorials out there, but the gist of it is, the ink manager will allow you to tell indesign: “When printing, make all instances of Color X into Color Y.” So you could tell it to make red into black, blue into black, and black into green, or whatever. This would be a global change through your entire document.
Has Adobe a plan to work on the tables in Indesign? Right now the lack of being able to move one cells width is cumbersome and so 1999ish.
thanks!
can anyone tell me how to complete the simple task of changing my document from picas to mm? The option seems to have vanished from the dialogue box and I can’t fathom how else to do it.
Sure, open indesign, click on Edit, and the preferences, then units and increments, and change them there, if you want this to be the norm when you open any document, do your changes without any doc open and that will set your preferences for each new document you open. hope this helps!
@Rob: Just a quick followup: If you’re on a Mac, the Preferences dialog box is under the InDesign menu rather than the Edit menu. Thanks!
ahaaahhh! Thank you so much Rob. Had already looked under the edit menu and it wasn’t there. All sorted now :)
Hi,
Maybe you could help.
I’m trying to create a form in InDesign CS6. Everything works just fine when I export it for PDF – except for one quite important thing.
The submit form button does not work. When clicking the button, I get the message: “Action not permitted”.
Everything seems to be done correctly, filled out the right fiels, checked fonts etc.
But nothing seems to work. Is it because, I don’t have Adobe Acrobat Pro installed? In that case the new “Buttons & Forms”-function in CS6 does not seem to be that cleaver after all. Or maybe there is a solution, that I have not thought about?
Hope you have an idea of what the problem could be!
Hi i would like know how i can center an ebook on screen.
When i export the work, it save into a .swf + .html file, when i open the .html file, it opens in a browser but it isn’t centered on screen. How can i do that ?? Any suggestions ?
Thanks
Joao: That is generally controlled in the HTML, and how the browser reads the HTML. You may need to edit the HTML manually to fix it.
I place text boxes (callouts) over photos. If I change the wording in the in the text box and then want to resize this box, the text disappears and it is a guessing game how big to make the box. I have to double click to see the text again and if it is not right, choose the selection tool (which makes the text disappear again) then resize and guess again. The old version was much easier. I could see the text while I resized the text box.
john: This feature should help: https://creativepro.com/allow-your-frames-to-resize-with-your-text.php
For example, if your firm has one, paralegals
and other highly skilled legal assistants who can outwit others with their keen sense of critical thinking.
By doing research online, you can discuss major problems solicitors
in glasgow uk like divorce and kids custody with utmost care.
On my version of InDesign CS5.5 I could select a word and hold sift and the cursor changed and then I could move the word into another sentence. or I could hold sift and option and copy the word and it would take on the formatting of that sentence. I cannot do it in InDesign 6??
How we can use Text Varibles in Indesign CS6?
To reduce spam, comments have been closed for this post. If you want to start a related discussion, head over to the Forums and create a new topic.