

Holiday Papercraft

And now for something completely different.
Here’s a little holiday project for you: take a break from your usual work to design and make a paper ornament to decorate your tree, cubicle, rearview mirror, etc. It easy, kinda fun, and you get to play with shapes and transform them.
If you just want to print out the ornament or customize it with your own images, you can download this snippet file and open it with any version of InDesign or later. If you’d like to learn how to make it from scratch, read on!
First, a little math.
What? Math? You just said this was going to be fun.
It is fun to fold shapes, but it’s more fun if you know why they fit together.
There is a branch of geometry called solid geometry that deals with 3-dimensional shapes. You might remember it from your school days if you ever had to use formulas to calculate the surface area or volume of a sphere, cone, cube, prism, etc. One topic in solid geometry is “nets”, or 2-dimensional shapes that when folded become solid 3-dimensional shapes. Two InDesign features are great for this: Step and Repeat and Flip.
To illustrate what a net is, here’s a nifty little app that lets you fold and unfold nets with a slider. You can also click and drag to rotate the shapes and view them from any angle.
So for our ornament project, we’ll make an octahedron (like two pyramids stuck together at their bases).
To begin, create a triangle. It doesn’t need to be any specific size, but it does need to be an equilateral triangle.

A whaa….?
Sure, you remember David’s post on how to create equilateral triangles, right?
When you’re sizing the triangle, just make sure that you can fit at least 4 copies across your page and 3 copies from top to bottom.
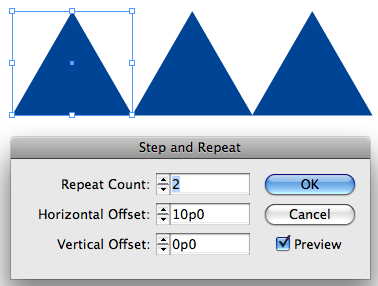
Now to make the net. With the triangle selected, choose Edit > Step and Repeat. Make the horizontal offset the width of the triangle, the vertical offset zero, and the count 2.
Select all three triangles and choose Step and Repeat again. This time make the horizontal offset half the width of one triangle, vertical offset zero, and count 1.

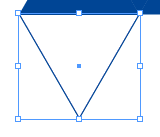
Now in the Control panel, make the proxy any of the middle points ![]() and then press the Flip Vertical button
and then press the Flip Vertical button![]() . You now should have six perfectly interlocking equilateral triangles. Nearly a net.
. You now should have six perfectly interlocking equilateral triangles. Nearly a net.

Select the original triangle. In the Control panel, make the proxy any bottom point ![]() , hold Option/ALT (to copy the triangle) and press the Flip Vertical button.
, hold Option/ALT (to copy the triangle) and press the Flip Vertical button.

Select the last triangle on the right, and again hold Option/ALT and press Flip Vertical.

Wait a minute, why did that work? I thought the proxy was at the bottom…
Yep. It was, but when we flipped the three triangles, they stayed flipped. That is, InDesign remembered what the bottom used to be and flipped the triangle around that axis. Make sense? You can tell by looking at the Flip State and proxy icons in the Control panel.
![]()
![]()
Bonus tip: You can right-click on the Flip State icon to clear transformations. Don’t do that now, just save that trick for future reference.
![]()
OK, now we need to make InDesign “forget” some triangles were flipped to make it easier to orient the photos we’ll place in them. To do that, draw any shape so it fits within a flipped triangle (the ones that point to the bottom of the page).

Then select both shapes and choose Object > Pathfinder > Add. Since the smaller shape was on top, its orientation (and its stroke/fill) is used for the merged shape.
![]()
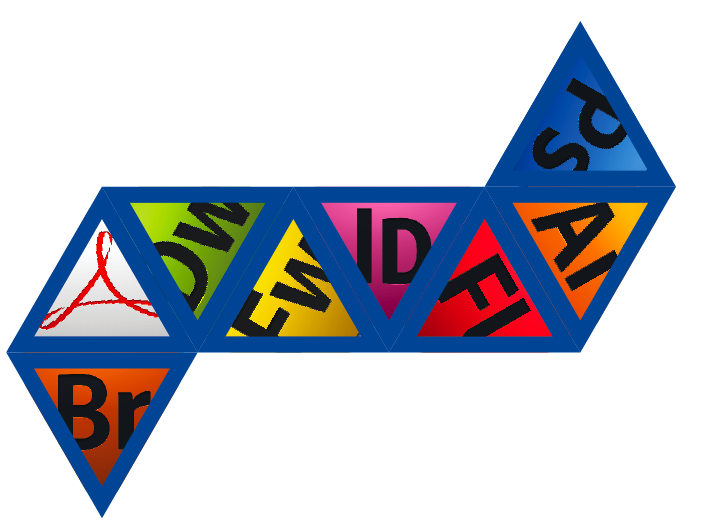
Repeat for the other three flipped triangles. OK, now we have the eight sides of our octahedron/ornament.

The next thing to do is fill them with colors or photos. If you place photos, you will have to rotate them so the tops and bottoms all match up when you fold the ornament together. Here’s a little cheat sheet for the rotation angles.

Make yourself an InDesign Secrets ornament.

Or a Creative Suite ornament.
The last thing to do is make tabs that you can use to tape or glue the shape together. You could just leave some extra paper all around the net when you cut it out. Or you could try something like this: Select the whole net, group it, and apply a drop shadow. Give it a Distance of 0, a spread of 100, and make it big enough to glue or tape.


Now the crafty part: print the net, and cut it out. Fold along the edges of the triangles and tabs, then glue or tape it together. It also helps to snip off the pointy ends of the tabs. If you need help figuring out how to close up the net, play with the octahedron animation here. Last, thread a hook or some string through the top and voila, eight sides of geek holiday fun.

Try some other shapes too. Just don’t attempt the dodecahedron after too many eggnogs.
Happy Holidays!
How odd? I was on a forum the other day and someone asked about Nets in InDesign? I didn’t understand the term “Nets”, never came across it, I presumed they meant die-formes? So then I looked up Nets and InDesign and didn’t come up with anything.
Although I’ve been creating “Nets” for a long-time, I’ve never known the “mathematical” term for them. Once I discovered what a Net was, I looked them up online and found this little dousy of a website for creating all sorts of “Nets” https://www.lifeisastoryproblem.org/explore/index_net.html
Pretty interesting stuff.
Thanks for sharing your tips on creating the “Nets”, Mike. Very good method and usage of Step and Repeat.
Hmmm… can’t seem to edit my post, that link, they are copyrighted and for educational use only. Well at least it might get people started? But you can google for Geometric Nets to yield a lot of results.
Thanks Eugene :)
That is a weird coincidence with the other forum. Hopefully that person finds their way here. Though I’ve had this idea kicking around in my head since the summer–you know how I can take a looong time to get around to some things.
Seriously cool!!! Thanks for the lesson Mike!
Oh, Mike, this could not have come at a more perfect moment. My wife and I were just trying to figure out what to do about getting some Chanukah Shrubbery, because all our ornaments are in deep storage during a remodel that is taking a couple of months longer than planned. Kids, get out your crayons, we’re makin’ ornaments!
But my favorite part was when you said, “you remember David?s post [about equalateral triangles]” — I had no memory at all of writing that! Talk about eggnog-intake… whew… :)
Mike, I will post a link from the other forum to here, which I’ll do shortly. It’d be cool if people posted their “nets” in the forums :)
I made hats for some friends for a soccer final, printed out on A3, they were ill fitting to say the leasts, but I attached some elasticated string and they stayed on, pretty much. They worked so well and people loved them so much that I’ve been asked many times create hats for different sporting events.
Now I have a new range of products to delight them with.
I used to do a monthly email in work of Cut-Out-And-Keep things for people. It was crazy to see people putting together cut-out-and-keep dice, and the spots were provided separately. Fun for all the office.
David-
That just confirms that you’ve forgotten more about InDesign than most of us will ever know ;)
Check this site out – way cool.
Wonder if any of the good interactive folding experts out there could come out with a plugin or script like this !!!
https://www.mathsnet.net/geometry/solid/nets.html
Thanks for the information.
It will sooth my brain cells as I
begin to learn CS4.
I had CS2 and am really excited
to get the ‘kinks’ out of my way.
This is a excellent time for me to help
my brain cells grow to new heights.
I may be getting old, but I’m not
stopping the learning process.
If you want a quick way of making an equilateral traingle to start of f with, just draw a rectangle 35mm x 30mm (or 3″ by 3.5″ if you prefer), then use the Convert Shape to Triangle option. It’s as near as you’ll need it, without doing complex calcualtions to several decimal points! Then you can resize it to suit your project.
It’s nice, man. I just found your site, but I’m sure that it will be the one that I can get a lot of Ideas
Great tutorial, very easy to follow instructions, thanks for posting it.
This pyramid ornament is very similar to one my grandmother made for me as a child. My family loved ornaments so much that we kept a perpetual list of where we got each ornament, the year we got it, and a description. It was our fun (and apparently strange) family tradition of Christmas documentation. https://documentgeek.blogspot.com/2014/12/christmas-and-love-of-documentation.html.