

How to Export Basic HTML, Part 2: Images


In a previous post, How to Export Basic HTML Out of CS2, I provided a step-by-step method for exporting the stories in your layouts to HTML from within InDesign CS2 or CS3, basic formatting intact, using a little XML Tags trickery.
(Although CS3 has a dedicated File > Export > XHTML feature, you can’t get the same basic HTML mark-up that this XML-ly method produces, the mark-up that I believe most web developers need — see the extensive comments to the above post for details. If in doubt, try both methods and show them to your web team; see which they prefer. I could be wrong!)
In the first article I mentioned that it was possible to include your layout’s images in the exported HTML, but “they require just enough extra work that I’ll leave that to another post.”
And so here we are. I’ll assume you’ve followed the previous steps and have already styled and tagged all the text content in your layout that you want to export, and now you’re wondering how to get the images to go along for the ride.
First: Are You Sure You Want To?
If the quality of the images in the final HTML file is important to you, don’t even bother exporting them to HTML (XML) from InDesign. Instead, open up the originals in Photoshop or Illustrator, crop and scale them to match the layout, then use either program’s Save for Web dialog box to export the best JPEGs and GIFs you can. Edit the HTML files with notes to the developers where each image should be inserted and get on with your life.
The problem is that while InDesign can automatically convert your linked images to GIF or JPEG during the export process, maintaining the same formatting as in the layout (cropping, transforms, and most transparency effects); you have no control over how it does the conversion. There’s no Save for Web step where you could compare previews of the same image with different conversion and compression methods applied, and choose the one that provides the smallest possible size with the highest level of quality.
Instead, all we’ve got is this, the Image section of the Export XML dialog box:

Note that what you choose here applies to every image that you’re about to include in the HTML export – you can’t specify which images should export as GIF and which should export as JPEG. Opting for the “Automatic” conversion (“I’ll let you decide, InDesign”) invariably exports everything as a JPEG unless it was a GIF to begin with. Even a solid, single-color rectangle AI or PSD file is exported as a JPEG. (Usually, flat-color images, such as logos, get the best results when exported as GIFs.)
If you don’t want “Automatic,” your other choices are GIF (all images converted to GIF) or JPEG (ditto). You do have some control over how the GIFs and JPEGs are created, but the same exact settings will be applied to all the images that you’re exporting, seldom the best choice.
On The Other Hand…
If the quality of the web images are not that critical, then go ahead and export them along with the text, as I’ll explain below. The results are not horrible, they’re just not the best. And exporting them is definitely faster than manually creating perfect GIFs and JPEGs, one by one.
This is especially true if you’ve done a fair amount of transforming the images in the layout. InDesign will faithfully reproduce the scaling and cropping you did in the layout in its converted images, potentially saving you hours of work. Even feathering is maintained, though as far as other transparency effects are concerned, I noticed that CS3 does a better job of handling drop shadows than CS2. (If you don’t want these effects to appear on the web, remove them before you export.)
One thing you don’t have to worry about is changing the Display Resolution. InDesign uses the high-res original file to create the JPEGs and GIFs it produces.
Let’s Get To It
InDesign can map your layout’s paragraph and character styles to HTML tags, which I covered in the previous article. As soon as you apply a tag to content (which the Tag palette menu’s Map Styles to Tags command does automatically when you click OK), that content appears in the Structure pane and is ready to be exported.
Here’s an example. Shown below is the inside spread of a 3-panel brochure (one of the free InDesign templates that comes with the Creative Suite) which has already gone through the Map Styles to Tags process. It looks a little weird because I’ve chosen View > Structure > Show Tagged Frames, so the tagged frames have a non-printing color overlay and border, to help me distinguish them from the non-tagged frames (the images and the big Lorem Ipsum frame) in the layout:
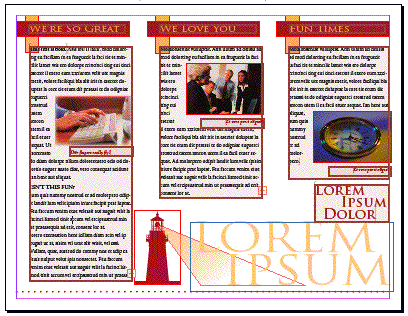
The story on the left has a headline (“We’re So Great”) in a frame, and the frame underneath has a few paragraphs of text that run around a picture of hands on a keyboard. Here’s the structure panel at this point, showing some of the tagged content from that story:

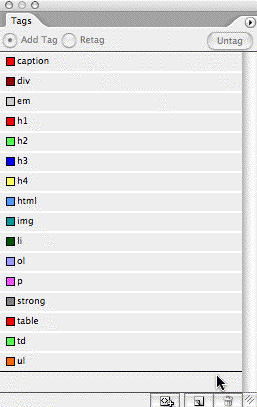
Automatic tagging doesn’t work with images. Instead, after you map styles to tags (not before! otherwise manually-applied tags get removed), tag the images manually. Use your Selection tool to select one or more images on a spread, then in the Tags palette (mine is shown below, the “img” tag is in the middle of the list) click once on “img.” Do this for every image you want to export.
As soon as you tag an image with the “img” tag, it gets added to your Structure pane at the bottom of the list of tagged content. As I explained in the previous article, the Structure panel doesn’t show content divs (frames) in the order of their appearance in the layout initially; so you usually have to do some dragging-and-dropping of the entries in the pane to get the order you want.
The same is true for images, so I just dragged the “img” entry from the bottom of the list into to the first story (the “div”) at the top. I dropped it right below the paragraph (the “p”) in the story that it belonged to.
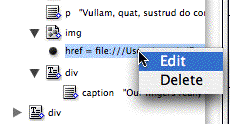
But the main problem with images in the Structure pane is that the attribute InDesign adds –the code that references the external artwork — is meant for XML, not HTML. So for each image you tag, you need to right-click on its attribute in the Structure pane and choose Edit:
That opens the Edit Attribute dialog box, which has two fields: Name and Value. Here’s how it looks for this particular image, “11002000962.tif”:
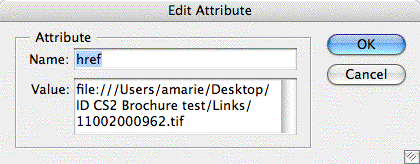
Modifying the Attribute Name area is easy, just delete “href” and replace it with “src” (no quotes). The Value field, though, needs major tweaking — it’s the part that tells the HTML file the name of the JPEG or GIF InDesign will create, and where it’s located — its “path” — in relation to the HTML file.
First, clear out the old path. In the Attribute Value field, delete everything except the original image filename, which you’ll see at the end of the text string.
Then, enter the correct path. In front of the filename, add “images/” (no quotes). This is the folder name that InDesign CS2 automatically creates on export when you export to XML errr HTML. It puts the “images” folder in the same folder as the source .indd file, and saves auto-exported JPEGs and GIFs to it. As long as you also save your HTML file into the same folder, at the same level as the .indd file — don’t save it to the Desktop — it will be able to find the images.
Finally, modify the image filename itself, so that it ends with “_fmt.jpg” instead of “.tiff” or “.psd” or whatever. Remember, InDesign invariably exports images as JPEGs. It adds “_fmt” to the filename when you tell it to export “formatted” images — ones that match the scale and crop in the layout– which is you’ll likely want to do.
Here’s the Edit Attribute dialog box after making these changes:
So after you’ve tagged all your images with “img,” moved them into the right stories in the Structure pane, and edited their attributes, then you should be good to go.
The Final Result
Now you can proceed with selecting an element(s) in the Structure pane and exporting it to HTML by choosing Export to XML. I won’t go through the details of that process (simple, but a couple tweaks are necessary) since I covered that in the previous article. Remember to change the extension from .xml to .html and save it in the right folder.
Otherwise, the main thing is to click on the Images panel of the Export XML dialog box, and be sure to choose “Optimized Formatted Images.” Here’s a close-up of that dialog box (same one that I introduced at the beginning of this):

And here’s the web page that resulted when I exported just the left-hand panel of the brochure — note how it retains the bold and italic characters, and even the feathering applied to the image:
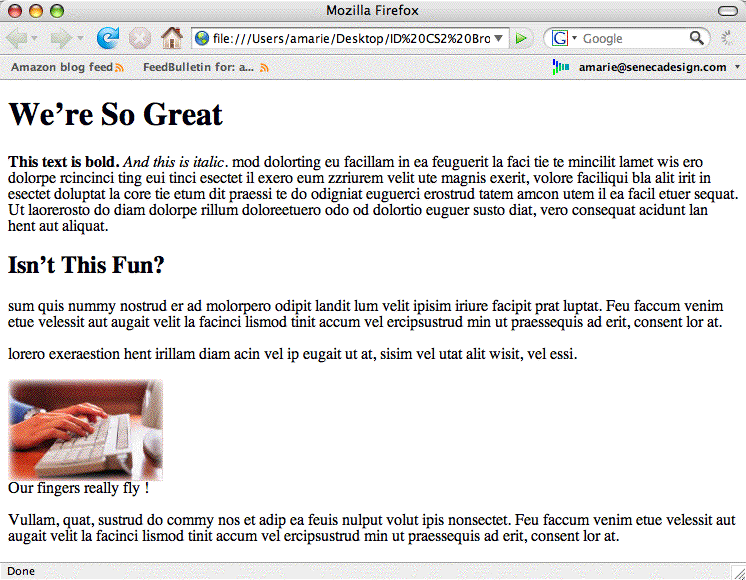
Obviously, the web page looks nothing like the InDesign layout page, but that’s sort of the point of this method. Your web team likely has styles set up for your site already, and given this HTML file, should be able to easily integrate their CSS to the basic mark-up you’ve provided.
By the way, none of this is necessary — the image tagging, the attribute editing — if you use CS3’s File > Export to XHTML feature. It exports all the selected images and text at once, and gets all the image links right, because it knows it’s supposed to create attributes for a web site, not XML.
If only it got the HTML right! Sigh.
I still can’t get the first part of this to work, let alone the images… hmmmmmm… back to school methinks.
hello. i’ve done these steps and now all i have for where the photos should go is a ? mark box!! help if you can!
thank you.
Sade, the question mark in the HTML means it can’t find the picture — the path to it and/or the image’s filename is incorrect. Check your attribute settings (the Name/Value pair) in InDesign for the missing images to make sur they match the location and name of the images that InDesign exported to GIF or JPEG. Choosing View > Source in your browser might give you a clue to what’s going on … it will tell you the path and filename of where it *thinks* the images should be.
Cracking stuff! :)
hello – i need to take a print publication to the web – while i can run photoshop actions and reduce the ppi’s, the problem is the ‘effective ppi’: e.g. the size of the graphic in the layout, if smaller than the images size say 300 ppi has an effective size of say 600 ppi. resampling the image to 72 ppi still leaves the effective ppi at 144 in this case.
is there a way or a script to base resampling on the size it is in the publication, so the effective ppi’s can be say at … 72 ppi?
thanks
Chris, first off, I assume there’s a reason you don’t want to just let InDesign do that for you? If all you want are 72 ppi versions of a layout’s images at their current InDesign scale, choose File > Export> XHTML. In the resulting folder, grab all the GIFs or JPEGs and toss out the rest.
Of course you have little control over the optimization that way, but just wanted to mention it.
I don’t know of a script, but Zevrix’s Link Optimizer or Link Optimizer Light plug-ins will do the job for you.
Great articles! I’m actually using the CS3 xhtml export with the classes – I’d like to use IDs instead, but I don’t see a way to do that in InDesign – is there a way? (I’m the print and web guy) I don’t want to have to attach IDs after the conversion – I want the converted file to just pick up the styles from the sheet I’ve already created and be done. I am trying to create a template – we create pest alerts for agriculture, and new ones come along regularly – I want it to be easy for anyone to come in and easily create a new alert – add content, attach styles, export and be done. The less post conversion adjustments, the better. Is there a better way to go about this?
Also, I’m having an issue where if I have images that fall in between linked text boxes, they get pushed all the way to the bottom of the document. If I cut the portion of text below the image and start a new text box, it works, but then the text won’t flow properly if content is added to the top section.
Any help or advice would be greatly appreciated. Oh and I’m using CS3.
Scott, I would love to see an example of your XHTML exports on the web, do you have an example URL of one? You’re the first person I’ve heard of who is using the XTHML output from ID complete with classes for actual web pages. (I know there must be more but you’re the first one I’ve encountered.)
Re attaching IDs, I don’t think there’s a way to do that via XHTML, though I think the XML way described above would let you do that.
AM
(last post says still awaiting moderation from a week ago, so trying to post again)
Hi Anne-Marie,
Here?s the xhtml export (with the figures bumped to the bottom): https://www.fl-dpi.com/temp/pest_alert_test/template5.html (I tweaked the stylesheet it made) The whole page needs to end up fitting into a department-mandated template (so I need IDs or spans in the code because the tags are already set) here?s what it should eventually look like: https://www.doacs.state.fl.us/pi/enpp/ento/r.indica.html If you can tell me how to attach IDs to elements, that would be awesome! – the span code in this is clearly weak, but I don?t see another option. (plus if an administrative assistant needs to create an alert, it?d be easy for them to select preset styles in InDesign)
Scott, thanks for those. Still not understanding where you want the IDs to go. In the final version I don’t see any IDs in the text, just em, strong, and p’s (besides the table) and it looks fine.
Usually the web page template would have the IDs already set, no? They just drop the XHTML output into a placholder?
AM
Hi Anne Marie,
My apologies for the confusion – The “final” version I sent is something that already exists. I’m using that page’s subject matter as a guinnea pig for my new template. I was just showing what my InDesign output would eventually have to fit into.
I just don’t like the idea of using span classes to do what I need, but not sure ID’s will even work in this case.
My main issue is really the images getting bumped to the bottom of the page in the xhtml export. If I have images in between linked text boxes, or with a text wrap, they appear at the bottom in the xhtml. if I break the link, and cut and paste the overflow text into a new text box, it works correctly, but that would cause problems later on if new text needs to be added.
Have you encountered this/know how I might get it to export correctly without having to break the overflow link?
Thanks again for your help with this!!!
Scott
how to come html