How to Put a Stroke Around a Group of Objects in InDesign
S.W. wrote:
When I group objects together, it is usually to create one visual image (diagrams, for example). I would like to add a stroke to the group’s bounding box, not all the individual frames within the group. I can text-wrap that group’s bounding box, why not a single key line?
You bring up a great point: When you group two or more objects together, they act like a single object in most ways. You can run text wrap around the group; you can anchor the group as a single inline or anchored object; you can even apply transparency effects to the group as a whole. (Though there are some gotchas here.) But you cannot fill or stroke the group itself!
There are, however, two solutions — though both will take an additional step or two.
First, after you have grouped your objects together, you need to draw a new frame. (This frame should not be in the group.) You can use any kind of frame (text frame, graphic frame, or unassigned frame). Then, depending on what kind of frame you have, you do one of the following:
- If it’s a graphic or unassigned frame, then: Select the group with the black arrow Selection tool, cut it (Cmd/Ctrl-X), then select the new frame and choose Edit > Paste Into.
- If it’s a text frame, then: Select the group with the Selection tool. If you’re using CS5.5 or later, then hold down the Shift key and drag the little anchored object blue box (in the upper left corner of the group) into the text frame. That makes it an inline object. If you’re using CS5 or earlier, you can do the same thing by cutting the group to the clipboard, then double-clicking inside the text frame (which switches to the Type tool) and then pasting.

If the frame isn’t big enough, or it’s too big, then select it (the outer frame) and choose Object > Fitting > Fit Frame to Content to make it fit the bounding box of the group exactly. Now you can fill or stroke your frame!

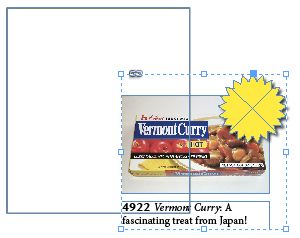
Although the text frame approach is a little unorthodox, one of the reasons I like it is that you can easily set the text insets (in Object > Text Frame Options) to control how far the edge should be from the edge of the group. For example, in the image above, I set the Insets to 9 pt, then chose Fit Frame to Content — the edge immediately updates to exactly 9 points from the bounding box.


David
You have forgotten to add that if the group is pasted within an InDesign CS6 text frame with autoresizing enabled (Text Frame Options ~ Cmd/Ctrl-B), the frame resizes automatically whatever you do to the group.
Great post. I’ve been using InDesign for ages but hadn’t thought of cutting a group and pasting it or anchoring it in a frame. I’d just been grouping it with the frame. This is much better! Thanks!
We’ve been using this technique for over a year now with great success (It worked well in CS5 and CS6 is even better.) The greatest benefit to us (we produce long books) is that the frame containing the group can be anchored to text, and when text revisions precede the graphic the graphic will move predictably with the text. It behaves as a single graphic element, which is convenient.
Great tip guys.
One thing I’ve been doing with complex shapes that have their own clipping path is:
– Duplicate the group of objects
– Select each object individually and go to Object > Clipping Path > Convert Frame To Clipping Path
– With the Direct Selection tool active, click each of the images within their respective frames and delete. Leaving only the remaining frames which are now paths.
– Select all of the frames and go to Object > Pathfinder > Add to combine the shapes together
– Add a stroke to the shape, reposition around your existing image arrangement and enjoy.
You can even copy that path into illustrator and use the ‘Offset Path’ function to create a space between the images and the stroke. Just copy and paste the path back into InDesign when you’re done.
Don’t bother,
add an inner shadow effect (normal blen. 100% op. 0%dist. 100% chock)
set color and size –
and you’r there!