

InDesign Basics: Working With Bleeds in InDesign

This is part of a series of articles for new InDesign users, highlighting basic information and techniques. We all had to start somewhere, so why not start right here?
InDesign is a product that has evolved considerably since its inception more than two decades ago. InDesign is now a product that can produce content for many different output formats, including PDF, EPUB, HTML, XML, and even mobile apps. With all of these modern digital formats, we sometimes forget that InDesign is still used heavily for print output. So when you mention the term bleed, it’s not uncommon to receive a glazed stare looking back at you.
What is Bleed?
Bleed is a term that comes into play only when you’re designing content intended for print output. It is neither needed nor desired for output to any format other than print. Bleed refers to a printing solution where elements on a page are designed to extend past the edge of a piece of paper. This is required solely because the physical printing process as a whole is not perfect and has inherent limitations.
Why Bleed?
Why would you need to include bleed in your InDesign project? Let’s start with the fundamental problem. A printing press is incapable of printing ink to the edge of a piece of paper. Well, technically it can. However, the end result would be similar to applying masking tape to the corner of a room before you paint: Often, the paint creeps under the masking tape, creating an undesirable look. The same would happen if you printed to the edge of a piece of paper on a printing press: The ink would build up on the edge producing globs of ink on the paper. Even modern digital presses, as well as desktop printers, have this limitation. If you’ve ever designed a product with elements extending to the edge of the paper, you’ll know that when you print your project to a desktop printer, you end up with a white margin around the page because the desktop printer is incapable of printing to the edge of the paper. Now, I’m well aware that there are some desktop printer models on the market that allow you to print all the way to the edge of the paper, but by and large, you won’t come across these models very often.
The Solution
To avoid the inherent limitations of the printing devices that we use (whether it be a press, digital press, copier, or printer), we need to print our jobs that extend to the edge of the page on a larger than necessary piece of paper and then trim the paper after the fact to produce the desired result. Now, it’s not enough to simply make sure that our elements extend to the edge of the intended page size (or trim size) because you need to account for another limitation of the printing process. That limitation is the dimensional stability of the paper or substrate that we are printing on. You see, paper is incredibly susceptible to dimensional changes from humidity in the air. This means that the paper or substrate can grow or shrink throughout the printing process. So if the ink only extends to the edge of the trim size, dimensional changes in the paper could cause a white edge to be revealed after the product is trimmed.

When a job is trimmed, dimensional changes in the paper could result in slivers of white appearing along the edge of a project. A black border has been added around the design for illustration purposes.
So the correct solution is to extend the design elements beyond the trim size to account for dimensional changes in the substrate in order to produce a desirable finished product. This extension of design elements is referred to as bleed.
Programs such as InDesign and Illustrator allow you to define the amount of bleed added to a project. Standard bleed size in the printing industry is 1/8″ (.125″) but some projects may require more, so be sure to ask your printer ahead of time when designing your project. With bleed added to a project, it is possible to account for adjustments in paper or substrate changes during the trimming process.
Adding Bleed to a File
In InDesign, it’s easy to add bleed to a project. In the New Document dialog box, simply enter a value for the bleed of the file in the Bleed and Slug section. Or, if the file is already created, you can choose File > Document Setup and enter the bleed value there.

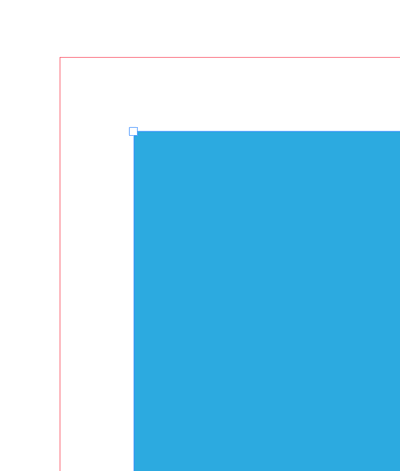
With the bleed added, you’ll notice a new red guide appear around the outer edge of your document. This guide is a reference point for where your design elements should extend in order to provide sufficient bleed in the printing process. This way, when the project is printed and trimmed, it will appear as expected.
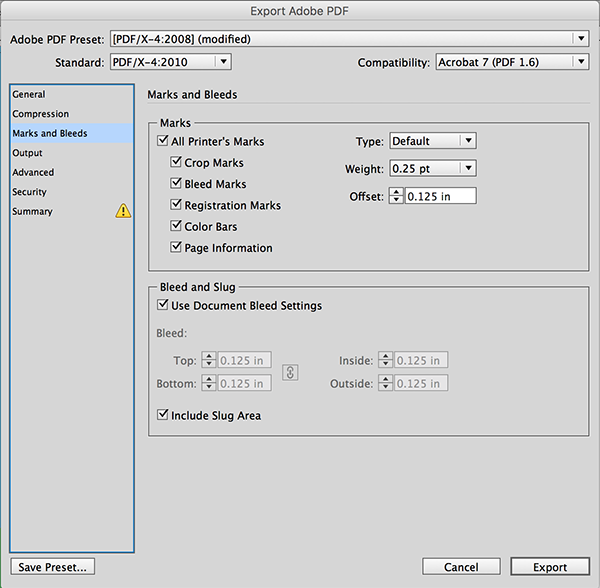
When a project with bleed is printed on paper, you’ll want to include bleed and trim marks as a reference for when the project needs to be trimmed. These marks are available in the Export dialog box when exporting to a Print PDF, as well as in the Print dialog box when printing. In the Marks and Bleeds section of the Print or PDF Export dialog box, you can choose marks to add (I usually include all marks) and how much bleed to include. You’ll typically choose the “Use Document Bleed Settings” option. In the figures below, you’ll see the settings chosen in the Print or Export dialog box as well as the resulting output file.

A Final Word on Bleed
Visually, bleed adds a refined and polished look to a project, but it does come at a price. When you create a project that includes bleed, expect the cost of the printed product to be higher than if the project didn’t involve bleed. This is because more paper, ink, and labor is required to produce that product. That being said, the end result is often well worth it!
Chad, as you mentioned, there are limitations in the trimming process as well as the printing process. Having bleed is great, but designers (amateurs using Publisher and Word come to mind) also have to keep in mind that there is enough variation in all these processes (paper dimensions, printing processes, paper skew – many digital printers have this problem, and trimming issues. Designing a bleed project requires keeping in mind the edge of the final piece as well. Designing to within 1/16″ of the edge of the trim, even with bleed, is not helpful to producing the best final product.
I deal with nametags. A lot. These are typically 3″x 4″ or less. This also applies to business cards. A design that puts text or important graphics less than 1/8″ of the trimmed edge is asking for trouble, not only from a production standpoint, but an aesthetic one also. Visually, it is hard to read something that close to the edge. And adding a rectangular border is almost asking for trouble. Sure, that helps with aligning the graphic, but there is enough “drift” in a stack of cards/nametags, that production issues arise.
Print shops that are trying to accommodate the fast turnaround of the digital printing age necessarily are using less sophisticated equipment than the presses of old. These machines have lower tolerances for such things as paper drift, skew, color matching, and even color drift. That doesn’t mean they are less accepting of poor quality, just that there is a cost to having press-like results from a laser printer.
Most of the time this is not a big deal, as turnaround and lowered cost is more important than perfect consistency is to the end client than it might be to the designer. In summary, the designer should use the negative space at the borders as part of the design, and expect that there will be some drift in the final product.
Great article Chad.
I appreciate you pointing out that you should check with your printer regarding the bleed amount. We often get PDFs not built to final trim size and have to reduce them slightly. If there is only an 1/8 inch before reduction we are short bleed. Of course building your file to final trim would eliminate that, but that’s another article.
Nice article. I personally don’t include all document marks when exporting. Much of the magazines I work with don’t love them at all…:) Even some print houses don’t want them. I think just to add bleed is enough.
Darin: I agree. It’s important to ask the printer. See Claudia’s article on the “new rules for printing” here: https://creativepro.com/new-rules-printing.php
Don’t assume if you give the printer a standard size that you’ll avoid cutting charges. At our shop, 8.5×11 files will be printed 2-up on 13×19, so it doesn’t matter price-wise if you have bleed or not. Also, we prefer to have bleed, no crop marks. The PDF creates a bounding box that determines where crop marks are in our files/plates.
That’s a great example Colleen, and exactly why I suggested that readers contact their printer before sending the files. Each printer will have certain requirements that are unique to that printer. There are so many variables that come into play.