Making a Process Color Mixed Ink Group
InDesign makes it easy to make a systematic grouping of color swatches — called a Mixed Ink Group — out of two or more process and spot colors. For example, 10% spot + 10% black, then 30% spot + 10% black, then 50% spot + 10% black, and so on. Unfortunately, Mixed Ink Groups must always include one spot color. But what if you want a group of swatches based on process colors instead?
Fortunately, there’s always a workaround. Let’s say you just want various process-color green swatches, made of different percentages of cyan and yellow inks.
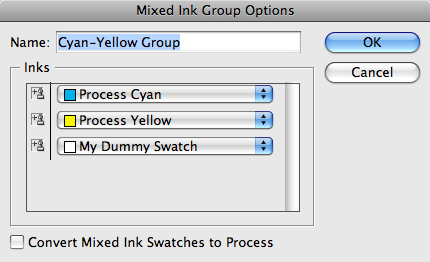
First, you need to make a “dummy spot color swatch” — just a white-colored spot color. Then, choose New Mixed Ink Group from the Swatches panel menu. Turn on the “checkboxes” next to the inks you want (in this case, cyan, yellow, and the dummy spot color) and then fill out the beginning values, repeats, and increments. Leave both the Initial and Repeat fields for the spot color set to 0 (zero). Always remember to click Preview Swatches before clicking OK to make sure you’re not accidentally generating a thousand swatches or something.

Then, after clicking OK, you will see all the mixed ink swatches listed in the Swatches panel, under a “master” swatch. The swatch naming isn’t very useful, but if you hover the cursor over one of these, a tooltip displays the ink makeup.

Of course, each swatch here includes zero-percent of the spot color. This is fine except that when you print, you will get an extra blank plate for the spot color. There are two ways to avoid this. First, you can double-click on the group (master) swatch to open the Mixed Ink Group Options dialog box, then select the Convert Mixed Ink Swatches to Process checkbox. When you click OK, InDesign will converts all the swatches to normal process-color color swatches.

Works great, but you lose the option of adjusting your group ink colors later. That is, what if you decide you’d rather have this be Cyan and Magenta instead? You’d lose the option of switching colors.
So instead: Choose Ink Manager from the Swatches panel and click on the “checkbox” next to the Dummy ink — that converts it to a process color upon export or print, so you don’t have to worry about a separate plate.

Now, if we could only talk Adobe into making those mixed ink group swatches named something descriptive…


Very clever tip! Cool!
Awesome tip.
One related thing I’ve done is to make shades of a color with mixed ink groups. You take a process swatch, open Swatch Options and temporarily make it a spot color. Then make the mixed ink group with 100% of the temporary spot color and increasing amounts of black. Then just change the original swatch back to process and all the shades become process as well.
They’re still named poorly, like you say. But you can fix this in a jiffy. Select them all by shift clicking, then control click and choose Swatch Options. Name with Color Value.
Come to think of it, you could do that for any temporary mixed ink group. Shift-select all the swatches in the group, control-click to Swatch Options, then choose convert to Process and Name with Color Value.
If you already have a spot colour in the document, couldn’t you just use that as a 0% colour in the mixed ink group instead of adding a fake colour? If it’s at 0% it shouldn’t matter which colour you’re using, right?
@Roland: Yes, any spot color would work, but I like making it explicit. It’s always good to think about what would happen if you gave your document to someone else to work on — would they understand?
Whenever I name something like that I usually go even further and just call it “don’t print this color”
Would really like to know a trick to map a process colour to a spot colour (i.e. Map a client supplied pdf placed in Indesign that uses process Black, but I would like to output it as a Spot named “Imprint Black”). Is their a way to Map the 4 process colours to Spot colours???
Thanks
Hi
I was wondering if any body has an answer to Jeff Preboy ‘s question regarding mapping process to spot colors? as I to am in need of this function.
At the moment I am using ID CS4
Cheers
Kev
Kevin, you can’t do that in the interface, and if you try through a backdoor (= per script) it tells you that ID “cannot alias a process ink”.
thanks Jongware, I did want to try and script this using apple script, but obviously this will fail also.
Any ideas if this is now possible with ID CS5?
kev
I have InDesign CS6 and those options are grayed out in my swatches panel. Is there was way to activate them?
Never mind. I got it.
If you’re working with several mixed ink groups, like seven, there should be option like with layers, where you can put mixed those multiple mixed ink swatches into groups/or folders.