Making Text and Lines Sit at a Diagonal
It’s easy to rotate a text frame so that your text sits at a diagonal. However, it’s not obvious how to make flow on an angle, but have the left edges of the text line up horizontally, like this:

There are, of course, several ways to achieve this (there is almost aways more than one way to do something in InDesign). One method is to use anchored text frames. But here’s another, relatively straightforward technique that lets you pull off this effect quickly.
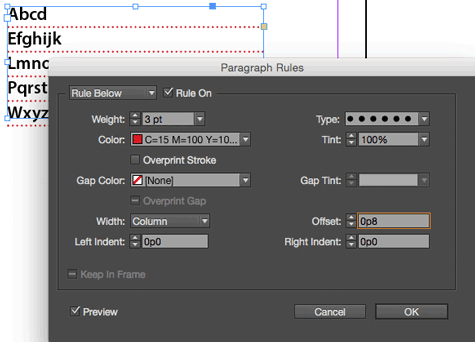
First, set up the text the way you want it. In this case, I’ve used Leading to space the text out, but you could use Space Before/After instead. Here, I’m adding a Rule Below to all the paragraphs:

Once you get the text more or less the way you want it, select the frame with the Selection tool and then switch to the Direct Selection tool (press A). When you switch from the Selection to the Direct Selection tool, InDesign selects all the points on the path for you. Now change the Skew field in the Control panel to a negative number, like -30°:

Then switch back to the Selection tool (press V) to select the object as a whole, and change the rotation of the object. The rotation angle should be 90 plus the shear angle. In other words, if you typed -30 for the shear, you add 90 and -30 to get 60. (Adding a negative number is the same as subtracting. So just think 90 – 30 = 60.)

Another example: If you typed -45 for the shear, you’d use 45 for the rotation. If you typed -80 for the shear, you’d type 10 for the rotation.
Anyway, look what happens when you do that:

Perfect! Except maybe those lines are too long. Unfortunately, it’s a pain to change the width of the text frame once you’ve skewed and rotated it. But it’s not too bad. The trick is to select the top two points on the path with the Direct Selection tool, and then double-click the Direct Selection tool in the Tools panel. That brings up the Move dialog box:

Set the Angle to the rotation angle you used above, and change the Distance field to adjust the width. In the image above, I’m making the frame 9 picas narrower.
This is one of those tricks that sounds insanely complex, but if you just follow the steps it doesn’t take long at all. And, of course, once you have made one of these frames, it’s easy to duplicate it and edit the text later.


Thanks for posting this…I use angled text for the top of a table at least a couple of times a year, and I have never been successful at matching the angle of the line with the angle of the text. This trick will be SO helpful.
SO much better than using individual text frames!!! THANKS!
Great! I don’t use angled text often, but when I do I’ve always used individual text boxes and locked guides to try and line it up properly. (such a pain). This makes me want to purposely incorporate angled text in a project so I can try this out!
Hi,
I just entered this great post!
I have another question, when i place text in diagonal, the letters “dance”, I found a solution by using illustrator and importing a pdf, do you have another idea?
Thanks!