

Mirroring Vertical Ruler Guides

The layout I most commonly use is one for facing pages, where the settings on the left-hand page are mirrored on the right (or you could consider the right-hand page mirrored on the left).
It’s easy to set the body text area to be mirrored. I just set the Inside margins to where I want them to be positioned on the master page.
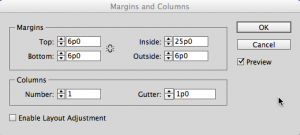
The inside margins set in the Margins and Columns dialog box

The mirrored inside margins on the master page
However, mirroring guides takes a little extra work. I first set all the ruler guides on the left-hand page. This usually involves a lot of numbers in the X and Y coordinates to position the guides precisely where I want them to be. For instance, if I want a guide exactly 2 points away from another, I copy the guide, paste in place, and then set the X coordinate for + or – p2. This can result in a rather complicated (but precise) page.

The guides on the left-hand page are in position, but need to be mirrored on the right-hand page.
The horizontal guides are spread guides — they go across the whole spread, and the pasteboard — so I don’t need to worry about mirroring them. In order to mirror the vertical guides, there are three things you need to know:
- Guides can be selected with the Selection tool as long as no objects are also in the selection area. If that happens, the objects will be selected, but not the guides. (You can also select all the guides on the whole spread by pressing Command-Option-G or Ctrl+Alt+G.)
- Any of the Transform commands are available for objects, but only the Transform > Move command is available for guides.
- The Transform Again command can be applied to any object or guide.
The next thing I need to do is store a transformation in InDesign’s short-term memory. What I do is create an object on the page and set its transformation point to be the right side of the object (in either the Control panel or the Transform panel).
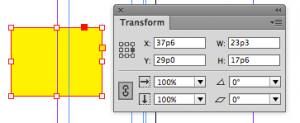
With the object selected, I set its transformation proxy to the right side.
With the object selected, I then choose Flip Horizontal from the Transform panel menu (or press the Flip Horizontal button in the Control panel, or choose Object > Flip Horizontal). The object is now a mirror-image of itself. The transformation for Flip Vertical using the right-hand edge as an anchor is now in InDesign’s memory for transformations. This is different from the clipboard.

The object after the Flip Horizontal command has been applied. I can tell it’s been flipped because the corner and achored object controls are reversed on the frame.
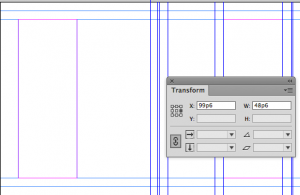
Once I’ve got that transformation memorized, I place a guide on the spine of the spread. This provides the correct right-hand edge for the guides I’m going to flip. If I select just the vertical guides on the page.If you’re wondering why not just choose Flip Horizontal with the guides selected: I can’t. Those menu commands aren’t available for selected guides.
I select only the vertical guides because if I try to flip the horizontal spread guides across the spread, InDesign will yell at me that the action would cause some objects to extend off the pasteboard. (Or, if they’re just horizontal page guides, it unfortunately does nothing.)
Now that the guides are selected, I copy them to the clipboard. What’s neat about this is the transformation is in one part of InDesign’s memory while the copied guides are in another.
I then choose Object > Transform Again > Transform Again. This flips the guides over to the right-hand master.
The Transform Again command remembers the command to Flip Horizontal and the guides are now on the other side of the master spread
I now need the guides on the left-hand page. I choose Edit > Paste in Place and the original guides appear on the left-hand page.
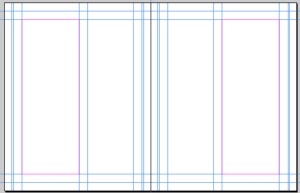
The master spread with guides mirrored on each side of the spine
If all you’ve got are one or two guides on each side, you can mirror them manually. But with complicated layouts, this technique works much faster. And once you’ve “primed the pump” with the Flip Horizontal transformation, you can move from one master to another and apply it to other guides.
In all honesty – mirroring guides should be an option in InDesign. It’s embarrassing it’s not.
I love the use of Transform Again in this context… never thought of that!
Thanks David. I’m always psyched when I can think of something you didn’t.
There really should be a command to mirror guides as well as objects. And then with alignments that recognize the spine of a master, it would be very easy to make facing pages mirror each other.
Hi Sandee, great post :) I think, you can save some steps here!
First, there is no need to copy and paste guides. Simply select a guide and enter e.g. + or -2Pt in the x-field and press alt-return.
To mirror the guides:
1. Create your rectangle and set its refPoint to spine, by pressing R for the Rotate-tool and drag the refPoint to the spine.
2. With the object selected, press the Flip Horizontal button with alt-click.
You get now a mirrored copy around the spine and InDesigns memory save the copy and the transformation!
3. Select your guides and choose Object > Transform again > Transform sequence again
Note:
If you drag page guides instead of spread guides for the horizontal guides, you can save additional steps.
1. Create the rectangle and flip a copy around the right edge by pressing Flip Horizontal with alt-Click
2. Select all guides by pressing cmd+alt+G and choose Object > Transform > Transform sequence again
In this case horizontal guides are not copied to the right side, but because they were selected first, the position in the spine is honored! No guide in the spine or moved refPoint is needed.
This is all too complicated?
No problem: Use a script for mirroring guides! Hans Häsler, a swiss scripter wrote a script called “HilfslinienKopieren” > in englisch “copyGuides”. There is a free download available at http://www.fachhefte.ch > downloads > JavaScripts > Mac OS X deutsch > InDesign CS5 > “HilfslinienKopieren”. Here you can find also another great stuff from Hans.
Kai
Thank you for posting this again, Kai!
(Unfortunately, we lost many comments and forum posts due to a technical problem on Friday. Kai came back and wrote this up again!)
Thanks Kai and Sandy! I must say I struggled with Sandy’s tip (sorry, don’t know what I was doing wrong, but the guides were being moved all over the place but not mirroring the original) but then tried Kai’s tip and it worked the first time! I do a lot of document layouts and this brilliant trick will make my life MUCH easier :)
sorry for misspelling your name, Sandee, embarrassing..
The flip/rotate indicator (P) in the middle of the Control panel appears white with a black outline if an object is flipped. If the object is not flipped, the indicator is solid black.
Awesome trick, I love it ! However, I can get it to work in the CS6 version (including with horizontal guides) but not in the CS5 one… I don’t know why. Any idea ?