

Organizing Print Presets in InDesign


Lauren writes,
I love having Print Presets in InDesign so I don’t have to enter all the information every time I print.
The problem is, I have so many (and use most of them all the time) and there seems to be no way to put them in any order other than the order I created them in.
Do you have any idea what I’m babbling about, and do you know any solutions?
Yes, I know exactly what you’re babbling about. ;-) It’s aggravating not being able to drag and drop the Presets (in the File > Print Presets > Define dialog box) in the order that you prefer, such as alphabetically. This is true for all the presets, not just the Print ones — you should see the PDF Presets I have, its dropdown menu is almost as long as the list of palettes in the Window menu!
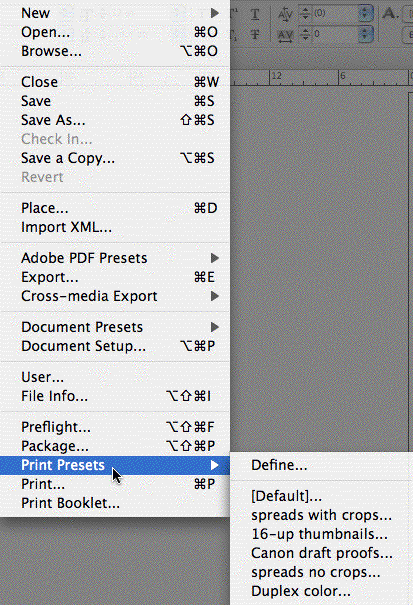
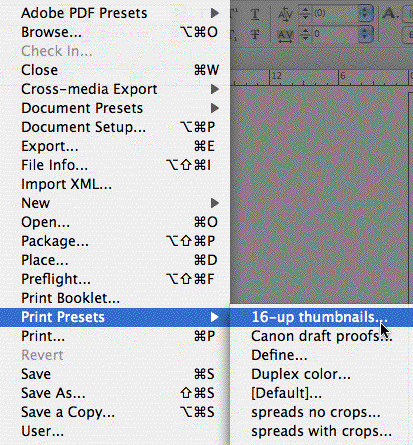
On-the-fly Workaround
One thing you can do — if you can remember to do this before you open the Print dialog box — is to use the super-secret keyboard shortcut for forcing InDesign menu items to appear in alphabetical order. Hold down Command+Option+Shift (Ctrl+Alt+Shift on Windows) and keep them held down while you open the File menu and then the Print Presets fly-out menu. As long as the keys are still pressed when you open the menu, its contents will be in alphabetical order too.
Here’s a before and after of my InDesign File > Print Presets menu to show how it looks normally (top image) and with the keys held down (bottom image):
This little trick works on all menus in all versions of InDesign, as far as I know. Just select the Print Preset you want from this list and the Print dialog box opens up with that preset active.
Unfortunately the trick doesn’t carry through to dropdown menus in dialog boxes, so you have to remember to do this instead of choosing File > Print (or pressing Command/Ctrl+P). Holding down the three keys while choosing the Presets dropdown menu in the Print dialog box has no effect on their order.
Using a Script to Set the Order of Print Presets
If you want a more permanent solution, download and install this script. When you run it, you’ll get a dialog box asking if you want to sort your print presets. Click Yes.
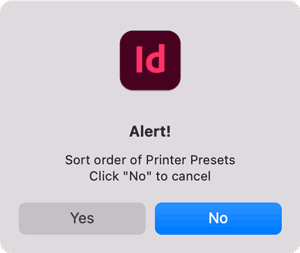
A second dialog gives you the option to sort your print presets in ascending or descending order.

That’s all there is to it!

Print Presets before sorting
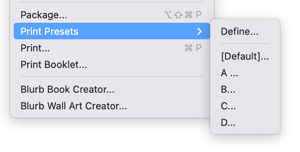
Print Presets sorted in alphabetical order
Very nice workaround Anne-Marie, including that ‘separator bar’ preset.
I’ve managed to keep mine organized as there are only three printers I have to worry about.
Mine are ordered thus:
HP 4MV Letter Portrait
HP 4MV Letter Landscape
HP 4MV Tabloid Spread
HP 8550 Letter Portrait
etc.
From the basics above, I can tweak the presets on demand for different effects. Such as adding printer marks, turning on or off spreads, etc.
It helps knowing, going into this preference, what printers are going to be used most often and in what layout.
-mt
Hi Anne-Marie,
Back in November, I posted a script here:
https://www.adobeforums.com/cgi-bin/webx?14@@.3bc19588/5
that will sort Printer presets. It won’t insert a separator though — nice trick. This script will work with both CS2 and CS3. Copy and paste it into a new ExtendScript Toolkit document and save it with a name of your choice in the appropriate folder (Scripts Panel for CS3, Scripts for CS2) and run it by double-clicking its name in the Scripts palette/panel.
Dave
Do you still have that script for alphabetizing print presets in InDesign? The link no longer works.
Here’s a different one that will accomplish the job. I just tested it and it still works. https://creativepro.com/downloads/sort_printerpresets.js.zip
Hi Anne-Marie,
Very nicely done, very nicely done indeed!
Finally, I see a good use for the “super-secret” shortcut. ¡Bravo!
Dave, I tried using the script with CS3, but it doesn’t work for me. Does the script need to be customized at all (ie: do I have to change anything?)
Well, I’m a goof. It works just fine.
But can you delete obsolete print presets?
Kass: Just choose File > Print Presets > Define, select the one you want to remove, and click Delete.
Thank you very much!!!
I’ve followed everything you’ve said here–my problem is much more basic. I have set default to print Composite RGB on my color printer–an HP 1220. In InDesign, even though I’ve set up printer output in Bridge, and even though I’ve made sure the “default” setting is set to Composite RGB, in InDesign CS3 when I pull up the print dialog, the preset pops up as Custom. I even named a preset “Custom,” hoping that that would do the trick, but no luck. A new “Custom” pops up at the head of the drop-down menu, and it’s set to Composite Grayscale. How can I get around this?
@David: I’m not sure what you mean by setting up printer output in Bridge. Are you trying to print from Bridge? Also, are you making your printer preset from the File > Printer Presets menu? Or just from within the Print dialog box. I much prefer setting up the Print dialog box just the way I want it, then clicking the Save Preset button.
David,
According to Adobe, if you want uniform printing results across CS3, you should set up print preferences in Bridge–not that you’re going to print from Bridge, but so that whether you’re working in Illustrator, PhotoShop, InDesign, or any of the other programs, you should have uniform printing results.
Oddly enough, InDesign seems to defy this setting: I have to select “default” every time I print. Instead of defaulting to “default,” InDesign defaults to “Custom,” the chief characteristic of which is that it prints in grayscale. I don’t get it!
I know this is an old post, but it’s still a pretty SWEET trick! Thanks so much for posting the “Permanent But Tedious” workaround. It only took me about 5 minutes to do, and I was able to sort my document presets by the most-used order, and group together pages, portions of pages (to be imposed), and envelope sizes.
Thankyou thankyou thankyou!!! This has been driving me mad for ages!
Instead of a separator I created a file called temp so I could use that between groups that may require a new setting in the future. For example, I have print presets for our restaurant, golf course, admin office, etc with multiple presets under each of these (since each has its own department code for billing).
Here’s a script that you can put in your InDesign scripts folder to sort Print Presets:
https://forums.adobe.com/thread/325291
I’ve tested it in InDesign CC 2019 and it still works fine.