

Polaroid Pix

I love the new user forums. Not only do I get to see what everyone looks like and learn from their experiences, but I also have a feeling I’ll never run out of stuff to write about. Yesterday, one person threw down the Polaroid challenge: how to make a placed picture look like it was an old Polaroid. Folks made some great suggestions, and now there’s even a Polaroid script we can use. Truly, the collective intelligence InDesignSecrets community is formidable.
The first option I thought of was to use an effect in combination with an object style for “instant” Polaroids. Since a picture’s worth a thousand words (or roughly 7.143 Tweets), I thought I’d illustrate my suggestion.
Start with a placed picture. It can be any dimensions, but it should be in a frame that is square or pretty close to it.

Give it a stroke as thick as you want the bottom of the Polaroid to be. A little less than one quarter the height of the picture seems about right. For now, make the stroke anything but [Black] or [Paper]. In the Stroke panel, align the stroke to the outside.

In the Effects panel, apply a Directional Feather to the stroke with 100% choke to the Top, Left, and Right. This narrows the stroke on those sides.
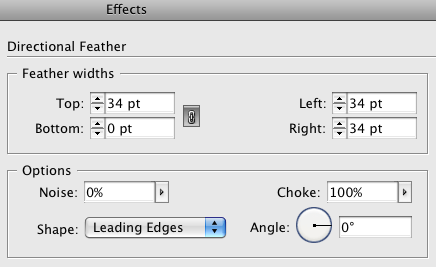

One thing to be aware of: if you plan to use text wrap with this image, the text wrap will be based on the original dimensions of the stroke, not what’s visible with the feather. You’ll have to apply a negative offset to the feathered sides to wrap text close to them.

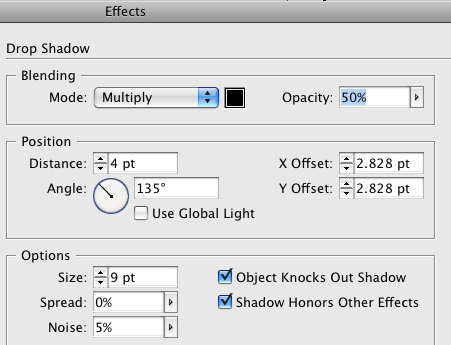
Next, apply a drop shadow. In the Options, check Shadow Honors Other Effects.
This takes the directional feather into account. Adjust the drop shadow settings to taste.
If the picture is to be placed on a white background make sure the drop shadow shows around all sides.
Change the color of the stroke to [Paper] or a small percentage of [Black], say 4%.

Create a new object style based on your creation.
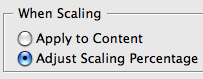
If you want to be able to scale the Polaroid, go to General preferences and check When Scaling: Adjust Scaling Percentage. This way, the directional feather will scale along with everything else.
If you want to apply the object style to photo that has been scaled, you need to select the photo and go to the Control panel menu (waaaaay over on the right side) and choose Redefine Scaling as 100%.
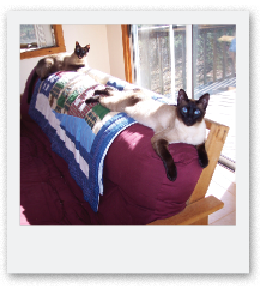
![]()
If you leave it scaled…
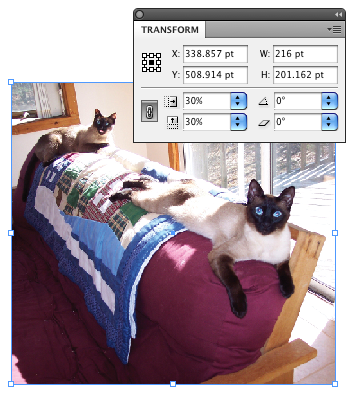
the effect may not behave as expected. These cats are not pleased.

But after you choose Redefine Scaling as 100%, it should work purrrfectly.
There’s only one more thing to do. Say “cheese..”
Eh…
May I suggest:
https://www.poladroid.net/
Easy ;-)
Thanks, that’s a fun little app. I do wish you could skip the wait time. But bonus points for the way it adds the subtle texture to the white frame and the other effects that you add. Also, looks like the current version only comes in French (or the link to the English version is pointed at the wrong file). Anyway, it’s easy enough to figure out. :) Cool stuff.
Wow … amazing as usual, Mike. The “Choke” setting on the Directional Feather would make a great Obscure InDesign Feature of the Week … shshshsh don’t tell anyone, we like to save these till the reveal. ;-)
That’s cool. I think the cats knows what you’re doing with their picture. lol
Well done Mike Rankin, Good job.
“Not only do I get to see what everyone looks like”,
If that is you in the photo: you are very advanced for your age!
Bustop
This PS action is also pretty accurate.
https://rawimage.deviantart.com/art/Polaroid-GENERATOR-V2-118854065
I know it isn’t an additional InDesign trick to do this but it works.
…which begs the question, how old do you have to be to remember what a Polaroid is? Whatever the cutoff, I’m way above it :)
Thanks for the tip!
I was just looking for something like that !
Thanks !
However, is there a way to make the corners of the polaroid round … ?
The “Outer Glow” style makes round corners (using Spread=100%), but is there a way to make the bottom margin larger than the sides and top ?
how do you make the shadow show all the way around.
This is something we are trying to do.
Sandra-
In the Drop Shadow dialog box, change the Distance value to zero. This will center the drop shadow beneath the object so it will show on all sides.
Excellent titorial although I am just not thinking in that way, if somebody asks me to achieve this effect in InDesign I would draw 2 shapes and subtract top most from Pathfinder. New shape is customizable and can serve as frame so you can adjust corner options (even before subtracting top most shape) and place inside frame any graphic or image like old paper and so on.
Bojan-
Yes, that would be very good way to go about it. The drop shadow would also be applied to the inner square, which would probably look very good in most cases.
@Mike Rankin, it is also possible to draw another rectangle, apply drop shadow and send it back if shadow in inner square is not desired.
I am having problems with the last step. When I try to select “Redefine scaling as 100%”, the option is greyed out so I cannot select it. Why would it not let me choose this option? This affects my images when I try to scale the polaroid to different sizes, the stroke does not scale with the image.
Hi Jerri-
The scaling of effects works differently with newer versions of InDesign, so this post needs to be updated. By default, effects will scale with the frame they’re applied to, so just select the frame with the Selection tool and use the Control panel scale X/Y controls, or hold Ctrl/Cmd+Shift and drag a corner or side of the frame and the directional feather will scale along with the image.