

Power Grouping: Working with Compound Paths

On the Mac InDesign User to User forum, darrenb asked:
I’m trying to make three boxes and have one image in all three but I can’t figure out how to do it without importing the image into each box and having to move it around to make it look connected. Is there an easier way?
The best answer is to create a compound path with the three graphic frames. A compound path is a shape made up of two or more subpaths, which may contain holes when one subpath is contained within another. You could consider a compound path as sort of a “power group.”
To solve darrenb’s problem:
1. Make the three graphic frames, and size and position them as you like.
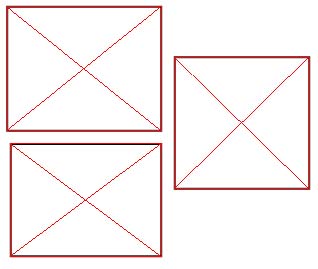
2. Select all three frames, and choose Object > Paths > Make Compound Path. You’ve created a compound path with three rectangular subpaths. (If you chose the Rectangular Frame tool to make the frames, you’ll now see that the X for the graphics frame is now defined by the bounding box of the compound path.)

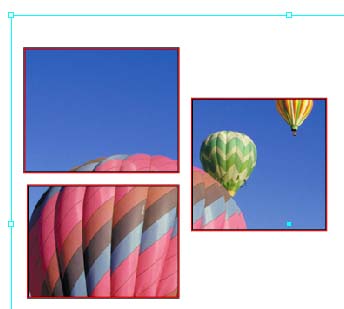
3. Choose File > Place and place the image into the compound path.
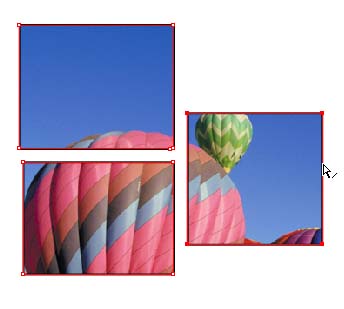
4. You can choose the Direct Selection tool, and click over the placed image. You’ll see the Hand icon, indicating you can move the graphic around to change its position.
You might think that you’d have to release the compound path to move the individual frames, but that’s not true. If you click on the edge of one of the rectangular subpaths with the Direct Selection tool, you’ll see the individual anchor points. The trick is that if you Option/Alt-click on the edge of the subpath, you’ll select all the anchor points. Then you can drag the subpath to a different location, or even resize it.
Compound paths are also very useful for manipulating type which you’ve converted to outlines. To convert type to outlines, either select a text frame with the Selection tool, or select characters with the Type tool. Then choose Type > Create Outlines. However, this creates the outlines as an inline object. If you want to make the outlines a separate copy, hold down the Option/Alt key when chooseing the Create Outlines command. Then a copy of the type is created on top of the original; use the Selection tool to move it elsewhere.

When type is converted to outlines, the resulting outlines form one compound path. However, you don’t get much flexibility to move individual letters without releasing the original compound path, and creating individual compound paths for each letter. Here’s how:
1. Select the compound path of the outlined type, and choose Object > Paths > Release Compound Path.
If the letters have counters (holes), there will be two subpaths created?one for the outside of the character, and one for the inside. You’ll notice that both subpaths are filled with the same color (in this example, black). You might be tempted to select the inner subpaths, and fill them with white. If you choose that method, you couldn’t easily place the letters on a different background and have it show through.
2. Instead, use the Selection tool and Shift-select both the inside and outside subpaths for each letter, and create a new compound path by choosing Object > Path > Make Compound Path. Repeat this for each letter. We’ll fix the holes in a minute.

3. Now use the technique we used for the graphic frames to select the inner subpath of each letter that has a counter. Option/Alt-click on the edge of the subpath to select all the anchor points. Once selected, choose Object > Paths > Reverse Path.
What this does is change the subpath’s direction. Holes are actually created by subpaths going in alternating directions. (Unfortunately, InDesign never tells you the direction of a subpath; you have to infer it.) Repeat this process for each hole.

4. Now you can choose the Selection tool, and Shift-click each letter to select all the letters (each of which has its own compound path), and move all of them onto a different background. Then you can move individual letters to create a playful effect!

Thanks for the tip!
I have done that Reverse Path part with Pathfinders Substract, is there some difference between using those two methods?
Once I had a lot´s of letters which I had to convert outlines. Then I found out that if you use different fill-color for every even and odd character, InDesign creates a group when you Outline the whole text, after creation you can change the fill-color back to whatever you like, ungroup it and you have nice separate letters that you can move around or color etc…
Coloring even and odd characters differently is fairly easy to make with nested syles.
Do this. Make a large picture frame and place your linked graphic into it. Now we will split it into separate graphic frames by using the script MakeGrid.jsx
The script is in the Window menu / Automation / Scripts / JavaScripts.
If you create a compound path with those letters and background and ‘Reverse path’ the letters, you get a stencil-look.
Thanks for sharing such a nice idea, piece of writing is good, thats why i have read it completely