

A quick way to abut the edges of 2 (or more) objects

I usually use smart guides to butt the edge of one object exactly up against the other. But sometimes there are so many other objects on the page that smart guides fail or are difficult to use.
Of course, you could pull down a ruler guide, snap it to the edge of one object, and then snap the second object to that guide. But here’s an easier, more goof-proof method.
1. Display the Align panel on your screen (shift-F7)
2. If your Align panel doesn’t look like the screenshot below, you may need to choose Show Options from the Align panel menu.

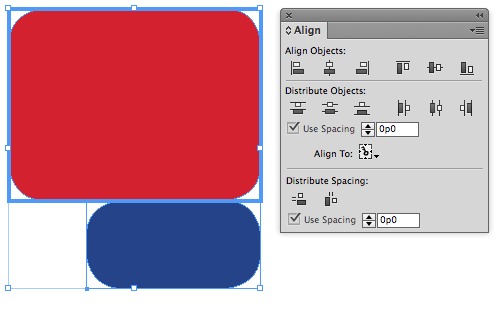
Display the align panel (shift-F7)
3. Select both objects
4. Click again on the object that you wish to remain stationary (this becomes the “key object”)

The heavy blue outline indicates which object is the “key object”. This object will remain stationary.
5. Enter “0” in the field next to “Use Spacing” if it isn’t already zero
6. Click the left-most button underneath “Distribute Spacing” to abut the top/bottom edges. Click the right-most button to abut the right/left edges.

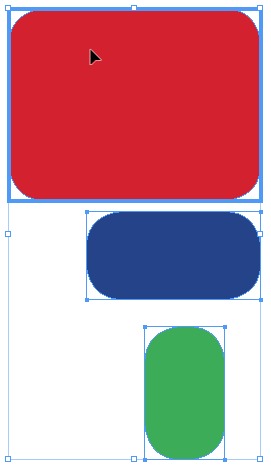
7. The result—the items are precisely butted up against each other.
You can do the same thing with multiple objects:

This might seem like a lot of steps, but it is actually just a couple of clicks once you get the hang of it.
Thank you for this helpful tip! This is going to come in super handy for me.
Aligning objects is key to good design. Speaking of “keys”, Keith has used a “key object”. For people not to speed with the latest InDesign, this is a new feature (think it was in InDesign CS6, if not it’s new to InDesign CC).
For those on earlier versions, you can lock an object in place and that should act like a “key object” as above, that is, remain stationary and the other objects around it hone in on it.
To build on Eugene’s and Bob’s comments, align to key object is available in Illustrator 5.5 (perhaps earlier) too.
Eugene, thank you! Your comment is still relevant in 2016 for those of us in the Dark Ages using CS3.
Keith didn’t mention it, but the same feature is available in Illustrator as well.
Wow! Thank you, Keith!
Great stuff, I use the align panel all the time and rely on it, it is also great for consistent spacings throughout a document: eg: captions sitting under a photo.
What I didn’t know about was the ‘Key object’. I have seen the blue outline and wondered what I was looking at. Thanks for the heads up!
Thank you Keith, knowing how to align to a key object will be extremely useful.
So that’s what that blue line is! So helpful. I LOVE the align tool.
Phenomenal! Much quicker than what I’ve been doing!
Thanks! Super Helpful!
Thank you Thank you Thank you
Awesome, I use align a lot but have never known about assigning the ‘key’ aspect
I am trying to directly abut two objects, but it keeps leaving a minute amount of space between them, even when I use “0”. Any suggestions? I discovered this tool about two minutes ago, so I’m sure I’m missing something!