

Getting the Right Bleed in Print PDFs

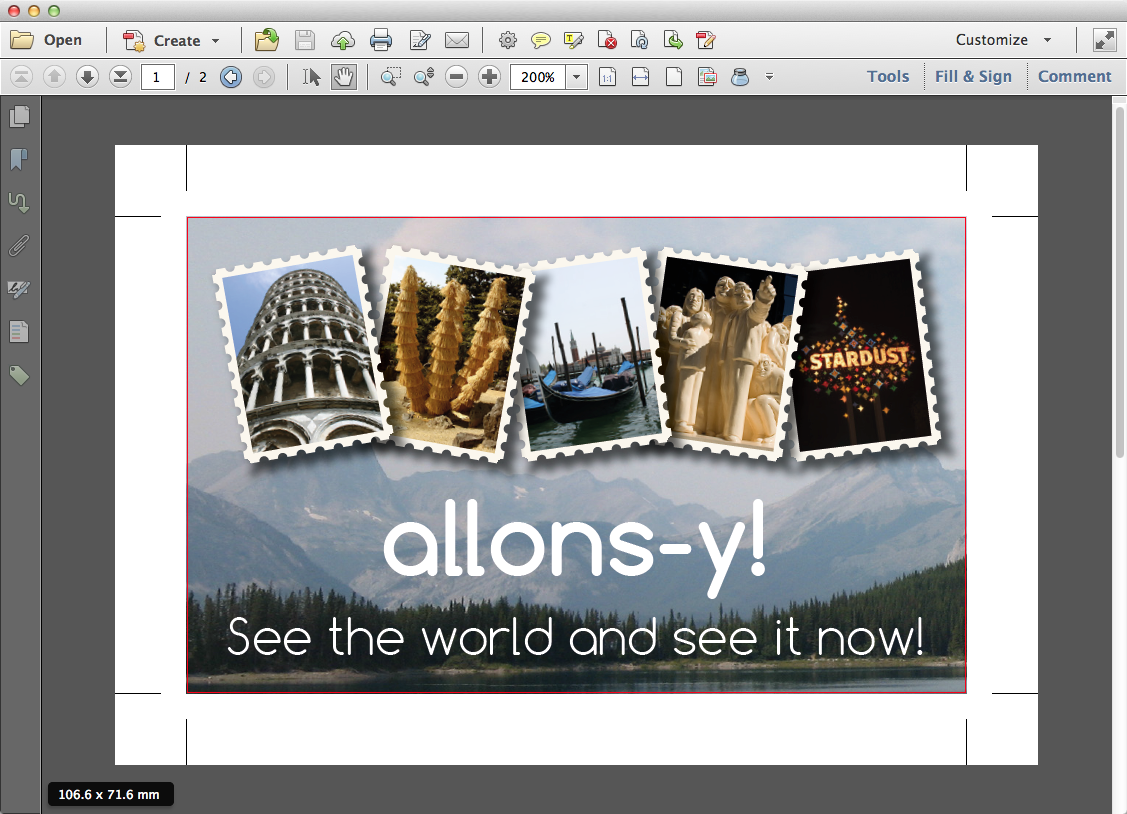
As a prepress operator, one of my responsibilities is to check artwork supplied by clients. An issue that I encounter regularly is PDF artwork that is supplied with no bleed, even though it is clear that elements of the artwork will need to bleed off of the trim edge. The following example uses a supplied business card that once trimmed will be 90 x 55 mm.

In the above image, the culprit is a PDF setting in InDesign that did not include the bleed.

Realizing the PDF had no bleed, I asked the customer to export the PDF again, but this time with 3 mm of bleed in the Export Adobe PDF dialog box. Note that when the Bleed setting is changed, the word (modified) is added to the end of the PDF Preset name.

Once the PDF is generated, you can see by the larger dimensions (96 mm x 61 mm) it has 3 mm of bleed all around.

One thing to notice is the presence of red and blue borders – they indicate where the relevant trim boxes are and they can be turned on in Acrobat’s Page Display Preferences or in the Output Preview dialog box (Tools > Print Production > Output Preview).

Let’s look at another instance of a PDF with no bleed:
Unlike the previous PDFs, this one contains crop marks, which isn’t a problem… but the lack of bleed on the image is! Assuming that the client hasn’t left their bleeds at zero in the Bleed and Slug portion of the Export Adobe PDF dialog box, what happened?
One cause: incorrect page elements
If I receive a PDF that looks like this, there is a possibility that the original InDesign page elements were not positioned to bleed. If this is the case, the elements of the artwork that are to be trimmed off must be extended past the trim area in InDesign, and a new PDF exported.

Another cause: Document Setup bleed settings
In this instance, the InDesign file has the artwork past the trim edges, so what is going on? The answer is the setting in the PDF Export dialog box.

This can happen if the client is using a customized PDF setting where the Bleed and Slug settings are taken from the Document Setup, as the default options do not do this. In this instance, that is exactly what is happening because the checkbox Use Document Bleed Settings in the Export Adobe PDF Dialog box has been checked. If we change the Document Setup so that the bleeds are 3 mm, this will resolve the issue.

Or alternatively, you could deselect Use Document Bleed Settings and manually enter the Bleed values as 3 mm all around in the export dialog box. Either method will produce following result:

That’s much better.
Beware of the default settings
Remember how I mentioned earlier that the name of an Adobe PDF preset will change when you modify the settings in the dialog box? That is because the default PDF export options (these appear inside square brackets in the dropdown list from the Export dialog box) do not contain bleed settings, so unless you’re using a customized PDF export option containing the necessary bleed, you will need to change the bleed settings each time you choose a default setting for PDF export.

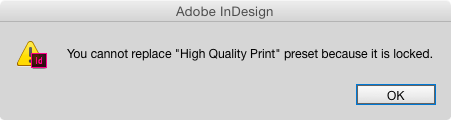
So why not change the default Adobe PDF Presets so they contain bleed? Because the defaults cannot be changed. Note that in the Adobe PDF Presets window, the selected preset cannot be edited (the Edit button is grayed out). And if you try to overwrite a default with a new preset having the same name, InDesign refuses.
So how do you determine how much bleed to use? Ask your printer. Some printers publish the details of their PDF requirements on their website. Or better still, see if your printer has a joboptions file that you can download and add to your PDF presets. If your printer does not have PDF specifications available online, feel free to ask them directly.
For those publishing POD, one benefit of Lightning Source over Createspace is that the former supplies a top-notch InDesign cover template with bleeds included. Createspace—and I’ve hassled them about this—only supplies a jpg image with obscure lines to indicate bleeds. Inside InDesign, those lines mean nothing. Nothing aligns on them. Nothing says, this is bleed, while this isn’t. Sloppy, very sloppy. Yet another illustration that Amazon doesn’t quite “get” publishing.
Unless Createspace has changed recently, they don’t even supply very good templates. I requested a template for a 206-page book. They apparently don’t do them in two-page increments and sent me one clearly marked for 204-pages. Knowing that might cause problems with the spine, I made the spine art a bit larger than the template suggested.
The control freaks at that Amazon affiliate did not like that and, without asking, shrunk down that spine and even bragging to me about doing that. What happened as a result? As anyone at Createspace ought to have known, that 206-page book printed as a multiple of four or 208 pages. The result is a spine that takes near-perfect alignment to work and for the copies I’ve gotten from Createspace, about half are out of line. Since it’s the cover appearing on that too-small spine art, it looks especially bad.
Those who layout book covers might keep in mind that the equivalent of bleed—content intended for the front or back cover leaking onto the spine or vice-versa, is a serious issue. Whenever you can, design so that shifting over isn’t obvious. Make their colors very similar. I try to default to having a bit of the spine leak onto the front or back because it looks far less bad, but the print police at Createspace seem intent on nixing that ploy.
I tried to communicate with the printer who produced a book I created last year but he wouldn’t respond directly to my emails, so I had to go through a middle person who had no clue as to how a book is to be printed. I had asked her to ask him why the interior dividing section pages didn’t bleed off the page as I created and indicated in the native InDesign file and the PDF; instead they looked as though they were sliding off of the pages with a white margin at the top of the page. The printer’s response was that all of the pages needed to have a bleed even though they weren’t set up to bleed. I don’t believe that is true, I think the printer doesn’t know what they are doing? I want to know if he is right and I incorrectly prepared the PDF or if I am right about the printer being incompetent. I want to prevent any more mistakes by not using this printer again in case my customer wants to continue to use this printer
Pamela, at my previous job, we were instructed that if one page of our magazine had a bleed, every page was to be laid out as a bleed. Not being a pressman, I did what I was told. Someone with more knowledge of the different types of press would have to explain the specifics of why, but at least you know you’re not alone.
It’s hard to know what processes each printer is using, but when you’re printing a book, you have to consider that there will be creep built in. There’s no penalty for having bleeds, but not having them can be trouble. https://helpx.adobe.com/indesign/using/printing-booklets.html#understanding_creep
Bleed often has to do with what kind of printing they’re doing. Colin isn’t talking about book publishing in this article, where there is binding.
If you’re printing on spiral bound and you need a bleed on the inside, you can see this tip here: https://creativepro.com/breaking-pages-apart-to-bleed-off-a-spine.php
Great Article Colin,
Thanks for saying…”So how do you determine how much bleed to use? Ask your printer.”
We often have to resize PDF’s when running on our web presses, so we ask our customers to give us .25 inch bleed, This allows us to output at less than 100% and still get an .125 inch bleed. The other issue we run into often is the Marks not being Offset enough. We recommend .3125 inches.
Usually 2mm of bleed is enough for sizes up to B4 or A3, then 3 or 4mm is OK. But yeah, ask your printer – I receive files with 12mm bleed… More is not better, just will cost ypu more in printing. :P
Hi all,
That’s a great article indeed. When you are a printing company you may not want to loose time constantly checking the PDF files for bleed, calling clients to send a new file over without warranties that the new file will still be compliant with your expectations. That’s why there are prepress tools that Colin must know that may operate on supplied PDF files to automatically edit the PDF boxes thus enlarging bleed box if need and even add bleed matter all around the trim box.
I agree any creator of PDF files should be aware of such things as Bleed but I like the ideas that loosing time with non perfect files can easily be fixed with a high level of automation ;)
Loic
https://www.ozalto.com
If you’re exporting PDFs with a bleed from InDesign more than once, why not create your own preset (call it “Acme Printers + Bleed”) and use that. As soon as you see the “(modified)” following the name of the export preset you started with (as Colin shows above), that’s your cue to click the Save Preset button lower left of the PDF Export dialog box, name it and save it. So simple.
I just jumped over to my own install of InDesign CC 2014 and though I haven’t needed to make a PDF w/bleed in a long time, you can see the small collection of presets I’ve built up over the years. https://www.screencast.com/t/9oEKp3gyts
It’s a pet peeve of mine but the offset and bleed should be linked. That is if there’s 5mm bleed then offset your crook marks to 5mm too. There should be nothing inside your bleed other than artwork. All printers marks and info should be outside the trimmed area. All to often I will get pdfs with all the right bleed but a colour bar sitting right on the page edge. Arrrgggh
Eugene > You are not alone there. I have tried several times to convince people to keep their crop marks out of the bleed area. They just don’t get it.
Eugene / Magnus > This x 1,000,000. I’ve lost count of the jobs I’ve had to adjust because of this. It is quite baffling that they are not linked – moreover, if page info is tagged then that falls into the bleed as well. I have my presets set up to account for this.
This is also one of the reasons that I ALWAYS set up large format work at 25% or 10%. If more than 25mm of bleed is required then the scaling can account for it, and leave any printers marks outside of the bleed.
Trying to get my designers to understand any of this is an exercise in futility, though!!
I totally understand this gripe, but cant find out how to change where the crop marks are placed in indesign!? It automatically places them there, so how to alter the distance??
oh… scratch that, after pulling my hair out for the last few hours, I’ve just discovered the offset! (long day!)