Saving Your Links Panel Settings
One of my very favorite features in InDesign CS4 is the ability to extensively customize what the Links panel shows. The problem is that unless you remember to save your changes in a new workspace, you’ll have to re-do them from scratch every time you clean up (reset) the workspace you were in.
For example, you might tweak your Links panel as I did mine so that instead of just the barebones minimum of filename, status, and page number, its shows you a bunch of useful file attributes and metadata:
Now, just looking at the Links panel I can immediately see the scaling percentage applied to every image in my layout by glancing at the third column. (How cool is that!) The fourth column shows Effective Resolution?can you see the problem children whose resolution is less than 225? I can also tell which images, if any, I accidentally scaled disproportionately because their scaling and effective resolution numbers each show two values, one for width and one for height. I can see that I did that to the chocolate_chunky.jpg file above.
To get this kind of readout in your Links panel, you just need to spend a bit of time with its Panel Options dialog box, which you open from the Links panel menu.
Checking off checkboxes in the Show Column area makes those attributes appear in the main Links panel as above. Checking them off in the Show in Link Info area makes them appear in the new peek-a-boo Link Info section at the bottom of the panel. (Link Info is great, but it can only show one linked file’s info at a time.)
After you add new columns of info to the main Links panel, you can resize the columns and even re-order them (note how I made the Page number appear first, before the filename) by dragging and dropping in the column header area.
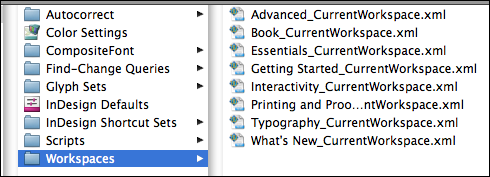
The problem is that all this customization work is only semi-permanent. It feels like you’re permanently changing the panel because if you switch to some of the other built-in workspaces, like Advanced or Essentials, the extra columns appear in the Links panel there too. Even if you quit the program and restart, your Links panel custom settings remain. But this is only because CS4 keeps a record of each built-in workspaces’ “current state,” that is, what the workspaces look like after your changes. They’re saved in little XML files in your user account’s InDesign CS4 Preferences folder:
But as soon as you choose Window > Workspace > Reset Workspace (to put everything back in the panel dock nice and neat, for example, after you’ve torn it apart during a grueling project), your custom settings are wiped out. Choosing Reset Workspace tells InDesign to synch the CurrentWorkspace settings to the original workspace specs. These virgin workspaces, by the way, are stored in your Adobe InDesign CS4 application folder, in Presets > InDesign Workspaces:
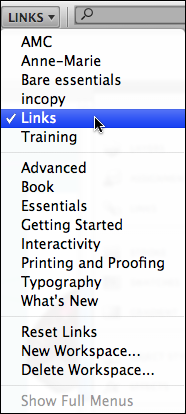
So the only way to make your Links panel custom settings “permanent” is to save your tricked-out Links panel in a custom workspace. With your Links panel just the way you want it, choose Window > Workspace > New Workspace (or choose New Workspace from the Workplace Switcher drop-down menu in the Application Bar), name the workspace and save it. Your custom workspaces are saved in the same Preferences folder as your “CurrentWorkspaces” versions of the default workspaces.
Now, whenever you want to see the Links panel your way, just choose the name of your custom workspace from the list of workspaces. If you mess around in your workspace and reset it to clean it up, you won’t lose your Link panel customizations because they’re part of the original settings.
I’ve created a few different of custom workspaces, but I named one Links just to remind myself that it has my custom Links settings:
In practice, I’ve found that I almost always use either the Advanced workspace, or (when I’m working with InCopy) my custom InCopy workspace; but when I want to see my full-bore Links panel, I just quickly choose the Links workspace. In other words I use it more like an alternative Links panel rather than a workspace, which suits me perfectly.


Great tip, Anne-Marie. Saving a custom workspace is definitely the way to go to save customized Links panel settings.
It’s a little like creating preflight profiles in CS4. When you create a custom one, it seems to be permanent. But actually it only lives in the InDesign preferences. If you restore preferences, it will disappear. In the case of preflight profiles, you need to EXPORT the profile from the Preflight panel in order to back it up.
I remember — back in the naive 1950’s — how we all thought that by 2010 we earthlings would have colonized the Moon and that our customized software settings would be auto-stored and easily backed up, restored and moved without headaches and boring procedures. Wrong on both counts!
But while there may be some technically plausible reasons why I’m not living on the Moon, I strongly suspect there are few good technical reasons why software customization should still be such a PITA.
Is there any manual to understand the details of Link Panels columns (other than trying?)
For example, what are columns named ‘Folder 1’, ‘Folder 2’, etc.
There are some useful columns I managed to learn about:
If a linked file is another InD document, the small down arrow appears near the thumbnail of file.
Push this arrow, and the list of sublinks placed inside this document will open down.
The column ‘Link Type’ shows Child for the images inside this link.
Column ‘# of Sublinks’ concerns their amount.
Fun, indeed!
“If a linked file is another InD document, the small down arrow appears near the thumbnail of file.
Push this arrow, and the list of sublinks placed inside this document will open down.”
This ‘down arror’ also appears when the same file is placed more than once, grouping them for easy relinking.
I’ve always used my own custom workspaces. In Bridge I used to use them for what are now the Essentials and Filmstrip workspaces, and in Illustrator, Photoshop and InDesign I like having the various panels nearby so I dock all the ones I use frequently (or otherwise might forget about) and save my own workspaces.
Nadya… Here’s a Links panel video tutorial done by Mike Ninness, the product manager: https://tv.adobe.com/#vi+f1582v1854
Also, if you read the sections on Managing Graphics Links from the online help files, you’ll learn a bunch of Links panel techniques and features:
https://tr.im/idcs4links
But I think you’re right, I can’t find the “Folder 1, Folder 2” etc. documented anywhere … except in one of our podcasts. ;-) But I don’t remember which one. Maybe we’ll do a videocast on it …
But anyway, the Folders refer to the filepath of the linked graphic. Instead of having the panel show the full path, you might just be interested in knowing a couple of the folder hierarchies.
If a placed graphic is in a Links folder, which is in a Project folder, which is in a Production folder; then Folder 0 = Links; Folder 1 = Project; and Folder 2 = Production.