

Slug size limit is six inches…or is it?

A recent topic on the Lassosoft InDesign mailing list focused on the document information area’s size limit. At one point the slug size limit was brought up and I was pretty sure it was six inches (Fritz discussed all kinds of InDesign limits here) but rather than look stupid I figured I’d fire up InDesign and double check.
I tried to enter 10 inches for the bottom and got the error I expected.

The value had to be between 0 and 6 inches. Excellent, I still have some functioning brain cells.
Just for kicks I tried it with the slug on the side and to my surprise InDesign allowed it…hmmm, 10 inches is okay. How about 24? Yup. 36? Why not? This is just silly…how about 100 inches? Sure, that’s just fine.
Well, I don’t want or need a 100 inch slug and I don’t want it on the side, I want it on the bottom and here’s where it gets interesting…if I lock the slug choices so they all change together, I can create a 10 inch (or 100 inch for that matter) slug all around.

So now what? Traditionally, you’d only find a slug on the bottom of a page and here’s where the trick comes in. Once you have you document set up with the slug on all four sides, use the File > Document Setup command and unlock the slug constraint. You can then change the left, right and top slug amounts to zero while leaving the bottom set to 10 inches.
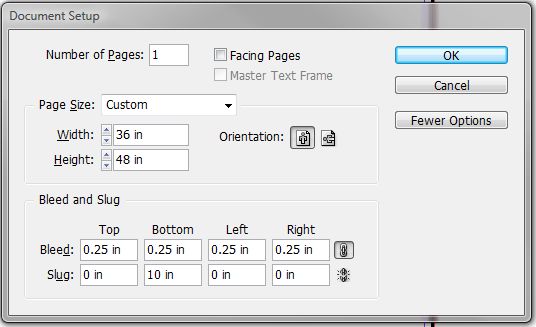
Why would this be useful? Well, for a letter size document, it wouldn’t be, but if you take a look at the screenshots, you’ll see that this document is a 36″ x 48″ poster and having a larger slug size is nice if you want to view the document and slug on screen and see both.
I tried this with CS4 and CS3 and it seems to work. I haven’t tried it on anything earlier.
I think that’s a great tip, but make sure you talk with your commercial printer. Many times the press sheet does not have enough room for a slug larger than a few inches.
Bob,
I applaud you for the trick.
But I worry about files that have had tricks applied to the basic document setup.
I worry that if the file gets sent to someone else, that all manner of weirdness will happen.
I worry that weird things could happen during the RIP.
Ehhhh, I guess I worry too much.
I just tried it and exported a PDF. It was fine. Six inches just seems like a very random size limit to me.
To be honest. I cannot see a reason for having a Slug even 6 inches (150mm for people outside of America).
As it gets trimmed off anyway, what the point?
Slugs are really helpful for those who print galleys and need information outside the trim that is still printed.
Bob’s need for a 10 inch slug is very valid. And besides the spotted garden slug may be 5 to 7 inches long when full grown.
I use large slugs for when designing hard back covers or binders. I find that I can accurately draw the template and keep the measurements on the page for when I need them. Sometimes I turn off all the layers and just leave the measurements layer and export it to PDF to send to the printers so they can check that my measurements will work with the binders they have. I can then work on the design while they do a blank mock up to make sure I’ve not missed something vital.
I think before I asked someone from IndesignSecrets if they knew of a script/plugin that would automatically insert a text box in the center of a line you just drew with the measurement inserted. I think having some sort of tool set for drawing measurements would be handy.
But I always leave my measurements in the slug area, outside of the bleed and I can view it Normal, Bleed or Slug view if I need to see the measurements.
Yeah, I understand the need for some people to have a Slug Area.
But in my experience, when I was working for a book Printer I deleted that information without even looking at it…
I trust what I say it is, not what other people say it is…
If the trims on my proof don’t measure up then no amount of slug information is going to change that…
I have never used the Slug area for Slug reasons. The only time I use it is to position Spine registration marks very quickley so they offset the bleed…
i.e. set global bleed at 5mm and set Slug to 10mm
The simply offset trims under the print menu 5mm with a 10mm bleed and you done.
Also works with CS and CS2. Doesn’t work with ID2 since it lacks the slug feature.
Probably a ‘bug’ with the feature from the start that was either never found or not thought worth ‘fixing’, IMO.
-mt
1. Your tip works only while creating new document – you can’t do it by selecting Document Setup of created document.
2. Making it your way also meets the limit – it’s 3527.778 mm (or 138.8889 in) – that is 10000 pt
:)
ah, I finally read the last reply! now I got it.
Two other useful purposes for a slug area are:
a) storing items on a master page pasteboard that you’d like access to on every page, and
b) making sure that alternate objects that might not have made it onto the page, but are still stored on the pasteboard, make it into the package folder for archiving. If it touches the slug area it will be packaged.
Sorry, I am not able to achieve this. Could you please explain in detail.