

The Gap Tool and Groups

[Guest author Ashley Mitchell was an Adobe staffer for over twenty years, mostly in the QE department, where as a senior tester he “tested almost every area of InDesign from InDesign 1.0 through CS5.5 (text, layout, UI, localization, you name it).” We’re happy to welcome his contributions to the blog. ?Anne-Marie]
Many people are familiar with how the Gap Tool works but a few special rules apply when groups are involved.
Below is a 5 x 5 grid of boxes within which the 9 red boxes having been grouped.
Under normal conditions the Gap Tool will look at every object on the page and find an appropriate gap. As far the Gap Tool is concerned, all the objects inside a group are treated as a single object and when you adjust a gap the entire group will resize or move as a single unit.
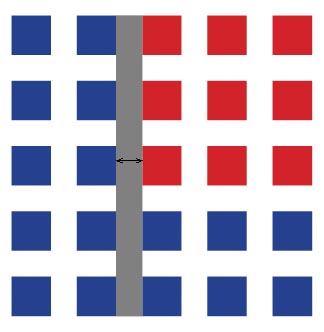
Outside of a group all objects are seen...

And groups will move or resize as a unit
However, when the Gap Tool is positioned over a group it is only aware of those items within the group, and when you adjust a gap only those items within the group will be effected.

Within a group the Gap Tool only sees the grouped objects...
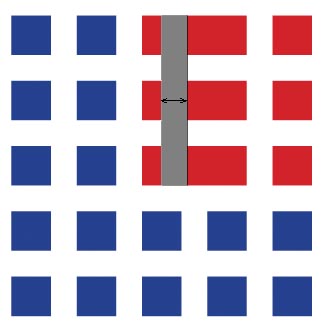
And only the grouped objects will move or resize
So next time you are using the Gap Tool and it seems as if it isn’t paying attention to all the objects that you think it should or you see objects resizing in an odd way, it could be that a group on the page is behind this seemingly odd or inconsistent behavior.
What do people use the Gap tool for? I have never used it and I don’t even know what I would use it for.
The align panel does a much better job – along with smart guides. I can’t really think of a legit reason for this tool?
I think it’s much more for creative design experimenting than for production. You have some objects aligning on a page and you want to play with repositioning them but keeping them in alignment. It’s much faster/easier to do with the Gap tool than the multitude of clicks you’d need with the Alignment options.
I find the gap tool most useful when I have a page design that mandates a specific spacing between objects, but doesn’t mandate their size. For instance, two horizontally adjacent text frames that must have 2 picas of space between them.
Based on copyfitting requirements, I want to give more space to the left textframe and less to the right, perhaps varying it continuously while dragging the mouse until I find the right balance. The gap tool makes this very easy and much more efficient.
It’s also a lot more effective if you’ve turned on Autosize and Fill Proportionally for the surrounding image frames.
AM
Like John mentioned, it is a quick and easy way to make text columns of different sizes while keeping the gutter between them consistent (you need to lay out the text columns as individual frames to do this, of course, rather than using the Number of Columns setting inside a single text frame).
You can do the same thing when you have a grid of images in which you want to resize the image frame but keep the spacing between the individual images consistent.
But I agree with Eugene, sometimes it is difficult to find a good reason to use the Gap Tool over more traditional ways of moving multiple objects.
One of the drawbacks, in my opinion, is that you can’t “select” a gap and numerically set the size of it, you just have to eyeball it and look at the H/W size indicator the floats next to the cursor. Smart Spacing helps if there are other gaps already on the page that are the correct size but that is not always the case.
Another drawback is that objects on both sides of the gap move at the same time, there is no way to “pin” one side or the other to the page (aside from locking them first) so that only the objects on one side of the gap move.
Both of these two issues were discussed when the feature was being developed (I was the actual tester for the feature when I worked on the ID QE team) but we just ran out of time before we could work out a good solution.
I think that with a few tweaks and improvements the Gap Tool could become quite a bit more useful and useful in many more situations.
Great there are uses for it. I guess I just never need it – yet. But when I do I’ll know some tricks for it too I guess.
Yep, i love the gap tool, although i’m more careful with the autosize, especially when selecting multiple images?
I use it for all the borders. Note also that it won’t work the same on the pasteboard or on the page.
I use the gap tool for the first time today. Thanks for sharing the functionality of the gap tool with regard to groups. That is exactly what I needed.
I teach InDesign in an evening class. Last weeks topic was the gap tool. My students loved it, but on some computers the gap tool wasn’t able to remove the complete gap between frames. A gap remained of ca. 1mm.
Is there a setting where a sort of minimum distance or margin can be inserted, or does anyone else has this problem as well?
Katrien: That is strange. You should be able to go all the way to zero. However, I wonder if perhaps the objects had a thin white stroke around them or something like that? So that they were touching, but it didn’t look like they were.
Here’s more on making two objects touch: https://creativepro.com/quick-abut-edges-2-or-more-objects.php
Hello David,
Thanks for your reply.
The stroke and the line colour were also my first thought, but that wasn’t it.
The problem happened not once, but several times, on different computers in different classrooms.
It’s not a setting, because when I make a new document and try again, the tool works fine.
I think it has to do with the order in which the students do a number of actions which makes the tool dysfunction…. It’s the only explanation I’ve got, but I’m not pleased with it…
The exercise they do goes like this:
Make a grid of frames using the arrow key’s. Place images in it. (I know they can do this all at once, but that’s the following exercise!)
Set fitting options (fill frame proportionally + fitting)
Adjust the grid with the gap tool using SHIFT and CTRL-keys (At school we work on pc.)
… It should work, and it does work, but not every time…
Also thank you for the info on the Align panel. We discussed this in the same lesson!
This is odd. There actually is a tiny bit of fudge factor built into the Gap tool to take into account objects that are almost truly aligned but not quite (and easy situation to get into if you change the stroke weight) but it is quite small- the objects can be out of alignment by only about 0.5 pt or so and it will still treat them as if they were aligned. When moving such almost-but-not-quite-aligned objects they will say slightly misaligned. This might be at the heart of what you are seeing but I’m not super hopeful about that.
If the students were using the Shift and Control keys they were moving the individual frames, right? If Smart Guides was turned in it could be that these frames were snapping to objects that were elsewhere on the page that were just sliiiiightly out of alignment with where they wanted the frame to end up. An easy scenario to imagine is that someone moved one frame and then applied a slightly larger stroke weight to it for whatever reason. When they move a subsequent frame with the Grid tool the edge of that frame snaps to the edge of the now-slightly wider frame that they had moved previously (wider because InDesign’s strokes are, by default, center aligned so if you change the stroke weight of an object you will end up changing the objects height and width, as well). If they had increased the stroke weight of this first frame by just 1 pt it would probably still look the same but would actually be 0.5 pt off.
Hello Ashley,
Thank you also for your input.
It is odd, isn’t it, but I’m 100% sure they didn’t place an outline or stroke on any of the frames.
Interesting theory about the alignment with other objects on the page, but there are none…
It’s a very simple exercise, or it should be. They have to make a postcard. They make a new document of 150x100mm, set the margins, make the grid as large as the area in between the margins… It’s the only thing on the page…
Hi there!
I am still having difficulty getting the gaps to all adjust as a group even though I am grouping the objects! Does anyone know of anything else that would cause only the single gap vs. the entire group to be affected? much help appreciated!
The gap tool is great for front end developers that need to get this type of information out of an InDesign document so they can create the CSS for the design.