

The scope of InDesign styles

While setting up a template for a complex XML workflow today, I was reminded of a point of confusion for many users about how InDesign’s Styles function.
InDesign features Paragraph and Character styles, of course, as well as Object, Table, and Cell styles. Paragraph styles are different than the other four types of styles. How? Paragraph styles must specify all the formatting for a paragraph to which it’s assigned. In other words, it’s impossible to create a Paragraph style that only specifies paragraph alignment, but not type face or left indent. So as you create a Paragraph style, every option in the Paragraph Style dialog box is filled in one way or the other.
But Character, Object, Table, and Cell styles behave differently. These styles may specify only the formatting that you want them to. In other words, their scope can be limited to a single attribute or group of attributes. For example, you can have a Character style that only applies an underline to text, leaving the type face, color, and style intact. Or you can create a Cell style that only applies a 10% gray tint to a cell, leaving the rules around the cell and the text inset from the edges of the cell untouched.
The mechanism for setting or ignoring attributes can be confusing. The interface varies in how you tell InDesign to “ignore” certain formatting and not include it in the style definition.
In the example below, from the Character style dialog box, to make the Character style ignore the Font Family, Font Style, or Size, you simply select the Family, Style or Size with the text cursor and hit the delete key to make the field blank. Easy enough.

But in the example below, Kerning, Case, and Position currently are ignored as part of the style, that’s why they are blank.

If I click on the Kerning field, I see three choices. “None” sounds like it will ignore the Kerning. But don’t be fooled. If you choose this option, a Kerning method of “none” will become part of the Character style.
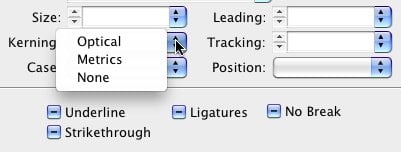
Only after you actually choose either Optical, Metrics, or None, and return to the drop-down menu do you see the option to Ignore the Kerning method as part of the Character style.

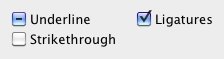
In the example below, we see a different type of widget. In this case, Ligatures are on as part of the Character style, Strikethrough is off as part of the Character style, and Underline is ignored. In other words, when this style is assigned to a block of text, Ligatures will be activated, any Strikethrough that the text may have will be removed, and the underlining of the text will be ignored. These “three state” check boxes appear throughout the Character, Object, Table and Cell style dialog boxes.
That’s really useful, thanks. This is definitely something that causes a lot of confusion. The “official” name is tri-state check box btw.
This was great info.
Thanks.
i’ve been using character and paragraph together since quark 3.x to indesign cs5 and still confused sometimes. not, it’s not and intuitive concept i think.
I agree that it can be confusing. One of the most important rules to remember is: Do NOT apply a character style to an entire paragraph. Character styles are for characters, words, sentences… But if you’re going to change the look of a whole paragraph, use a paragraph style. Most of the paragraphs in a document should have the character styles set to None.
(This is a pet peeve of mine. I have seen so many documents that have a paragraph style and a character style applied to every paragraph. Insane!)
I really like using paragraph and character styles. Where it gets me though it when I have an imported Word doc that retains the italics, I don’t want to go through and select each italic word and apply the character style to it. There must be a Find/Change that someone can recommend.
@Luis: Agreed. You can use find/change to find all text that “looks” italic and apply an italic character style. Then save that as a find/change query preset so you can use it again quickly later.
Or (sorry for the commercial plug), you can use the Create Basic Character Styles feature in the BlatnerTools plug-in. That will do all the work for you with one click.
With character styles you can also highlight the listed value and use ‘ctrl – delete’ (PC) to clear it. This is handy where there is no ‘ignore’ option.
It doesn’t work with para styles that I can see.