

Tip of the Week: Finding Overset Text With Preflight

This tip was sent to Tip of the Week email subscribers on June 4, 2015.

Sign up now and every week you’ll get a new InDesign Tip of the Week and Keyboard Shortcut of the Week, along with roundups of new articles at InDesignSecrets and CreativePro, plus exclusive deals sent right to your Inbox!
Just scroll all the way down to the bottom of this page, enter your email address, and click Go! We’ll take care of the rest. Now, on with the tip!
A couple weeks back, I wrote a tip for using the Story Editor to view and edit overset text that you can’t access in the layout. But what if you need to locate the overset text first because you’re working with an especially long or complex layout?
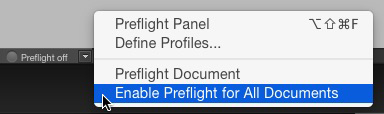
After a pause you’ll see the preflight status off the document. If errors were found, a red dot appears. Double-click the word “error” next to the red dot to open the Preflight panel.
![]()
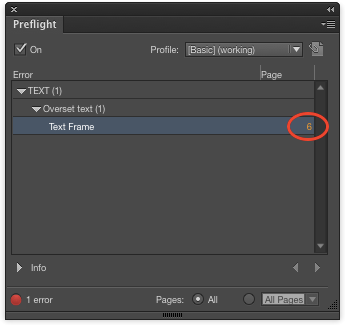
If there are problems with overset text, they’ll be listed under the TEXT category. Click on the small triangles to reveal the exact instances of overset. Then click on a page number to jump to a specific overset text frame.
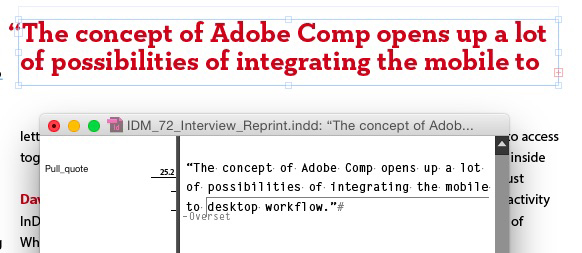
The frame will be selected and you can immediately press Command+Y (Mac) or Ctrl+Y (Windows) to open the Story Editor and see/edit the overset text.
Good suggestion. Preflight is one of InDesign’s unsung heroes.
Personally, I hate the sheer ugliness of the Story Editor. It recently came to me that, if I need to get into overset text, I could just click on the continuation box in the last text frame and open up a temporary frame to use as I edit the text down to fit on the current page. Once done, I can eliminate that frame.
There’s another situation where I use the Story Editor but wish I didn’t have to do so. Since space before in a paragraph style does not work at the top of a page, for chapter headings that need to start part of the way down a page, I often displace text downward with Paragraph Styles-Advanced Character Formats-Baseline Shift.
That does the job, but it also means that cursor clicks are nowhere near where the text is displayed on the screen. ID still sees that cursor insertion point where it would be if the text wasn’t displaced down.
Know anyway around that when a chapter title needs to be changed? Story Editor does let me get to the text, but opening the ugly beast to make a minor change is irritating.
To sink something at the top of the page, I use a rule above (color none), and check the box that says “keep in frame.” I’ve had the offset be very large to sink things down.
Edit to add: And I use separate master pages for chapter opener pages. I normally use the rule above to heads sink at the top of pages for even lines.
Dwayne, thanks for the helpful suggestion. I’ll have to get invisible rules a try.
A different master page would work, but text keeps getting added or removed, changing where those chapter pages appear. Changes in Chapter 1 can mean the master pages need to be moved for dozens of pages afterward.
I’ve heard there is a third-party script that assigns master pages based on a style on the page. It’d be great if Adobe would work that into InDesign. The hitch could be coming up with a way to prevent conflicts. Multiple paragraph styles could create the same master page but the a master page could not have several multiple styles assigned to it.
Yeah–I feel the pain when text reflows. Happens all the time for me.
That third party script sounds pretty good.
It is very good :-)
https://www.id-extras.com/products/mastermatic
You can use it to link master pages to paragraph styles and/or object styles.
In the case of a conflict (two paragraph styles on the same page linked to two different master pages), the rule is that the lowest down in the list wins. Simple!
Having said that, I tend Michael W Perry’s technique for dropping chapter titles, i.e. negative baseline shift. I don’t usually have a problem clicking in the right place to select the text — it’s usually easy to estimate, so I rarely resort to opening the story editor for that.
The problem with the invisible rule above technique is that it only works if the text-frame first-baseline setting is NOT set to “exact”. If it is set to exact, it the rule above will not push down the text — try it and see. I always have my text-frame first baseline set to exact (I like to know where it will be), so this particular idea doesn’t work for me.
Yes–in cases where it’s not fixed or exact, it will not work. But I have mine set up for ascent. I never use exact.
That plug-in looks very intriguing.
I also used to use ascent (or maybe x-height). But then I had these inexplicable instances where the last line of text on a page would simply disappear, and only lengthening the text frame a little would bring it back… Until I figured out what was happening: Did you know that in some fonts, the hardwired ascent line for the italics is a little higher than the ascent line for regular? That is, there is no hard and fast rule that says that the italics ascent and roman ascent measurement has to be the same, even for a single font! Combined with this is the fact that the ascent setting only looks at the first character of the first line of the frame. So if that character happens to be italics, and you happen to be using a font where italics is a little taller than regular, and you’re using a carefully designed baseline grid such that the text frame is exactly the right height for x number of body-text lines: in such a case, you can end up with a disappearing last line of text!
That’s why I don’t use the ascent setting any more! Using the “fixed” setting “fixes” that particular problem!
I have noticed that, Ariel. Italic and small caps seem to be the offenders at times. But I always leave a little extra room beneath my last baseline for things like that (a point or two extra). I think it was a habit I picked up from my days in Quark that stuck with me.
This tip just basically saved my life!
Thank you — exactly what I needed today!!