

Two Tips in One: Vertical Spreads and Shared Layouts


Robbi wrote,
I was wondering if there is a way to have a group of objects in one document mirror in another document. For example, I have a layout that needs to print across a horizontal binding (calendar style), and it’s 8hx10w. Because i can’t have “facing pages” sit on top of one another, I lay it out in one document that is double-height (16hx10w), with images splitting across the middle. Then I copy all the images/text/etc from the top half of the page over into another document that is set up as single pages, 8×10, and then do the same with the bottom half onto the next page.
The problem comes when I have to change something – then I have to recopy all the changes into the new document again. I thought that snippets might be useful but can’t figure out how to edit them (and if I could, would the changes apply to all the snippets I’ve already placed, or would they only apply to future placments?). If you have any ideas on how to solve this problem, I would really appreciate it.
Until Adobe adds a Vertical Spread option, there is a workaround that solves this problem. (Snippets wouldn’t work, they’re like library items … placed instances aren’t linked to the source.) Let me summarize the workaround first, then I’ll show you some screen shots of a sample calendar project.
The answer is to first create and design the source document using a page size that is equal to one vertical spread — double the height of your actual page size — as Robin explained above. Save this file in a safe place.
Then, if you’re using CS2, you export the .indd layout to PDF, and place the PDF into a new document with your actual page size. This is the document you’ll send to the printer. Each page of the PDF needs to be placed twice; on one page cropped so only the top half of the PDF page is showing, and one more time on the next page, cropping it so only the bottom half shows.
(During this email exchange, David reminded us that if you’re using CS3, you can skip the export to PDF step and just place the native InDesign layout file, the double-height one, into the target .indd file instead.)
Now whenever you need to update your target file, you edit its source instead. Save the changes to the layout file, re-exporting to PDF if you needed that step, replacing the older PDF. Since your “real” target document is linked to the double-height source, its Links panel will show a bunch of out-of-date icons. Select them all and choose Update Links, and the target document is good to go.
Make a Calendar with Vertical Spreads that Bleed
Here’s an example. I’m using CS3 so I’m placing the actual .indd source file; if you’re on CS2 you can replicate what I’m doing with a PDF.
First, I created the source document. It’s tabloid (102p tall by 66p wide). I added a p9 bleed all around, and a 6p slug guide left and right so I can include my “fold” marks on the left and right pasteboard for these screen shots. I also added a p9 slug guide to the top and bottom, which helps me to retain the bleeds when I place it into the target document. (More on that in a bit.)
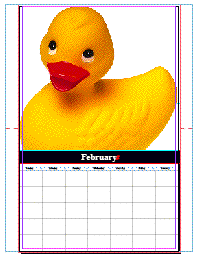
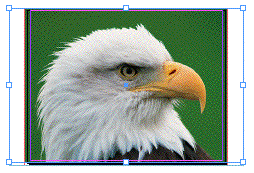
Using the ever-so-lovely images from the Samples folder in the Photoshop application folder, I created pages for January and February. Note how each image extends down into the bottom half of the double-height page. You can see my magenta fold marks in the slug area, left and right of each page:

Then I created my target document, the one I’ll send to the printer. This document is letter-size, landscape orientation (51p tall by 66p wide), with facing pages turned off. I added the same bleed and slug guides as in the double-height file.
With the target document active, and an empty page 1, I went to File > Place and chose my source .indd file. When you import an .indd, PDF or .ai file, it’s important to turn on Show Options in the Place dialog box so you can choose which internal bounding boxes InDesign should crop the file to. When you’re placing an .indd file into InDesign CS3, your choices are Page, Bleed, or Slug:
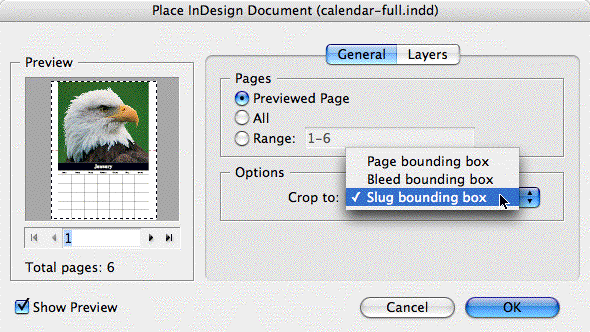
If I choose Bleed, then InDesign won’t include my slug area, which contains the fold marks. (It’s not necessary to have a slug area, of course. I just wanted to get those fold marks in there.) So I chose the Slug bounding box option. Note that there’s no “Bleed and Slug” option. That’s why earlier, in my source document, I added a slug guide equal to my bleed guides on the top and bottom. If I hadn’t, InDesign would have cropped off the top and bottom bleed when I placed the file.
Oh, sometimes I’m so clever I can’t stand myself.
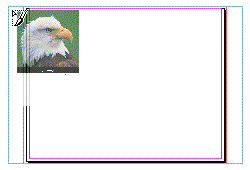
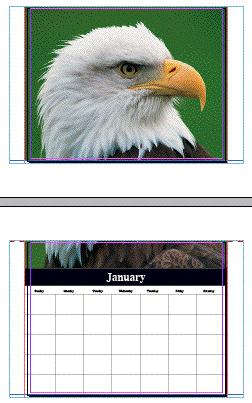
Since my target document has the same bleed and slug guides, I can position my loaded place cursor over the top-left corner of page 1’s slug guides (screen shot on left) before I click, so InDesign creates a perfectly-positioned image (screen shot on right). As you can see from this zoomed-out view, the placed image frame extends down into the second page, since it’s so big:

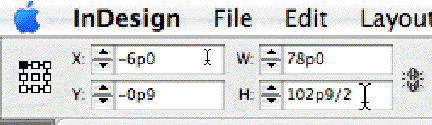
That’s a simple matter to fix. After making sure that one of the top reference points (in the reference point grid to the left of the Control panel) is selected, I add “/2” after the current measure for the selection’s Height field and hit the Return/Enter key. That tells InDesign to bring up the bottom of the cropping frame to half its current measure:
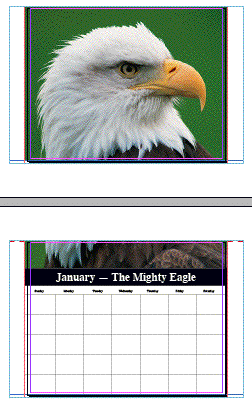
So, page one — the top half — is done, bleeds and all. To do the bottom half, copy this image, move to page two, and choose Edit > Paste in Place. Then use the Direct Selection tool to select just the image on page two, and not its frame. We’ll use the same sort of arithmetic to have InDesign precisely move the bottom half of the image into position.
In CS3, when you select the contents of an image frame, the X and Y transform fields get a plus symbol, indicating that they’re showing the current image offset measure (how much the image is offset from its frame, not the page). I want the image’s Y measure — its vertical offset — to be negative, meaning it moves “up” within the frame. How much of a negative? Precisely one-half of the image’s size. Which I happened to copy from the H field in the previous step, after InDesign did the “/2” math. So in the Y+ field, I paste in “-51p4.5” after the 0p0:

…which moved my image exactly as I want for page two. Here’s what the first two pages in my target document look like now:
You Only Have to Do this Once
It actually goes kind of fast, once you get into the rhythm. You place one page at a time from the source document (the .indd file or the PDF file), do the math, copy and paste in place, do the math again, then go back to File > Place for the next page.
Once it’s done, save the document. Now whenever you need to update it, open the source document (the double-height one) and make your changes there. Save the .indd file, and if you had placed a PDF of it originally, re-export it to PDF with the same name and in the same location, replacing the original.
Now open your target document and look at its Links panel. You’ll see that your modified pages show out-of-date icons:

Shift-click all the out-of-date links and choose Update Links; you’ll see your document update accordingly without any images changing position:
Great tip! This would also come in handy for those preview images on the back page of the calendar. You could either show the whole page (including the calendar boxes) or crop it to just the picture. That way if you change the picture or the crop, it’s automatically updated on the back of the calendar as well.
New technology = proceed with caution. I just had a disaster with my newspaper where I used a placed document for the skybox on page 1 of my main newspaper file. The background imaged; another picture and a photo didn’t. Now I have a ghosted photo with no context or no nuthin’ above the fold.
This works good if you have an element you use across a range of documents that need updating from time to time. For instance I use it on installation instructions that are update regularly. There is a block of text with company information that changes occasionally. I keep this block of text as a separate file then if I change that file it updated in all the others.
I have a different method which I prefer.
The first part is the same. Create a single pages document at the full size of the vertical spread. Once the document is created export a PDF with bleeds and no marks.
Open the PDF in Acrobat and rotate all the pages 90 degrees and save.
Next create a new document with facing pages at the actual size required for printing but rotated 90 degrees so that if the full document unfolded will be 11×17 create the new document at facing letter size pages.
That will create 17×11 spreads. Place the PDF page by page. The first and last pages will of course need to be done with place and crop method.
Export a new PDF and voila.
This is brilliant! When I first started reading I was like no, no, you can’t just combine the pages, because printers need to break up pages to create the weird impositions necessary for calendar printing. But then you really nailed it with combining the pages and then splitting them within a new InDesign document. Nice!
I like Bob’s solution too.
Worth noting is that the 5.0.1 update fixes the problem with stitched images in placed INDD files making that a very attractive option now.
Taysh comments here that you can use the Links panel to keep track of which page of a multi-page PDF or ID file is about to be placed (into the 2nd “trim size” doc).
This is really good, I’ve used the method for a University Architecture presentation that is 16 A1 sheets, laid out 8×2. Many of the images spread across more than one page and I need to consider printer margins. I’ve placed and cropped the pdf 16 times and it works brilliantly!
Teus de Jong wrote a nice little script in 2005 that automatically exports any document to PDF, then creates a new document in rotated aspect and places the PDF, rotated, ready for for either printing as spreads for top binding or single sheet use, or for imposing into a saddle-stitch binding.
You’ll find it at https://www.adobeforums.com/webx?14@@.3bbd4bb6/0
Where did you get the shell for the calendar? I have lots of photos that I want to use for a NFP group I work with and I can’t find a 2009 calendar shell. Thanks.
Ann, please read this thread: https://creativepro.com/need-to-build-a-calendar-in-indesign.php
Isn’t it much easier to treat the whole document as being rotated 90 degrees and use rotate spread view 90 degrees for all spreads?
@Matthew: That’s a great point, and it brings up an inherent issue with a blog like ours: This article was written in 2007 (see date at top), long before there was a “rotate spread” feature in InDesign.
Anne-Marie, your one-liners have me rolling. Great article, and great sense of humor! Thanks!
Thank you Naomi :D
Anne-Marie, although you posted this a while ago, I just found it and it’s going to help me with my current project. Thanks very much! However, I’m wondering how to handle page numbers–I won’t be able to use automatic page numbering in the original document since each single page will eventually be split into two pages. Will I need to wait and add them in the target document? I’m working in CS5.