Underline Every Line of a Paragraph, All the Way to the Edges
CL wrote:
I want to style a paragraph where every line is underlined. No problem. However, I want those lines to extend the length of the text frame, regardless of text length. Full justification is not an option.
That’s a tricky proposition, CL. As you noted, underlining all the text in a paragraph is no big deal. You can even make a paragraph style that has the Underline style applied to it. (You could also apply a character style that underlines the text, but my basic rule is: Try hard to avoid applying a character style to every character in a paragraph. If you find yourself needing to do that, you’re probably better off making a new paragraph style instead.)
I can think of two ways to achieve your goal, neither of them particularly elegant. First, you could anchor a group of lines into the paragraph. For example, I drew a red line across the length of the frame, then used Step and Repeat to make as many rules as there are lines of text in the paragraph (using the same vertical offset as the text leading):

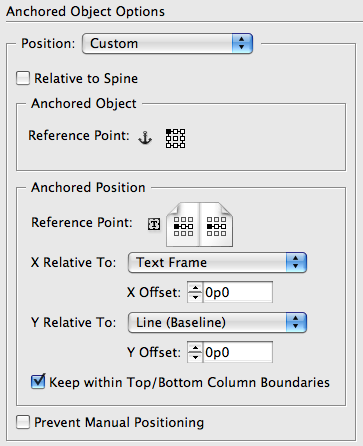
Then I selected all those lines (I dragged a marquee around them with the Selection tool, then Shift-clicked the frame itself to deselect it), then grouped them (Object > Group). At this point, I created an object style for this group, which makes it easy to change it in the future. Then I anchored it into the paragraph (cut with Selection tool and pasted into the first line of the paragraph with the Type tool). Here’s the Anchored Options pane of the Object Styles dialog box:

Later, you may want to apply this to another paragraph. No problem: Just copy the anchored group and paste it into the first line of the target paragraph. If there are too many lines, you can easily delete one or more with the Direct Selection tool. (If you need to add more lines, it’s harder… you’d have to unanchor, ungroup, add, regroup, reapply the style… oh, it’s not pretty…)
Multiple Paragraphs
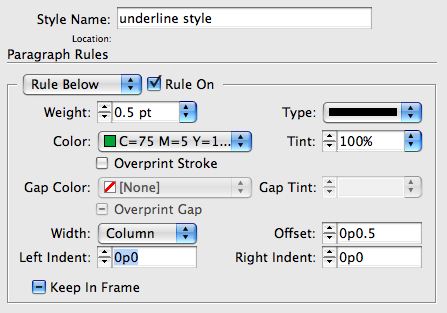
The second way to handle this would be multiple paragraphs. This, too, is far from optimal. Basically, you would have to add a paragraph return at the end of each paragraph. Then those paragraphs could have a paragraph style that applies a Rule Below:

The key there is to make sure the Width pop-up menu is set to Column (not Text) so that it stretches to the edges of the frame.
Of course, this technique would be a problem if the text is going to be edited further. Or exported later.
Specialized Stripes
Okay, I just thought of another (somewhat insane) method: Create a customized stripe. Here, I have a four-stripe stroke made by choosing Stroke Styles in the Strokes panel menu:

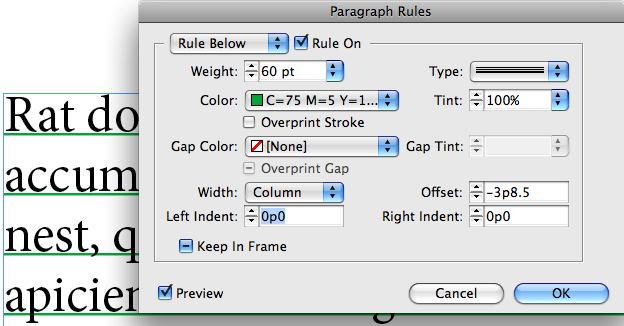
Then you can apply this single stroke as a single Rule Below (or Above) to a four-line paragraph:

The Weight should be (I think) the leading multiplied by the number of lines. Getting the Offset just right is tricky, but doesn’t take long with trial and error with the Preview checkbox on.
My heart says there has to be a better way, but my brain says sometimes you have to suffer for the sake of art.


Hi.
One i’m thinking of is a mix of both your methods :
At the beginning of your paragraph, anchor a text block, object style says : fill it with a paragraph style including only the rules, anchored object relative to Line (Baseline).
You type the number of required paragraph returns.
The bloc now moves with your edited text, and if you need more or less lines just type return or delete.
Making the line style a child of your paragraph style, you keep the leading.
Problem arise with paragraph split on two columns/pages. Have to add another anchored bloc…
Luckily, this doesn’t involve text wrap over an anchored object :)
I think that if I only had a few paragraphs I wanted underlined, I would just make tables. Very easy to underline the entire paragraph that way.
@Patrick: Do you mean putting each line of the paragraph in a separate row in the table? Not sure how that’s easier than just breaking it into individual paragraphs.
However, you could anchor a table in much the same way I discussed anchoring that group of lines. That would be far more convenient, because you could simply make the table longer or shorter for each paragraph and it would add/remove “lines” as necessary!
When the number of lines per paragraph is not too high, or those paragraphs could be split with forced returns I would opt to use paragraph rules above and/or below, BUT using custom stroke styles for the rule type.
I would play or edit the number of stripes per stroke as well as their width. Then in the Paragraph rules I would adjust the weight and its offset.
(Note: increasing the weight obviously makes the stripes thicker, thus their width and position must be adjusted in the stroke styles window). Editing the stroke style applied can be previewed once applied.
I understand the challenge is with left aligned text, with left justified text, a right indent tab applied at the end of each paragraph, and an underline character attribute in a paragraph style would be enough.
Regards
I hope to god, our designers don’t start underlining things just because it’s an available function or trick. There are far better options than to underline paragraphs for emphasis.
I would suggest two steps:
make a paragraph style with every line is underlined and apply where necessary
and then
using Find/Replace, in all paragraphs with underline style, insert Right Indent Tab before the End of Paragraph.
Here’s a weird way – but I envisage a lot of problems if it’s not black text on white paper.
Preferences>Grids>Baseline Grid>Color>White
View>Grids and Guides>Show Baseline Grid
On the Text Frame
Text Frame Options>Baseline Options>Baseline Grid
Use Custom Baseline Grid.
Start: 0 mm
Relative to: Top of Frame
Incerement Every : 6mm (for 14/17pt for example)
Color Black
On the first paragraph of the text:
Rule Above: White
(make it sit on top of the First Baseline at the top of the frame)
View>Grids and Guides>Show Baseline Grid
Hide all text frame edges etc.
File>Print/Export>General>Options/Print Visible Guides and Baseline Grids
Unfortunately, I don’t know how to make the baseline grids thicker, but you do get an underlined effect that goes right to edge of the frame, whether the text is indented on the left or right.
You also have to set the paragraph to snap to baseline grid, either in the Paragraph Styles under Indents and Spacing>Align to Grid, or through the Paragraph Panel (the little buttons on the bottom right).
Just an idea :)
Just to add – I know my “solution” isn’t all that practical or indeed advisable. It is a way you can do it, but in the real world you shouldn’t even consider it.
The way I’d probably do it would be to use two text boxes, one on top of the other. (One with the text, the other with the underlines.)
This seems like a pretty simple way of doing it to me, but I might have overlooked something.
I’m still trying to figure out why anyone, anywhere, would want to underline all the lines of a paragraph.
But I do appreciate the thinking and ideas. It definitely has me thinking about how to do it. Not that I ever would and I would rather die a slow horrible death than to use underlines in that way. But the thinking of how to do it (the underlines–and not my slow death) is interesting.
{edit: I know Dave thinks a character style sheet would be the wrong way, but if was nested it wouldn’t be that big of a deal, would it?}
Maybe there should be a way to do so like with CSS’s background-image property.
[Alt]+[Ctrl]+[J] / Paragraph Pule
>Rule Below (NO)
Couldn’t get easier. :)
As for why… well I’m using it for a Nutritional Facts Panel…
why? to make a form, where people fill in stuff:
for example:
Name: ______
Adres: ______
etc…
thx Nick D., you answered what I was searching for, short and clear :)
Nick’s answer will work great for forms, but it won’t work in the context of the original question.
I thought I’d cracked it with a single paragraph style that combined a top paragraph rule, bottom paragraph rule and underline option (which are a nightmare to line up with each other!).
This worked fine for the top and bottom lines of a paragraph, but wouldn’t right justify the underlining of any lines in-between the top and bottom.
You can work around this by adding a right-justified tab to your paragraph rule, then manually tabbing to the right margin of each line of text, but this is pretty nasty. Works great for multi-line answer areas on forms though.
To reduce spam, comments have been closed for this post. If you want to start a related discussion, head over to the Forums and create a new topic.