

Why Red Boxes Instead of Blue?


Chris wrote in with a perplexing mystery:
We just moved from QuarkXPress to InDesign to produce our weekly college newspaper. Our newpaper students are using templates created by the graphic design department to lay it out. When laying out page 1, we keep getting red page element boxes (both graphic and text) instead of the traditional blue boxes. These red boxes won’t allow us to arrange, send to front, send to back, etc., which makes designing an attractive page 1 problematic to say the least.
Ah … the old “traditional blue boxes” issue! ;-)
I hear this question quite a bit actually; mainly from new InDesign users who, like Chris and his team, have been supplied with InDesign templates created by experienced users or clients.
Color of Layer = Color of Frame
The reason that the non-printing bounding boxes of text and graphic frames are colored blue (Light Blue to be exact) in InDesign is because they’re on the default layer — Layer 1 — whose color is light blue by default. Open your Layers panel to see it:
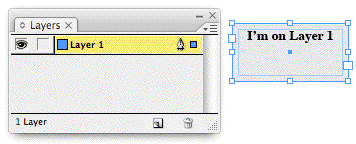
If you never crack open the Layers panel you might think that the light blue color is, indeed, “traditional,” and has nothing to do with layers. But as soon as you start working with files with multiple layers, you’ll quickly grasp that the color is actually communicating layer information.
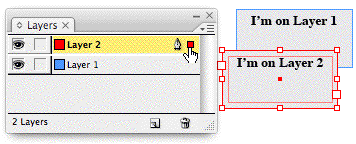
If someone adds a layer to the document (mainly for production purposes), it gets a different color, and objects on that new layer get colored to match. It’s a feature; a quick way to tell which layer an object is on without having to open the Layers panel:

So, the “red boxes” are objects that are on a different layer, whose color has been set to Red. In documents with multiple layers you might have green boxes, yellow boxes, purple boxes and so on.
Arranging Between Layers
The Arrange commands (Object > Arrange > Send to Back, Send to Front, etc.) are confined to the current layer. Select an object and choose Send to Back, and it moves to the back of the layer it’s on, not to the back of everything on the page. It’s easy to miss this nuance if you only work with single-layer files.
When you add more layers, you quickly learn that layers themselves have a stacking order. Objects in top layers (the order as seen in the Layers panel) always appear above objects in lower layers. So if you wanted to move something to the back of everything on the page, you’d have to move it to the bottommost layer first, and then choose Object > Arrange > Send to Back.
In other words, to set the arrangement (the stacking order) of any two objects in a multi-layered document, you need to deal with two stacking orders: the objects in a layer and the layers themselves.
Chris’s Answer
So let’s go back to the original question. Chris needed to move a “red box” so that it appeared below a “blue box.” Let’s assume that the layer colored red is above the layer colored blue, which happens to be the default when you add a second layer, as seen above.
Chris could drag Layer 2 below Layer 1 in the Layers panel, which would put everything on Layer 2 below Layer 1, but I’m guessing he just wants to change the stacking order of that single Layer 2 object. Sending it to the back is not enough, he needs to put the object on Layer 1 first.
You do that — move an object to a different layer — by selecting the object so you can see its Layer proxy icon, the little colored square to the right of its layer’s name. Then you drag and drop the square to the layer you want the object be on — in this case, Layer 1.

(I have a special copy of InDesign that changes text strings when the frame changes layers.) ;-)
Now you can select the object and choose Send to Back, and it will move to the back of everything on that layer. Since Layer 1 happens to be the bottom-most layer, the text frame appears in back of everything on the page itself.

Well answered! Such a small thing, but yet so vital. All that’s left to say is: “Welcome to the wonderful world of InDesign!”
Also…in the screen caps above, there is an empty box to the right of the little ?eye? icon on each layer. Make sure you don?t see a little pad lock icon in those boxes. That means the layer is locked and would also prevent anything in those layers from moving. Simply click the lock icon to unlock the layer, and you can move stuff around again.
Thanks Lauren! Good advice.
There was so much info about Layers I was tempted to include in this … heh. I advised Chris to read the section on Layers in InDesign’s online help; as anyone should do if they’re unfamiliar with them but need to work with a multi-layered document. (And even if you don’t, you should read it! Layers are so useful in all sorts of ways.)
If you need to get everything onto just one layer quickly (and still maintain relative placement for X, Y & Z) do the following:
1. Open the layers palette (or panel)
2. Make sure all layers are unlocked
3. Edit > Select All (Cmd + A)
4. Object > Group (Cmd + G)
(now objects are all on one layer you can drag the little colored square in the layers palette to whichever layer you wish to have the objects on.)
5. Object > Ungroup (Cmd + Shift + G)
6. In the layers palette, drag unused layers to the little trash icon to tidy things up.
I would love to be able to group things across layers without them going to the same layer.
Eugene, such cross-layer grouping would of course be useful in some cases — but I strongly fear it’s “physically” impossible in any computer program for graphical objects to behave that way, since it would violate the very fundamental logic of the object/layer stack.
Actually Klaus, QuarkXPress has no problem with cross-layer grouping. And it behaves logically too … if you select a “loose” non-grouped object that’s above another object (which is part of a cross-layer group) on the same layer and Send to Back, that “loose” object jumps right behind the object that’s part of the group, but stays on its original layer.
Cross-layer groups cannot be sent to back/front (the commands are greyed out). Regular groups can be sent to front/back.
Anne-Marie, that’s amazing! I’ve not touched QXP since AD 2000, I’m pleased to report — though I briefly looked at their 7.3 demo version two weeks ago, and just said “Ugh, I’m not using that ugly, crude beast!”
OK, I’m happy to stand corrected — then we can maybe get that feature in ID, too.
Anne-Marie: “Ah ? the old ?traditional blue boxes? issue!”
That inspired line of yours has me chuckling still!
So when are you two bringing out a new podcast — aren’t we paying customers overdue for a delivery now??? Or did you take my money and abscond to Mexico?!
I am trying to transition from Quark 6.5 in my current work flow. I am a little stump about linking or threading text. I would like to set up a job with the boxes pre-linked how do I do that. Is there a text box and an image box. The boxes seem to be generic
correction to the linking question. I would like to pre-link text boxes in templates I am preparing
Frank, my suggestion is to check out the lynda.com/IDsecrets link to get a free one-week trial to lynda.com. Then you can watch the videos on InDesign (including threading text frames). Even better, it’d be a good idea to get a book on the topic!
Frank, I completely disagree with your reply to Eugene about grouping across layers without the objects actually moving all to one layer (you felt it was ?physically? impossible in any computer program for graphical objects to behave that way, since it would violate the very fundamental logic of the object/layer stack).
The solution to this problem is not a difficult programming feat at all. It just requires a new menu command such as “Group Layer Objects” and a secondary object/layer stack that would behave similar to the first or “Primary” stack. Objects grouped across this Secondary stack could be moved about just as though they were grouped on the Primary stack but without affecting the layer order indicated in the Primary stack.
Undoubtedly Adobe (or 3rd party developer) would have to modify other commands to accommodate this feature but the benefits of grouping without moving everything to the same layer are huge, especially for multi-language publications such the catalogues where each language appears on it’s own layer with a common image layer. Indeed, this would be a huge benefit when it comes to database integration where applications like InCatalog require objects to be grouped in order to properly link their contents to the correct database recordsets.
Thank you SO MUCH! We’ve been using InDesign for years, and we never use layers, so after my colleague edited a common file (and apparently added a new layer), I could not send any “red bordered” images to the back. So frustrating! Now, I see it’s such a simple fix. Whew!
Thanks for the article, very helpful!
This is probably the only place where I get clear cut answers to the issues I’m having as I’m learning InDesign on my own!! Thank you so much!!
Thanks for the all the above helpful info – I have a related question to this. I have somehow accidentally managed to create two layers in a large document: a “Default” (blue) and a “Master default” (red). I too wondered just why I had pages of red boxes and other pages of blue boxes. And after googling up my query I found this location. My question is how do these two layers relate to my master which (I truly hope) is the same for everything. Should anyone point me to a primer on this I would be grateful. Else, please tell me what the ramifications are and/or how I should get out of it. Thanks in advance.
My guess is that the designer created a layer that he put all the master page objects on. It’s not required to do this, but maybe their reason was so that they could easily distinguish all master page objects on the document pages by the color of their frames. More recent versions of InDesign already do this by using dotted frames for master page objects, but those can be hard to see for tired eyes.
I’m the “designer.” Without going overboard on detail, I have a long-term project to replicate an old out-of-date manual. Been working on/off on this for about six years. Actually started on it with PageMaker (I was a whiz at PM – user from Version 1 through PM7). ID constantly befuddles me. I do use the Master Page to set up a template for each chapter: some objects that are common to every chapter. But for the life of me I don’t know how or why I’ve apparently suddenly (and “suddenly” could mean over the past 18 months) created a second layer. I’m just concerned that I’ve introduced something into this large project that may have deleterious effects when I gather everything up and book all the chapters.
At this moment I’d be glad to know if a “Default” layer has special meaning compared to “Master Default.” TIA
Thank you Anne-Marie for the clear explanation. I’m a sign maker that uses CorelDraw & CadLink programs, but often receive InDesign & Illustrator files from clients. Your explanation is very helpful. Wish I had read this article years ago!
This was driving me nuts … thanks for the help!