

A Closer Look at Panels

“Don’t sit so close to the screen! You’ll hurt your eyes!” How many parents have said that to their kids? For me, sitting too close to the TV was a free way of getting a bigger screen. Sometimes it pays to stare closely at InDesign too, because you might notice some subtle clues it is giving you.
One such clue, hidden in plain sight, is a little bold line around certain panel lists.
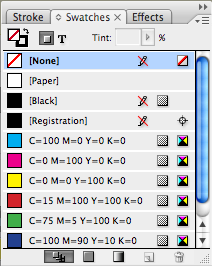
Notice the difference between these two shots of the Swatches panel?

Panels like Swatches, Links, Styles, Effects, Tags, Index, and so on are basically lists of choices. Usually you make a choice by clicking on an item. But when you see that bold line around the list, the list has focus, and it will respond to input from your keyboard. You can use arrow keys to navigate the lists or you can start typing the names of items in the list à la Quick Apply, to select them.
So under what circumstances does the bold line appear, indicating that the list has focus? You’ll see it right after you summon the Links or Swatches panels by choosing them from the Window menu, or pressing their keyboard shortcuts. You can also give the lists focus by command+option/ctrl+alt clicking in the list. If you click elsewhere, the list loses focus.
Here’s a rundown of panel behavior when lists have focus.
Swatches Panel: If a tintable (hey, there’s a new word) swatch is selected when you summon the panel, the tint field will be highlighted and you need to press tab to get down to the list. Gradient swatches, [Paper], and [None] are not tintable, so if one of them is selected, the list has focus. Once the list has focus, use the arrow keys or start typing the name of the swatch you want. If you have a page item selected, the swatch is immediately applied to it. For more on this, see Anne-Marie’s post, or mine on Publicious.net.
Links Panel: When you summon the Links panel, the list has focus, and it’s ready to accept keyboard input. Press the keyboard down arrow to move through the list, or start typing the names of links. Now you might be saying, “Great, but what’s the point? Once you have a link selected, what can you do with it from the keyboard?” By default, not much. But you could add some keyboard shortcuts for commands like Update Link, Go To Link, and Relink. Combine those with panel navigation from the keyboard, and I think you’ve got something pretty slick. Too bad holding shift while you press the arrow key won’t highlight multiple links. However, command/control+a does select all links.
Paragraph, Character, and Object Styles Panels: When you summon these panels, you don’t see the bold line around the lists, even though they do have focus. But it’s a tease, because while you can navigate like in the Links and Swatches panels, you can’t apply the styles to selected text or frames. Rats! You’re going to have to stick to mouse clicks or Quick Apply. But perhaps all is not lost. Again, you could assign shortcuts to functions of the panels. Maybe Clear Overrides, or Break Link to Style.
Layers Panel: The list has focus when you summon the panel, and you can immediately navigate the list. Unfortunately, there is nothing you can do with a selected layer. There aren’t even any good candidates for keyboard shortcuts, since all the layer options are smushed into a dialog box instead of a menu. But it’s still worth taking a close look at the Layers panel because you might notice another subtle cue it’s offering.

See how Layer 2 is in oblique type? That indicates the layer is nonprinting because someone unchecked Print Layer in the Layer Options dialog.
So be good to your eyes and sit back from the screen a little bit. Just don’t blink too much or you might miss something.
When I drag an existing layer to the ‘new layer’ icon of the Layer Groups panel (I use DTP tools’ Layer Groups plugin) it auto sets the new layer to be non-printable.
Is this default InDesign behaviour, or due to the plugin, because it’s quite annoying at times.
Roland-
I haven’t used Layer Groups, but I’d blame that one on the plug-in. Do you have the most recent update to Layer Groups (v 1.2)? There was a different nonprinting bug in an earlier version.
Yep, 1.2.0.
I’d uninstall the DTP Tools plugins to trouble shoot that one (and another problem I seem to have gotten when I updated their plugins), but I can’t remember if they need de-activation or not and thus might not be able to re-install them. Guess I’ll contact DTP Tools’ support on that.
Great tips,
I would just like to add also that you can use the escape key to navigate from the swatches list to area above where you can use X to alter stroke and fill focus, and J to alter formatting affects focus.
Cheers,
Rob Staley
Oh and this one too: you can use command, option, tilde to jump back from the fill/stroke, formatting icons into the tint field, and then tab to focus on the swatches.
Cheers,
Rob Staley
I am running InDesign CS4 on Vista Ultimate 64 without a problem. In transitioning to Win 7 Ultimate 64 I find that my mouse is totally ineffective on the menu bar. The keyboard used for the same operation poses no problem. Moving from the Text pointer to the Selection Tool is also difficult, unless I resort to the V-Escape command.
Any thoughts regarding this problem? Thanks.