

Adding Navigation Buttons for Interactive Documents

In the current state of design and publishing, the desire and need to create interactive documents is growing at a rapid pace. The term “interactive” however, can be applied to a plethora of technologies and file formats including DPS, AEM, PDF, FXL, and Publish Online just to name a few. Regardless of the intended output or format of your documents, the creation of navigation buttons in those documents is a common request from clients and designers alike. Although many applications that display these various documents offer methods for navigating from page to page, creating custom navigation buttons for your documents provides a much more immersive experience to the end user.
Adobe InDesign provides designers with the tools necessary to add interactive buttons to documents that will be retained when exported to .pdf, .fxl, .swf, and Publish Online. For users of DPS and AEM, these buttons work for those formats as well. In the example below, I’ll work with a multi-page InDesign document that I’ve created previously in which I’d like to add navigation buttons. InDesign allows you to create buttons from virtually any type of object including drawn shapes, text frames, graphic frames, and placed images. I would like the navigation buttons that I create to appear on every page of the document, so I’ll be creating them on a master page that all of the document pages in my document are based on.
Creating the Buttons
Begin by opening a document in which you’d like to add navigation buttons. Navigate to the master page and create the buttons where you’d like them to appear. For this example, I used two placed images of a boot print for the “previous” and “next” buttons and I drew a circle with a stroke to use as a “home” button.
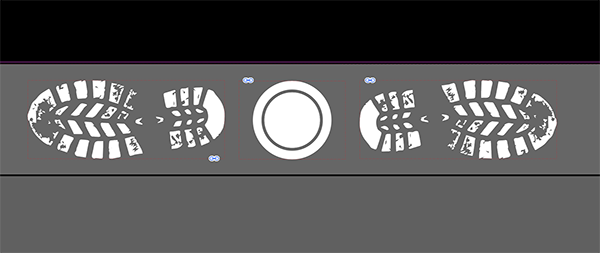
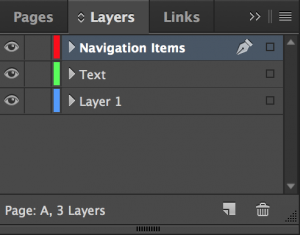
When creating navigation buttons, it’s almost always desirable that they appear on top of everything else on each document page. For this reason, I always create a separate layer called “Master Items” or “Navigation Items” and put my navigation buttons on that layer, making sure it is at the very top of the stacking order in the Layers panel. Not only does this ensure that the buttons will appear on top of everything else in the stacking order, but it also helps keep things organized and provides the ability to show, hide, and lock those items if desired.
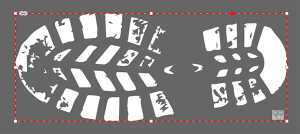
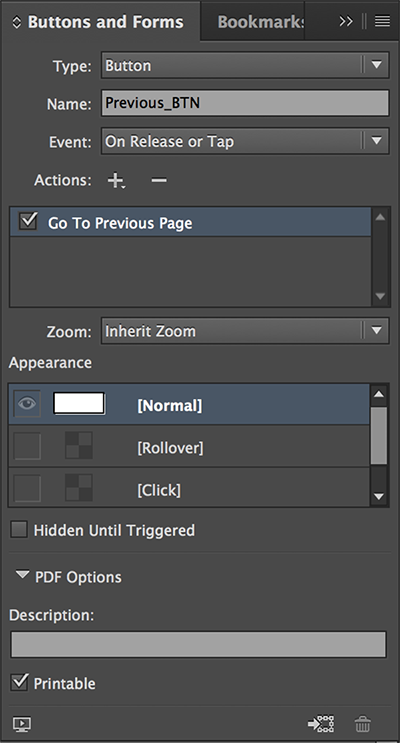
Now that you have the visual look of those buttons in place, it’s time to actually make those elements function and behave like buttons. Select one of the buttons and open the Buttons and Forms panel by choosing Window > Interactive > Buttons and Forms. Now, convert the selected object to a button by choosing Button from the Type drop-down menu or by clicking the Convert to Button button (I never get tired of saying that) at the bottom right corner of the Buttons and Forms panel. The selected object will now have a dashed border around it and an icon will appear in the lower-right corner of the object indicating that the object is a button. You’ll only see these elements if the object is selected and you are in Normal viewing mode. Preview mode will hide the icon.
Although we’ve converted the object to a button, that button currently doesn’t actually do anything. We need to add an action to the button to tell it what we want it to do when clicked or tapped. With the object still selected, click on the + sign in the Actions section and choose the action that you’d like the button to perform. In this example I chose Go To Previous Page. You’ll now see that action listed in the Actions section indicating that it is assigned to the selected button. Note that you can assign multiple actions to the same button. I like to name my buttons appropriately in the Name field. I do this mostly out of habit, but this is particularly helpful when you get into more complex button creation where you are controlling other buttons with the button you are creating. An appropriately named button is much easier to identify than “button 1”, “button 2”, “button 3”, etc.
Select one of the other buttons. This time, we’re going to speed up the process by simply clicking on the + sign in the Actions section and choosing Go To Next Page. Conveniently, this converts the selected object to a button and assigns an action to the button all in one step! Next, select the shape in the middle of the previous and next buttons and assign the Go To First Page action to it. This button will serve as a “home” button that takes the user back to the starting point at any point in time.
Testing the Buttons
Testing these buttons isn’t as straight forward as it could be, and your ability to test them within InDesign will depend on your destination format. In the case of an interactive PDF file, you’ll need to export the InDesign document as a PDF and test it in Adobe Acrobat or Adobe Reader. Just make sure that when you export the file as an Interactive PDF, that you enable the “Include Forms and Media” option. Unfortunately, button objects don’t usually work on mobile devices (like the iPad), because the PDF readers (even recent versions of Acrobat) don’t recognize them. If your PDF is destined for a mobile device, you may want to use a hyperlink instead. You can use anchored links to jump to a specific page.
In the case of Fixed-Layout EPUB and Flash, you can preview the interactivity using the EPUB Interactivity Preview panel or the SWF Preview panel both of which are found by choosing Window > Interactive in InDesign. These panels allow you to preview the buttons and other interactivity that you’ve added to your document before you actually export to those formats. One item worth mentioning is that the default preview in both the EPUB and SWF Preview panels is “Set Preview Spread Mode” which only previews the current page. To preview interactive buttons that navigate from one page to the next, be sure to enable the “Set Preview Document Mode” button. Both of these buttons are located in the lower right corner of each respective panel.

In the case of Publish Online and other formats, you’ll need to test them in their respective environments which usually means uploading them to their intended destinations for testing.
Regardless of your intended output, you’ll find that buttons can add a richer experience to your interactive documents making for a better overall experience for the end user.
I work on a Mac and have noticed that when I test the buttons and/or links, they don’t always work; when I have them tested on a PC they work. Any ideas on why this happens or how to correct it?
Make sure that in the ePub preview panel you have the Preview ALL PAGES selected, (the most right pages icon on the button), otherwise it will not work in preview!
Denise, thanks for bringing that up and Frans, thanks for the solution. I forgot to mention that in the article so I’ve added it in to make things clearer. I hope that helps!
I’m looking for a way to add a close document button to an interactive pdf. The issue is that the PDF will be full screen so closing it is not always evident to a user. So far I’m not finding a way to do this.
Why the radio button always appears on top of all pages..? though it’s on the lowest layer (some pages do blank on the position of the button, and some do cover it – so it’s desired to be not appeared)… it appears on top of all pages on the output (PDF) while it’s not on the InDesign (as desired). It is made on the Master page – but the other items that they are not “button” (same on the Master page), it’s just worked as desired (some covered, some not). Any idea on this, InDesign’s Masters?
I have created buttons on my master pages, but I cannot get them to perform their assigned action in the PDF. The buttons I added to the TOC in the document work just fine, its the master page buttons that don’t work. Any ideas on how to fix that? I don’t really want to have to go through and add the buttons on every page.
I have a text book I created with InDesign in which I want to add syllabus amendments in a panel on almost every page. I only need to show the amendments on a low resolution pdf for web use so I thought I would simply create a button to open the amendments panel which will float over the page and can be switched on and off as required just leaving thw button in the margin.
How do I get the button to open a panel on the same page?
(I thought the panel might be part of the ‘click’ state of the button, hence, hidden until clicked).
Thanks in advance,
Denis.