Alias One Color Swatch to Another
Perhaps you know that InDesign’s Ink Alias feature (hidden inside the Ink Manager) lets you alias one spot color to another. But you can force it to alias to a process color, too, if you’re a bit tricky about it.
First, what is aliasing? Let’s say you have imported AI, PDF, and PSD files with spot color Pantone 286C, and you’ve used that same spot color to fill or stroke InDesign objects and type, too. Suddenly, your client tells you that they’ve changed their corporate color to “Pantone 235 C” and you need to update all your files before your big job goes to press… tomorrow.
Sure, you could open all the source files and change them to the new color. Or you could save yourself a lot of time by aliasing the old spot color to the new spot color in InDesign. To do this, make sure you have spot color swatches for both colors in the Swatches panel. Then, open the Ink Manager. (You can find the Ink Manager in about 5 or 6 places, including the Swatches panel flyout menu, the Color panel flyout menu, the Print dialog box… they all go to the same place.)

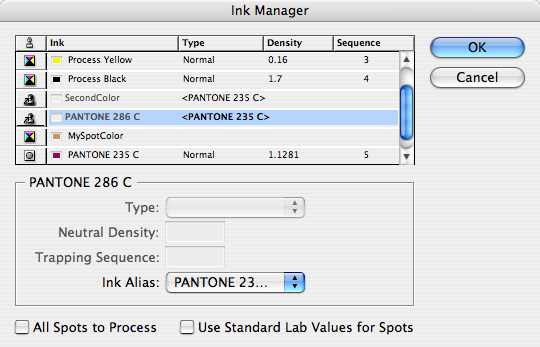
In the Ink Manager dialog box. select the “from” color (here, Pantone 286) and choose the “to” color from the Ink Alias pop-up menu. When you click OK, InDesign aliases one to the other, so when you print or export, the colors shift accordingly.
The problem is that normally, you don’t see the aliasing on screen, so you just have to trust it. Fortunately, you can force InDesign to display aliasing by turning on View > Overprint Preview (or turn on seps in the Separations Preview panel). For example, here’s a shot of a PSD duotone inside a stroked frame, with vector artwork in an INDD file (with transparency) on top of it. (Remember that you can place INDD files into CS3 as easily as PDF files.)

Now here’s what it looks like after aliasing Pantone 286 (blue) to 235 (dark red), and then turning on Overprint Preview:

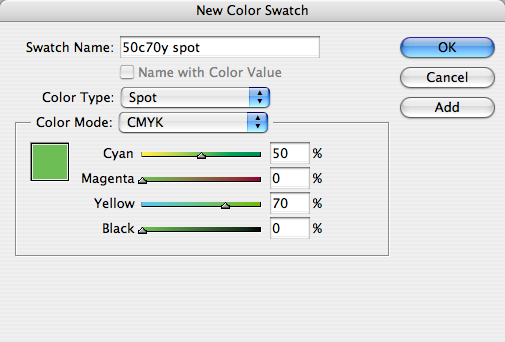
Okay, that’s great. But what if your client said, “we’re not printing with a spot color anymore. We want this color printed as a process tint build of 50% cyan and 70% yellow.” Ink aliasing is great, but you can only alias a spot color to another spot color (or to a solid process color). Or can you?
When talking with Sandee Cohen recently (via Skype, while she was in Copenhagen! I love technology…), we came up with a clever solution. First, build a CMYK color swatch for the color you want. But instead of defining it as a Process color, make it a spot color.

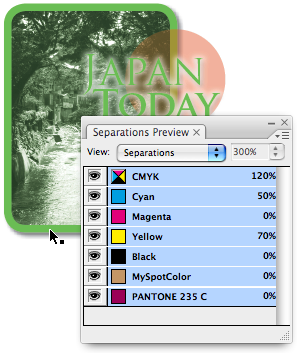
Now use the Ink Manager to alias your spot color to this new “CMYK spot” color… but before you close the Ink Manager, click on the icon to the left of the CMYK Spot in the ink list. That tells InDesign to separate the color into process colors.

That’s it! When you print or export a PDF, you’ll get process colors:

Sandee and I will be presenting a session about staying flexible and keeping your options open ’til the very end at The Creative Suite Conference in a couple of weeks in Chicago. Then Anne-Marie and I will be doing an InDesign tips & tricks session. If you like this tip, you’ll love the conference.


I use a similar technique when I need to make a mixed ink colour… I’ve been doing a lot of work where I overlay CMYK over a spot silver to make lots of different metallics (like the metalFX set-up). To make my swatches I make a ‘Spot Silver’ and a ‘Spot Colour (green for instance)’, then I use the ‘mixed ink swatch’ to combine these together, then I use the ink manager to split just the ‘Spot Colour (green)’ back to process – this way you can control the ‘green’ like a global colour like in illustrator giving you the 0% – 100%. Leaving you with just the Silver as a spot!
Too bad we still can not alias “Black” to a spot color! I so often have files submitted in black and the clients wants to see a pdf in something like 485. Major prepress pain in the butt.
Hi Terry,
You could always use third party tools for Acrobat such as Enfocus Pitstop to globally change colours.
Modern pre-press workflows use the DeviceN or NChannel colour space which typically comes out of InDesign in any case – therefore re-mapping becomes easy.
Jon
I just had a call from a printer who wanted to know how to move a black job containing placed grayscale PDF pages in an ID CS3 document to a spot and I told him that as far as I know, there just wasn’t a direct route.
Surprisingly, this is a lot easier to do with a piece of software history that most designers still cringe at: PageMaker.
You export the ID pages to EPSs, place these in a new PMkr document (with page sizes of course), and simply select the EPS and the right spot colour from the color palette. Then in PMkr, use Print to File as EPS files and use these to replace the PDF pages in the ID document. When you then export to PDF from ID, you’ll see that it really works.
I’ve used this in a pinch where I have been given a pile of EPS logo files of various spots and even process colours.
One other route that can sometimes work (I just used the other day actually) is to take a vector file and place it into AI. Then put your spot colour behind that EPS (usually as a rectangle) to cover the area you want. Select both items and make a ‘Opacity Mask’. That moves everything 100% black, to 100% of the spot colour chosen. And all tints in between, of course. Save as an AI file with PDF compatability, and place into ID.
One way I’ve figured out how to change black to a certain spot color (such as Reflex Blue) for the client to proof, would be to export a PDF and open it in Photoshop. Then change the Image mode to grayscale, then to duotone…
in the doutone options you can change it to use only one ink color (monotone) and you can specify that spot color. Easy as that, and it will separate and trap perfectly (as long as you dont mind going from vector output to rasterized output – but I always choose 600 dpi and you really can’t tell as long as you aren’t enlarging the graphic).
Chad,Your advice from 8 years ago made my day. Exactly right and seems like a basic thing to do, why should it be so tricky? In my case today it was a print service vendor who wanted my file to be Reflex Blue, not the client wanting to see it as proof. Seems to me the printer could make his offset plate from the black channel and just print Reflex Blue or any ink he needed, but no.
Chadthebad, I have to admit that I’m very wary of any sentence that includes “open it in Photoshop.” It is far too easy to screw up a document by opening it Photoshop. The number one problem is that vectors all turn to pixels. 600 dpi might be okay for you (perhaps you only print on newsprint), but for most people, that would look mediocre to poor quality.
[…] you can get around that by using ink aliasing! I wrote about aliasing in this article. But you can stretch the idea a bit in order to have your cake and eat it, […]
[…] ki, ink aliasing kullanarak bu sorunun üstesinden gelebilirsiniz! Bu makalede aliasing hakk?nda yazd?m . Ama sizin de pasta var ve bu yemek için fikir biraz uzatabilirsiniz! […]
The “from” color is in my swatches panel, but does not show up in the Ink Manager; how can I fix this? Thanks.
Françoise: If it is not in ink manager, it is probably not a spot color. Only spot color swatches show up in Ink Manager.
Thank you!
I used grep to change text in black to blue. Text was in individual text blocks on a form so could not select all. Know absolutely nothing about grep, but in the find/change dialog box for grep: Find what: leave blank, change to: leave blank; find format (with magnifyer glass icon) select text fill as black, change format: select text fill as blue. Then change all in document and voila! Imagine what I could do if I could actually get to grips with grep!
It’s good that you tries your hands on GREP but this is not GREP actually, it is a character attribute and can also be done from the Text Find/Change tab. Try it if want to confirm. If you are crazy about learning GREP, than there are huge resources available on this forum itself.
You are right Masood, perfect result. I would love to learn GREP but it seems so complex I have only ever attempted the most simple of formulae and only when I have been desperate.
Hi
I have a spot colour Ink Alias to another spot colour. I need to run a script that assigns Ink Alias’s…..any idea how to access this property in InDesign JavaScript scipting????
Gary
Just to say this still works, and it’s really easy! Thanks. Saved me hours of work!
Thank you David Blatner, I was searching for this solution for ages… Now I can finally relax and alias the PMS colour to another whatever my client wants :)