

Breaking up pages with the Page Tool.

In my previous post, I wrote about the Page Tool in InDesign CS5. Not only can you use this tool to resize pages, you can also use it to reposition pages and their content. Anyone who designs artwork that is going to be wire-o bound for instance, would probably like to be able to a) design the document pages as spreads and b) be able to break-up these spreads when the time has come to deliver finished art PDFs to the printer.
Unfortunately you’ll need to work with a non-facing pages document layout for the trick I’m about to show to work…
The document set-up
- Start by creating a non-facing document ? clear the Facing Pages check-box in the New Document dialog ? and create at least two separate Master Pages. One for the right-page designs and one for the left-page designs.
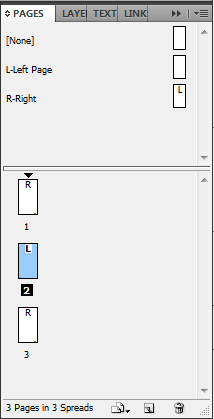
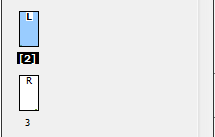
- Select Page 2 of the document and from the Pages panel menu deselect the Allow Selected Spread to Shuffle. Square brackets will appear around the page number in the Pages panel.
- To create a page spread, drag page 3 next to page 2.

Obviously this is a super tedious task, if you are creating a longer document. So my advice would be to set-up most L-R spreads in advance, before starting the actual layout work.
- Right-click the selected spread and choose Duplicate Spread, or alternatively choose Duplicate Spread from the Pages panel menu.
- Select the two page spreads in the panel and repeat the Duplicate Spread action. Continue to select larger page spread ranges and duplicate the spreads until you think you have enough pages for your layout.
You can now spend some time putting the layout together and submit PDF proofs in spread format (Select the Spreads check box in the Export Adobe PDF dialog to generate PDF spreads).
Time to break-up
When it is time to submit individual pages with bleed on 4-sides to the printer:
- Selecting the Page tool
 .
. - Next in the Pages panel, Ctrl/Cmd click on all the Right hand pages.You should see a blue overlay appearing on the right hand pages in the document.
It’s now time for the break-up … I know break-ups are never easy ;-) but remember… once they’re wire-o bound they will be together once again ;-)
- With the Page tool still selected. Click the Top Left Reference Point (or any reference point on the Left) in the Control panel.
- Clear the Enable Layout Adjustment check box.
- Select the Objects Move with Page check box.
This ensures that when the right hand pages are being moved away from the left hand pages, the content on those pages will move with the pages. Let’s assume I want to move the pages about 10mm apart from each other.
![]()
![]()
- In the X-field, add +10 behind the measurement (e.g. ‘120mm +10’), Press Enter/Return.

The result is that the page spreads still appear next to each other in your layout, but now have a 10mm gap between the pages. I think that’s kinda cool! ;-)
All that needs doing now is for you to go through the document and expand any artwork to the bleed guides in the spine area before creating the finished art PDF to your printer.
Wow .. .brilliant!
Tiny point: It’d be fine to add “+10” if your default measuring system was mm but if it’s inches … might be a little too much? ;-)
@Anne-Marie :-) thanks :-)
Maybe I should add some ‘inches’ measurements as a comparison :-) don’t want people wondering where on earth those right hand pages have disappeared to :-) :-)
How much would you add in that case?
Well there’s 0.039 inches in a mm ;p
What a practical way to use that feature .
Unfortunately – InDesign won’t give you a Bleed Line between the pages – perhaps CS 6? LOL.
Great post though – love the flexibility this can add.
For the life of me I can’t get the bleed to show up in between the spreads, like in the screenshots?
I have 5 mm set for bleed – I have to offset the pages by 11 mm for the bleed line to show in the center of the spreads. That solves that.
@Eugene,
I think you’ve answered your own question ;-) … for the bleed to appear around both pages once they’ve been ‘broken-up’, you’d need to ensure that the gap is 2x bleed value + a little bit :-) The bleed on my document was 3mm only.
Oh I got there in the end, LOL.
*misses ability to edit posts*
Very nice!
Maybe I should update that old script to use this method…
Have you updated the script? If so, where can I find it?
Rich- You can get the script here: http://in-tools.com/article/scripts-blog/separate-pages-script/ I just tested it and it still works.
@Harbs would be cool to have a script that would get to this stage even for Facing Pages docs :-)
e.g. look at Master Page spread applied, generate separate Left and Right master, apply L and R master, deselect Allow Selected Spreads to shuffle, change to non-facing pages, and continue from there, with a dialog that allows people to set the ‘gutter’ between pages or something…
:-)
So this lets you pretend you’re working on a facing-pages document, but without the benefits like easy page shuffling and away-from-spine-page-numbering?
What happens with spread-spanning images or backgrounds? Won’t they move with the page you’re moving off to the side, completely fudging up your design?
Maybe I’m completely missing the point here, but I think working on an actual facing pages document and exporting that to PDF without turning spreads on would be far easier.
@Roland
I generally advice people with artwork that is ‘spine-spanning’ to perform a copy and paste in place and set this up as two separate images. for Left and Right side.
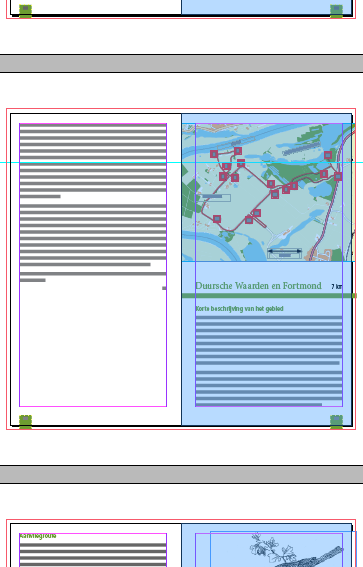
For documents that are wire-o bound you need to have bleed on all 4-sides. The example I used shows you a good reason why you’d need to break-up the pages… The map on the right hand page runs to the left and right edge of the right hand page.
When this page is to be delivered to the printer, it needs to have this map image bleed on left and right hand side.
Working with a facing pages document wouldn’t work, as there is no way I can display the left-side bleed that is required, as it would appear on the right hand page as well.
Hope this is making sense :-)
I’ve always done it this way with facing pages: In the pages panel, select the spreads that need to be split apart. In the flyout menu deselect “Allow Selected Spread to Shuffle.” Then, you select the thumbnail of a right-hand page in the pages panel and drag it slightly to the right. This will maintain the spread’s left and right affiliations while allowing you to then go and extend the bleed into what was the spine area for a coil bound book (or for a perfect-bound book).
I’ve been in the position before where I needed to convert a very large document to be printed and wirobound.
I have to say the quickest and easiest way was to setup as actual facing pages, then Break the Spine Apart. I did this by hand the first few times and it wasn’t hard to do – even with large documents. It was a matter of scanning down the pages and finding images that should have spanned the spine, it was then just a COPY and PASTE IN PLACE on the next page, and the image gets placed exactly where it should be. And then just expanding pieces off the spine that butt up against it.
Harbs script for breaking the pages apart makes it far easier to separate the pages. But adjusting the images is fairly easy, at least in my experience; and didn’t take long at all.
I have in the past also setup with single pages, as Cari points out you can do, with A Master and B Master being verso/recto pages etc. Which works quite well in some cases, but not so well in other cases. But the added bonus of actually making it a facing pages and separating it with the Page Tool makes this worth revisiting in future projects.
But that’s the fun – there’s always more than one way to do something in InDesign (or anything really) and this is yet another great tip on using the Page Tool. Thanks for the cool tip.
Now, if anyone knows of a way of getting the Page Tool and the Gap Tool to be at the bottom of the Tool panel, just under the Apply Fill, Apply Gradient, Apply None, I would love to hear.
I detest where they are in the Tool panel as it is.
“Harbs script for breaking the pages apart makes it far easier to separate the pages. But adjusting the images is fairly easy, at least in my experience; and didn’t take long at all.”
Where can we find this script?
Thank you so much for the post dear. This is so nice of you to post such a useful stuff. Good day.
Thank you very much for this post. This is really a good one. Keep it up.
Is it possible to have portrait and landscape mixtures in a multi page document?
@Barb:
Yes, it is. That is in InDesign CS5+ you can use the Page Tool to select a Page in your document and then change the orientation for instance.
In earlier versions you’d need to build separate documents for portrait and landscape and then combine them to single PDF for output delivery using InDesign’s Book feature.
I’m not getting the blue overlay. Am using Windows XP.
How do I get the blue overlay?
Hi Susan,
Are you in InDesign CS5 or higher? You need to use the new Page Tool and click on the page in the Document window of InDesign or else click on the pages in the Pages Panel. Make sure you have the Page Tool selected in the tool box when you do this.
As far as I am aware, the blue overlay even appears when you are viewing the document in Preview mode.
Cari.
I’m running into 2 problems:
Using the page tool my x coordinate is not highlighted, I can only adjust my y coordinate. I think the problem is that it’s not allowing me to break or move my master spread, which is my second problem. Does anyone know how to break up a master spread after it’s been applied to multiple pages?
WOW! Thank you for your help! So easy! ;)
Having the same problem as Melissa – any ideas?
thanks!
@London designer + Melissa: I think you’re probably working with a Facing Pages document.
You can try to split pages in a facing pages document as I wrote about in this blog post:
https://creativepro.com/breaking-pages-apart-to-bleed-off-a-spine.php
I don’t think anyone has added to this in a while but THANK YOU!
i’ve been going crrrrrrazy trying to figure this out for the last few hours x
Absolute bloody legend mate!
Thank you!
Do you have the steps to do this in CS6? For some reason I can only move my pages on the Y axis.
I am sorry, I am just crazy and had facing pages on! Awesome tip here ;) I work for a printing company and this is a perfect way to set up perfect bound books!
Yes!
Thank you! This saved me a lot of time on a cookbook that was changed to spiral binding at the final stages.
Thank You so much! This whole process was so Tedious, but with your article I was able to figure it out!
I disagree completely. If you have facing pages you have to set up your document with facing pages. Otherwise you will get problems with Paragraph Styles and Object Styles which are bound to and away from the spine. So this is not a good solution, it is not a solution at all.
Or when you have facing page, you will have to apply the left master to the left page, the right master to the right page. With your method it is not possible.
In the Adobe Forum I have written another method WITH facing pages: https://forums.adobe.com/message/6226204#6226204
See #7 from me.
@Willi
Were there any other problems you found with this? Your solution is how I tend to fix the issue when a client sends a file that is set up without bleeds.
For me personally I think the real issue is that as designers (Which I am one, I just so happen to print and produce perfectly bound books too) want to get the full visual of how the page will look in the book. Thus the option of facing pages.
You can get the feel of facing pages but the benefits of setting it up correctly by using this method by just creating a new master that contains two pages then create the gap for bleed.
This way you only have to drop one master.
For the issue with the styles that are bound to the spine you simply have to change them to align “Away from Spine”. You can simple create a new style that is away from spine and assign it accordingly. This solution creates a way for a person to see their spreads while still having the bleed they need. It also requires a lot less time spent on splitting pages apart.
It is not true, when text flows and a paragraph with toward or away from spine is divided in 2 pages (not very often, but it happens) you can’t tell on one page toward the spine, on the next away from the spine. You can’t make 2 paragraphs neither because a paragraph is an entity which should not be divided by logical terms.
Putting apart a single page is only there needed where a design break is here, on other pages you still see the spreads.
For clients you would never give away an open INDD, export a PDF with facing pages front cover and you see how the spread looks like in Acrobat. PDF is the way to test a file anyway.
Sorry, your description is way to complicated to manage huge documents because any change in text or page will have an influence in the following parts which should be avoided. And a double sided printed document has to be set up as facing pages.
With not facing pages and moving around them it could also happen that they move vertically which is possible with single pages, also not wanted an miscalculated gaps between pages will create other problems, all those are not apparent in a facing page environment.
@Wilhelm
I see exactly what you at talking about with the issue with the paragraphs!
My issue with the facing pages is I have clients that have spreads, and crossovers on almost every single page of their document.
So you are talking about separating out 40-60 page documents with your process.
This is something they will not do. Which leaves pre-pressers to do. Which then can cause a ton of issues with text, page alignments, objects and everything your are explaining because the pre-presser is doing it and not the person who actually designed the piece.
I think we are just coming from opposite sides because I feel your way is more complected, with more steps needed to be taken and I know you feel the same way about mine.
If I was handed a large document that needed those bleeds your solution is honestly the only way I agree on that.
But setting up, I think this solution is better still, even with the paragraph issue there are still ways to work around it.
To say this is not a solution at all I think is a bit much.
Thank you for pointing that issue out though.
Thanks!
It works!
I am very new to indesign. I was given some files by those who had the position before me and asked to change the layout so that the pages are not side by side in the same spread. We want to make them separate so when viewed as an ePub they can scroll from page to page rather then shuffling across one spread to see both pages.
I don’t know all the language required to describe the situation well but I would love some help on this so if screen shots are required then I am more then happy to provide them. Thanks for any help in advance.
I’m on CC2015.3 and receiving this crazy message:
“Requested operation would cause one or more objects to be too small.
Please check whether the stroke weight is too large.”
I can move the pages manually, but not by entering 220 mm in the Gap Tool pane.
Any ideas what I’m doing wrong, or is it some kind of bug??
Thank you! So helpful. We’re doing binder pages. This worked perfectly.
When outputting as spreads… any page gap created this way will be part of the output. So… 2-4″x6″ pages… with a 2″ gap between then, outputs as a 10″x6″ spread rather than the proper 8″x6″ spread. Bleeds aside, this is an issue if you intend to output as spreads. Adobe should REALLY be ignoring the page gap in spreads upon output. However, as of CC2017… it’s still there. You have to go back through and REMOVE any gaps you created this way before you output as spreads.
I received some templates that had this layout and scratched my head for hours trying to figure out how this was done. THANK YOU! You all are so helpful with these tips!
You just saved me from needless headache in splitting an 42×84 (INCH!) ad for some elevator doors! THANK YOU!!!!
This Looks like a great solution for my bleed issue! However, I am having major problems with my x-axis adjustment. The y-axis is active, but the x-axis is greyed out. Using the page tool as you have outlined I can adjust the pages vertically, but not horizontally to break the facing pages and get the bleed in the center where needed.
I have changed so many settings but still can’t get this x-axis to activate. Any ideas? Please help!
@angela: You have to select the even-numbered Page while your file is still in Single Pages mode. Uncheck Allow Selected Spread to Shuffle, then File->Document Setup->Facing Pages
Hi, there is a blank page within my book document, and I am trying to move all the pages up so that the blank page is gone. I’ve been moving chapters at a time, and was working fine, until I hit Chapter 6 and I can’t seem to move it up at all? It keeps jumbling the pages. It says there are objects on the page, but I can’t see any even with hidden characters. Tried doing page breaks. I’m lost now as to what to do.
Does anyone know what else I can try?