

Build a Moving Bike using Flash in InDesign, Part 1

I’m just sitting here watching the wheels go round and round
I really love to watch them roll
-John Lennon
When I was a kid, I had a Schwinn Sting-Ray bike that looked something like the one pictured below. Though that beloved bike is long gone, I couldn’t resist bringing it back to life with the help of CS5’s animation features. Click the image to open a SWF animation, then click the “Let’s Ride” button to see it go.

The overall effect is built up from several separate animations that are triggered to play concurrently when you click that “Let’s Ride” button. Some are obvious, like spinning wheels and pedals that revolve around the chain ring. Others are not so obvious, like the trickery needed to get the chain to appear in between the pedals. There’s a lot to describe, so I’m going to break it up into a few posts. Let’s start by doing as Mr. Lennon advised us, and watch the wheels go round and round.
Each bike wheel is a group of two ellipses and 8 sets of parallel lines rotated around a center point.

Once you’ve drawn a wheel, getting it to spin is easy. In the Animation panel, choose Spin from the Preset menu. From there, you can adjust how fast the wheel spins by changing the values for Duration and Play.

To make the wheel spin smoothly, change the value of Speed to None. The Speed menu could be called the Acceleration menu, or the Change in Speed menu. So a value of None means no change in speed.
I have my bike moving slowly so you can see the moving parts clearly. The wheels rotate only once over 4 seconds.
Getting the wheels to move horizontally while they spin involves a great trick that I learned from Bob Levine. You can only have one animation applied to an object or group. But if you group that object (or group) with something else, say, a frame with no stroke and no fill…

…you can apply another animation to the new group. In this case, I chose Move Right.

With this method, you can compound the effects of as many animations as you like on the same objects.
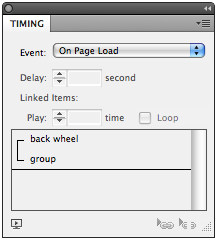
For the wheel, match the duration of the two animations (4 seconds).
To get both animations to play at the same time, you have to select them in the Timing panel and click the Play together button.
Presto!
Your Mileage May Vary: In theory, you can make the wheel spin and move right with just one animation. You can apply a Move Right animation and then in the Properties section of the panel, make the Rotate value 360.

In practice with this particular project, I never got it to move as smoothly as I can with two separate animations. But try a single animation for yourself and see if it works for you. In any case, now you know the group method as a fall back.
Caveat Ungroupor: One thing to be aware of when using the group method: ungrouping will remove the animation applied to the group. Not surprising, since there is no longer anything for the animation to apply itself to, but still a potential source of nastiness for the thoughtless ungrouper. If you need to get at elements of the group, use the Direct Selection tool, or the Control panel buttons for Select Content, Next, and Previous. Or in many cases, you can simply double-click to grab a grouped object.
I Want to Ride My Pi-cycle: The key to getting the movement of the whole bike to look right is to make sure it’s traveling the right distance for the speed at which the wheels are spinning. Assuming we’re not riding this bike on a sheet of ice, there will be a normal amount of friction present. If the wheels rotate once, then the bike should travel a distance equal to the circumference of the wheel. How do you find the circumference of the wheel? Well, think back to geometry class (or just cheat and Google “circumference formula”). Since the wheel is a circle, the circumference is Pi x the diameter of the wheel. In my case, the wheel is 85 pixels in diameter. So for one rotation, it should travel 85 x 3.1415yaddayaddayadda pixels (about 267). If you’re feeling super lazy, just multiply the diameter by 3, and offer an apology to the ghost of Archimedes.
To apply the correct value for the distance traveled, click on the motion path and enter the circumference value in the Line Length (L) field in the Control panel.

You can actually enter Pi into the Control panel field, and for a moment, I thought maybe I’d find an Easter Egg where InDesign would use Pi in the calculation.
![]()
But sadly, no.

Still, how cool would that have been? I think that might have made David’s year, given his affection for Pi.
Next time we’ll take a look at animating the pedals, and you’ll have to think back to physics class and remember the difference between revolve and rotate.
Look, it is not Flash oke? it is InDesign…
If you’re referring to the title of the post, well, blame the SEO gods. Otherwise I coulda gone with my original title, “Pedaling Purple Pixels.” ;)
That made my day :
https://www.joyofpi.com/images/davidandpi.jpg
(the rest of the article is cool too :) )
Yeh.. but Mike, can you pull a wheelie on it?
very clever use of animations and stuff. Looks neato.
@F vd Geest: Yes, blame me… I changed the title to include “Flash.” The problem is that “SWF” and “Flash” are different things, but they are commonly used interchangeably.
@Franck: LOL! I’m glad you like that photo from 1997. That pi statue is on one of Boeing’s technology campuses south of Seattle. I got permission to bring a photographer there for an author photo. Believe it or not, my hair was much longer just a few years earlier (imagine Ozzy Osborne).
@Mike R: This is a wonderfully twisted example of the great things you can do with InDesign. Thank you! Thanks, also, for a reminder of that bike… I had one just like it when I was a kid. Oh, those handlebars… that banana seat! And yes, mine was purple, too!
I had the same Sting-Ray and also loved it. But mine was gold with a leopard-print seat!
Great tutorial, but I prefer the Pee Wee Hermans’s bike. https://en.wikipedia.org/wiki/Pee-wee's_Big_Adventure
Just making fun David, I feel that making this kind of animations in InDesign is abusing the program ;-) LOL!
My question is, how do you get the wheels to turn after you print it? Do we have to wait for CS6?
Anne-Marie-
What is this “print” you speak of? I thought that died long ago.
A-M, A couple of stiff drinks should do the trick!
Actually, we can make wheels turn in print. We just need a lenticular lense to overlay on the output. https://www.3dphotopro.com/lenses.html
They are a little pricey, so maybe I’ll stick with Jennie’s method for now.
If you want to see InDesign’s animation abilities at their tragic worst, try getting two gear wheels to mesh (gears available thanks to Jongware)!
Jeremy-
It’s pretty easy to get gears to mesh by spinning objects in opposite directions (give one a rotate value of 360 and the other -360). But where I agree it’s tragically flawed is if you add an effect, like bevel and emboss. When the gears rotate, so does the effect.
https://creativepro.com/wp-content/uploads/2010/10/gears.swf
Yuck!
Mike, what is the name of your dealer? I want some of the stuff you?re taking…
J-C-
Adobe is my dealer. I’m high on InDesign, man. ;)
J-C-
This one’s for you.
https://creativepro.com/wp-content/uploads/2010/10/gears_JC.swf
Mike, now try with different sized gears :D
My Illy Gear Up script (thanks, Jeremy!) is ‘geared’ to create interlocking cogs, the paths should copy just fine into ID.
And, psah!, I didn’t think it would be useful to write it for ID but now I might reconsider.
Jongware:
You’re much better off writing for Illustrator than ID for pure animations.
Illustrator lets you use symbols that translate into symbols in the exported SWF. This makes the exported SWF smaller and much better to run. (I think this is why each time I try to get the bike animation to run, it stalls or fails.)
You’d have to export to FLA from InDesign and then rework all the motion presets and buttons to get the same sort of compactness from symbols in ID.
That’s not to say I don’t love ID SWF. But I think it is primarily for offline presentations. Or inserting into PDF documents.
Sandee-
If the bike stalls you need to pedal harder!
Joking aside, the animation plays smooth as silk for me, as long as I don’t increase the size of the browser window and stretch it. Not bad considering the bike was made up of more than 60 objects, most of which have effects applied to them in addition to the animation.
I’m seeing the same as Sandee. How big is that SWF file?
It’s 160k. I ran into some weird WordPress problem posting it to the blog, where it would get scaled up to fit the browser window regardless of what I set for dimensions. This happened if I tried to export the bike as a selection or if I changed the document size to fit the animation. The only way I could get it to not be scaled up was to make the document size larger (1024 x 768) and export the whole thing at 100%. Would love to know if there’s a fix/workaround/better approach.
Cute.
But the engineer in me noticed that the pedals and the wheels are spinning at the same rotational speed. They should be rotating at a rate relative to the ratio of the diameters of the sprockets on the rear wheel and pedals. (In this case, the pedals slower than the wheels.)
Don’t worry, I won’t check the sprocket tooth pitch! ;-)
This is great. Thank you.
I am creating a Web banner ad with a fly in from left “20% OFF” icon. Ive managed to create the effect but unsure at what file format I save it to keep this effect for the web people, upload onto the web and show the client it animated.
Any ideas please?
Emelia
PS. Graphic artist trying to do a animated web banner ad in InDesign 2015.