Building an Org Chart or Flowchart in InDesign, Part 1
On the one hand, InDesign is not the best tool in the world for making flow charts and org charts and that sort of thing. On the other hand, other apps are not the best at making professional-looking (“pretty”) layouts. Sometimes “pretty” is more imporant, and we turn to InDesign.
But how best to make an org chart in InDesign? In this first of several articles, I’m going to describe a few of my favorite charting tips. Let’s start with making some shapes.
Making Diamonds
InDesign is great at making rectangles and ovals. If that’s all you need in your flow chart, then you’re set. But lots of folks want diamonds and other shapes.
If you can’t draw a proper diamond with the Pen tool, you’re not alone. Fortunately, there are easier ways. Here’s one:
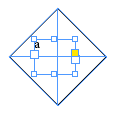
First draw a square frame (hold down the Shift key to keep it square). Rotate it 45 degrees in the Control panel’s rotation field.

Draw a small text frame over it (make sure the text frame is completely surrounded by the diamond), and (optionally) put some text in it.

Now select the rotated square and the text frame and choose Object > Pathfinder > Add. The result is a diamond-shaped text frame in which the text is still horizontal. Give the frame a stroke and/or fill.

?If you want the diamond more squat, just change the H field in the Control panel, or drag the top or bottom handle.

That might seem like a lot of work, but of course, you only need to do it once and then you can duplicate it whenever you need another.
(You may notice that the text is centered in the image above. Horizontal centering is easy, but vertical centering has long been a bugaboo. In CS5, it’s simple: Just open Object > Text Frame Options and choose Center from the Vertical Justification pop-up menu. If you’re using CS4 or earlier, you can fake it by adding a blank paragraph before the text, then adjusting the size and leading of the two paragraphs — one blank and one with text — until the text is centered vertically.)
?Making Shapes with Convert Shape and Pathfinder
You can make many other shapes in InDesign by starting with a rectangular frame and then choosing from the Object > Convert Shape menu:

That can be particularly helpful for making triangles. (Of course, see here for how to make a perfect triangle in InDesign.)
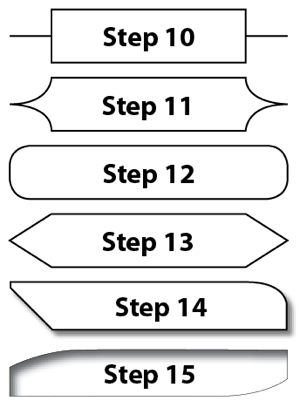
If you want a fancier shape, you might consider creating it with a combination of the Corner Options, Pen tools, the Pathfinder panel (or menu), or the Direct Selection tool. For example, here are some wacky shapes you might use:
 These were made (top to bottom) by: rectangle with corner options set to Inset (with radius bigger than half the shorter side); corner options set to Inverse Rounded; corner options set to Rounded; corner options set to Bevel; a combination of corner options and bezier points along with a drop shadow; a rectangle with two bezier points added with the Pen tool, then adjusted with the Direct Selection tool, and with an Inner Shadow.
Of course, remember that just because you can make really weird shapes doesn’t mean you have to.
In the next part I’ll explore how to align all these objects and start to tie them together with lines.


Ugh flowcharts… the bane of my existence! And the way some people supply them UGH. Drives me demented. Then someone decides, “actually made a mistake, that’s the wrong text” and supplies another file with 100’s of text frames in Word and you have to pull them all out and reinsert them.
I usually do the layout of the page or article, then leave a space for the flow chart. I then start a new document to that size and draw the flowchart there and then place the InDesign file into the layout. It means I have a separate file if I need to place it again, and any update is reflected throughout. And it’s also available to others should they ever need it.
But I usually use tables to make my flow charts, I don’t have fancy beveled edges or things like that. Step 10 and 13 are totally doable as tables.
I look forward to the next steps on these – I’ve never seen others tackle Flowcharts in InDesign, so this could be very interesting.
Nice, I am looking for the next part.
Wow that sure seems to take a lot of time to draw these! Suggestion – Why not do this in something else (like Open Office Draw or the free Diagram Designer) and then make it look pretty in Illustrator and save as an EPS?
I have engineers trying to give me stuff all the time from MS Visio which I can’t do anything with. So I finally got a couple them to start using this:
https://logicnet.dk/DiagramDesigner/
Now they can draw them, I can place them, and I don’t have to hardly touch them in INDD!
Times have indeed changed.
I still have part of a roll of graph paper that I used to draw (with a pen…not a pen tool) and layout Org Charts. One little bitty piece of photo typesetting paper at a time. Of course, I didn’t mind all that much until we switched from rubber cement to wax.;-) Actually wax was a quantum leap for production.
Guess what…they even had the “oops, I forgot” thing going then, too!
The biggest tricks include drawing your basic shapes first, choosing a typeface that is readable at just about any size, sketching the org chart, picking a good layout size for final scaling (it will need to be re-purposed), and turning on the grid…graph paper gone hi-tech!
Hi awh,
Thank you for your suggestion – https://logicnet.dk/DiagramDesigner/. This seems to be a lot simpler than Visio.
What’s the best export file for Indesign that works for you?
Thanks!
Creately is a much simpler tool to create org charts and flowcharts. There are templates and examples to choose as well.
Just a quick note…
I’m looking at InDesign CS and the Vertical Justification is in the Text Frame Options dialog, too. I’ve been using that feature for a long time!
:)
@Derek: Yes, the feature has been there for a long time. But new in CS5 is the ability to use it for frames that are not rectangles. In the past, that feature stopped working with non-rectangular frames, or if a text frame was affected by text wrap.
Even though the title promises instruction on org chart creation, the write up only covers flow charts.
Anybody with a good advice on how to build a fairly simple organization chart?
Thanks
Thomy
@Thomy: Most org charts I’ve seen basically are flow charts (usually with rectangular frames). Can you point to examples of org charts that look different, or that you’d like to create in InDesign?
Thanks for the help! I have also found How to Make a Flowchart using lucidchart and it is very easy to use!
We use a lot of Org Charts in Engineering Proposals, which require a position “title” in one box, and a name in the box underneath. (https://www.edrawsoft.com/images/examples/Hospital-Org-Chart-Full.png)
Best solution we’ve found is to draw a mini-table. This allows us to apply styles to each Table so that they can be applied and/or changed more easily.