Cell Spacing in Tables? Sorta.
Two attributes of table cells have a long history in the web design field: “cellpadding” (equivalent to InDesign’s “cell inset” or “text frame inset”) and “cellspacing,” which is the amount of space in between the cells. This HTML Code Tutorial page has a decent explanation of the two, with illustrations.
As far as I know, no page layout program with a Table function has a cell spacing feature, including InDesign. So whenever I hear someone ask “Where’s the Cell Spacing command in InDesign CS2?” (as I did this morning on the InDesign User forum at Adobe.com … this post expands on my reply there) I know the user must have a web design background.
InDesign does not have any way of setting a cell space measure. Cells are separated by, and share, a single stroke. If you apply conflicting stroke settings to adjacent cells, the most-recently applied one “wins.”
If you really need cell spacing, though, I do have a …
Cell Spacing Workaround
Depending on the table you can sometimes fake the look of cell spacing with the type of stroke you use.
For example, if you don’t need color inside the cells, try putting the table over a colored background or over an image, then select the whole table and use the Stroke palette to apply a 6 pt or larger stroke of the type “thin-thin,” colored Black, with a None (transparent) gap color.
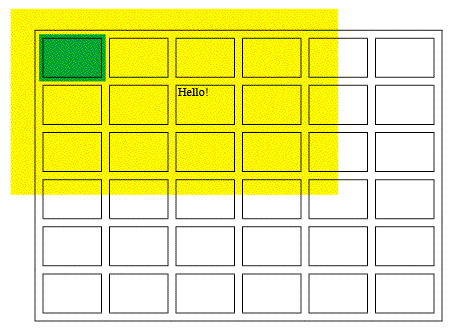
You end up with a black grid of cells that appear to be spaced apart, and you can see the background objects through the cells (behind the text) and spaces between the cells. Here’s an example:

You can make the stroke a heavier weight to increase the “spacing” between the cells, but of course that increases the weight of the opaque portions of the stroke as well.
The stroke called “thin-thin” uses a ratio of 25-50-25: The stripes are 25% of the stroke weight each and the space between them is 50%. I made a custom stroke style from the Stroke palette menu with a ratio of 10-80-10 (which I called “thinner-thinner” … heh) and applied it to the examples on this page.
The problem is that you can’t fill the cells with a color, otherwise the color bleeds into the space in between the cells … the strokes always “align to center” in tables, so the color bleeds halfway into the empty space. You can see that in the image above, where I filled the first cell with green.
Workarounds Inside Workarounds
If you need color inside the cells, but still want the space in between the cells to be transparent, the best I’ve been able to come up with is to fill the cells with colored tables.
Click inside a cell you’d like filled with a color and set its cell insets to 0p0. Then choose Table > Insert Table, specifying one row and one column. Click OK and the table almost fills the cell. Select the embedded table and in Table Options set its stroke to 0 and set space above/below to 0p0. While it’s still selected, fill it with a color from the Swatches palette.
You may have to drag on the embedded cell’s borders to get it to fill the cell exactly, but once the first one is perfect, you can copy/paste it into other cells that are the same size.
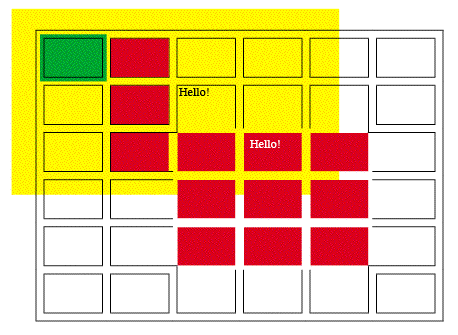
The example below shows a few of the same grid’s cells filled with colored one-celled tables. The ones upper left still have the grid showing. To make the “floating” red cells in the center, I selected the cells and changed the stroke color to None (but didn’t change the weight):

A lot of pain in the butt workarounds for this, I know! To tell the truth, if I had to create this effect for a real project, I’d probably just create a grid of small text frames and rely on grouping and align/distribute to do what I needed, if I could get away with it. On the other hand, if I was faced with a lot of tabular data, I might just go this route.


Hi, Anne-Marie …
Concerning the call-spacing in Tables/Color issue …
Maybe I’m missing exactly what you want to do, but I’ve developed tables for newsletter calendars that do what you need with no problem. Using your custom stroke system, I simply give everything a “gap color” of Paper or any other color. It fills the entire gap, and if you color the cell, there is no bleed. I can send an example if you like.
Thanks for all your ongoing help.
Jerry
Hi Jerry, the reason that a lot people want to be able to space out cells is so they can put something behind the table and have it show through the spaces … which wouldn’t work if you colored the stroke gap with Paper. Yes?
Right you are (unless they just want a solid color behind, in which case you could color the gap to match). I guess for the real fun, we’ll have to wait until ID CS3 which I hear is supposed to have the ability to make just about everything independently transparent (though I guess “everything” may still not apply to table cells.)
The other workaround is to insert a thin row or column between every regular column and row, and make them transparent (and go back to a regular border stroke on the cells with contents.) Any background graphic will show through the padding columns and rows, while allowing you to color your cells any way you choose (or make them transparent, too.)
Hi
I’ve discovered one way to make the line transparent ? you need to set all borders to white, and then use the ‘multiply’ transparency mode for the table.
This will make the cells opaque as well usually if using over an image, but that effect can be cool. But it’s a very easy way to get a ‘gap’!
Hope this helps!
Ben
(PS – If you could set the transparency mode for just the stroke we’d be on a winner!)
Hi.
I found another way to fake cell spacing. It is a small trick that I picked up after some research into this topic.
The idea is to create a paragraph style that has a colored background. Here is how to make one if you don’t know how:
In your paragraph style, go to the paragraph rules section. Go to the ‘rule above’ or ‘rule below’ and tick ‘rule on’. Select a thick stroke and offset it to the size of the cell, adjust the left or right indent if necessary to fit your table. Select the text and apply the style.
Hope this tip is useful. I know this saved me heaps of time for all my calendar projects.
hi
i have proplem wth table indesign cs4 the row colrs is blue and the fonts is paper .
i send it to p d f the i cant see the font i cant understand the problem
please help me
thanks
For a vertical gap between cells. Give the textbox containing the table a column count, then flow the table. The table wraps round to the next column. Control the gap using column width settings.
CorelDraw do that with one click….
https://postimg.org/image/pbosohrkf/
I have a table with a border all round but there is a tiny gap at the bottom between the last cell and the border. If I close the border the last row disappears, if I enlarge the row depth the row disappears. Any suggestions?