

Change Default Drop Shadow Settings


I don’t know who at Adobe decided that drop shadows should have an opacity of 75% by default, but it drives me crazy. Every time I apply a drop shadow I have to dial it down some — usually to 30% or 45% — which is much more pleasing to my eye:

Today I finally figured out a way to change the default opacity (and other default drop shadow settings, like Noise percentage) for shadows applied to text frames, graphic frames, and drawn shapes in CS2 and CS3. Your custom defaults appear automatically whenever you open the the Drop Shadows dialog box, whether you open it from the Object menu; from the Command-Option-M (Ctrl-Alt-M on Windows) keyboard shortcut; or in an Object Style Options dialog box.
However, I still haven’t come up with a way to change it for the types of objects I most often apply a drop shadow to: placed images. (But there’s a workaround, which I detail at the end of this.)
For everything else, here’s the simple two-step process for saner shadow defaults.
Step 1 of 2: Make New Object Styles
You may have noticed that whenever you drag out a text frame, ID assigns it the [Basic Text Frame] object style by default. Whenever you drag out one of the graphic shapes — the empty rectangle, ellipse or polygon — or draw your own artwork with the Pen or Pencil tool, ID assigns it the [Basic Graphic Frame] object style.
The stupid default 75% opacity Drop Shadow attribute is part of these Object Styles. BUT we don’t want to edit these styles (listen to our podcast #59 for details … Cardinal Rule #2 is “Don’t edit default styles”) since that results in unwelcome surprises when copying and pasting objects from one InDesign file to another. Instead, we’ll make new ones, and tell InDesign to use those automatically. If you copy/paste objects linked to custom styles, they come along for the ride; so formatting stays intact in the receiving document.
Begin with InDesign CS2 or CS3 running but with no documents open. That way, the changes we make will become the new application defaults (they’ll work on all new documents we create from now on). If you want to change the defaults for a project currently in production, you’ll need to repeat the steps here with that layout active.
Now, duplicate each of two default Object Styles by dragging them onto the New Object Style icon at the bottom of the Object Style palette. Then double-click one of the copies to open the Object Style Options dialog box. Rename the style (I’ve added my initials in the CS3 screen shot below) and turn on the checkbox for Drop Shadow so you can edit the defaults:
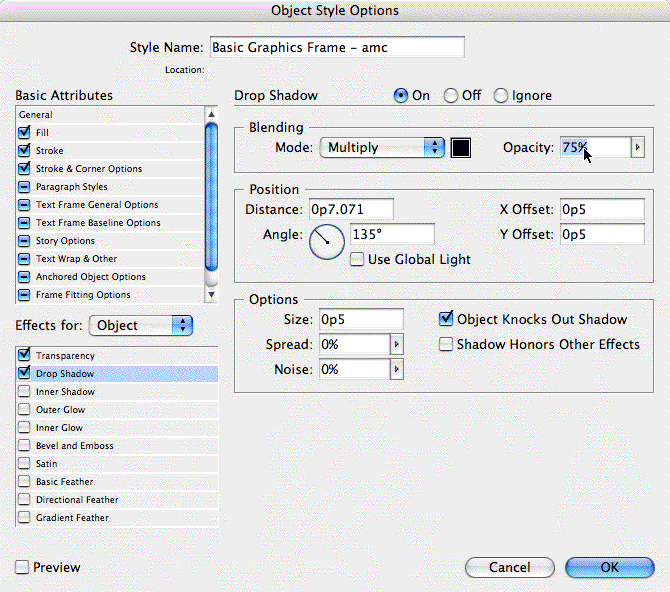
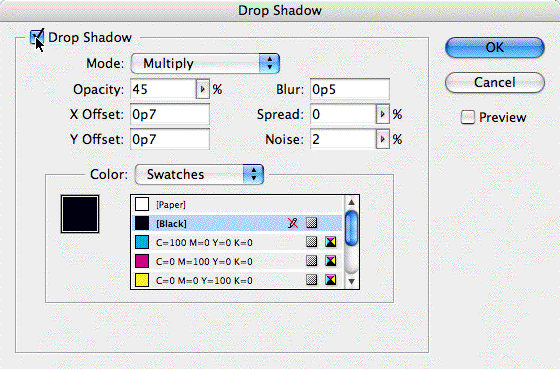
After you’re done editing the default settings, uncheck the Drop Shadow attribute in CS3; in CS2, leave it checked in the list of attributes but turn it off in the Drop Shadow details panel to the right. Otherwise, every new object gets a drop shadow, yikes! Note that your edits “stick” even with the attribute disabled — here’s a screenshot of the CS2 version of the same dialog box, after I’ve edited the shadow defaults and then turned it off. Can you see the opacity is now 45% and the Noise is 2%?

Click OK to close the dialog box, which saves your edits. Now do the same thing to the other Object Style you duplicated: Double-click it to open the Options dialog box, rename it, turn on the Drop Shadow attribute, edit the defaults, turn it off, click OK.
Step 2 of 2: Make Them the New Defaults
A little-known feature in CS2 and CS3 is that it’s easy to change the default object style for text frames and graphic frames. You can drag and drop the cute little icons in the Object Styles palette from the old default styles to the new styles, or just use the palette’s fly-out menu to choose the ones you created:

Either way you’ll end up with the icons appearing next to your doctored object styles, indicating they are now the default styles for those object types:

To test it out, create a new document, then drag out a text frame or shape frame (the plain Rectangle tool and its cousins), and choose Drop Shadow from the Objects menu. (In CS3 it’s in the Object > Effects fly-out menu.) As usual, you still have to turn on the checkbox in the Drop Shadow dialog box to wake it up. However, note your new default settings! Woo-hoo!
What About Image Frames?
When you place an image, or drag out one of the placeholder frames for it (the shape tools with the X in them), InDesign defaults to the [None] object style. And you can’t edit the [None] style. Argh! Personally I think it’s a bug. (Actually, I just left a comment on the InDesign Live Help page about this.)
About all you can do is the following workaround … after you’ve reported the bug/feature request to Adobe of course.
Create a new Object Style, called perhaps Basic Image Frame, and do the same thing as described above for its Drop Shadow defaults (turn it on, edit, turn it off). Be sure the style isn’t based on another object style (it should be based on None) and uncheck all the attributes. I’m pretty sure this is what the default “None” style does. Here’s what mine looks like in CS3:

Now, to take advantage of your refined drop shadow defaults, you just have to remember to always apply your new Basic Image Frame style to all the images you import or placeholder frames you create. In CS3, you could use Find/Change Object to change all [None] styles to Basic Image Frame, I guess. Since all the attributes are ignored in the style, it won’t change any formatting; just the shadow defaults.
Either way it’s a pain, but if you’re a drop shadow freak (or there are other default settings for your image frames that you’re constantly changing), this is the way to go.
Thanks for this tip. Helps me out with having to change each drop shadow. Keep up the great work, love the tips.
Yes! Thank you. that default has annoyed me forever…I tried changing it in workspace, but it wouldn’t take…Love this tip!
For those of us who aren’t religious about applying object styles, the old PageMaker trick works, too: with no documents open, set your defaults. Those defaults get applied to new documents.
Dan, that only changes the default setting for graphic frames (in CS2 and CS3 at least) you create from then on. Actually, it adds an override to the default [Basic Graphic Style]. Styles … you can’t get away from ’em! ;-)
It doesn’t change default drop shadow settings for placed images or text frames, as far as I can tell.
FWIW with the method I explained above, you don’t have to apply any object styles for the new defaults to work. (With the exception of shadows for placed images … would love to find a solution for this.)
Thank you Anne-Marie! I’d been using an object style via function key/Keyboard shortcut (as you and David have indicated in the past) to handle this annoyance.
Question: What does FWIW mean?
-M
FWIW = For what it’s worth.
:)
AM
I just switched from Publisher to InDesign and it’s a little intimidating still, given the power and myraid bells and whistles. I saw some nice shadow effects on a few templates, but couldn’t figure out how to do them…know I know! Thanks!
Thank you, thank you, Anne-Marie! I’ve been searching for an answer to the “ugly default drop shadow” dilemma for months now. What was Adobe thinking?
“for saner shadow defaults” has really made me laugh…
I agree, I’ve been working with InDesign CS3 for a couple months now and every time I use a drop shadow I immediately change the opacity and distance! Now I have my normal settings as default.
I have noticed lots of other issues with InDesign drop shadows though… when exporting as a pdf or eps I get all kinds of crazy white lines and or distortions of crisp vector objects. Some of which actually showed up in the printing of our last publication (which I didn’t think would) I wonder if anyone has a good solution for this? I found a quick fix solution but it would be nice to know if there is any way to stop this in InDesign.
Almee, when printing documents with transparency (including drop shadows), or when making Acrobat 4 files or EPS files, make sure the Transparency Flattener is set to High Resolution. You should not see any lines when you actually print. However, also make sure you have updated to the 5.01 version.
Just noticed that every object in CS3 are applied drop shadows in the “effect”. When turn it off manually, the shadows are not showing on screen but the “drop shadow” effect are still there with the”knock out” option checked. Any one know how to fix this? Thanks.
I have an object with a drop shadow on top of a resume. I went to put that same object on the bottom with a 180 degree change, but cannot figure out how to make the dropshadow appear on the opposite side so as to balance the object.
This is probably so elementary, yet, I cannot understand how to do it by the help button. I need help from a real person. Can someone please advise. I really appreciate whatever someone can suggest. Thank you
Crystal…disable global light in the drop shadow settings.
@Crystal: More on rotating drop shadows here.
Had to make some minor adjustments for CC2014 but it still works! Thanks!! This is exactly what I needed.
I know I’m running an old version of InDesign (CS2) but I love it and it works for me… with that said, I’ve been meaning to find a way to change my default drop shadow setting for literally years! i mean 75% is just craaaazy! thank you — i will now effortlessly have gorgeous dropshadows without all that clicking and typing!
I am in CC2018 now and thought to change presets fort once and for all; mainly because every time I want to give an object an outer glow I have to change my prefs every time. Still it seems impossible to change the random settings. Very annoying!