

Changing the visible layers for Illustrator documents

When you place a layered Illustrator file, you have the options of showing or hiding those layers from within InDesign instead of having to go back to Illustrator to change the visible layers. This is a terrific way to show alternate versions of a file, make working with buttons or object states easier, or just use one Illustrator document for multiple instances in an InDesign document. For instance, here are a bunch of icons placed in InDesign.
Various icons from the same Illustrator file with different layers visible
However, if you look at the Illustrator file, you’ll see that each icon, as well as the modifying colors, are on their own layer.
The icons set on their own layers in Adobe Illustrator.
This technique also makes it easy to create multi-state objects with alternate images for each state.
An example of how different Illustrator layers make up the various states of a multi-state object.
Working with Illustrator Layers
So how do you display the layers of an Illustrator file? There are two places to set the layer visibility. The first is when you choose the Illustrator file to place. Click the option to Show Import Options (or hold the Shift key as you click Open) and you open the Place PDF dialog box. (Don’t let the fact that InDesign thinks the Illustrator file is a PDF bother you. It only indicates that you can do the same actions with placed PDFs.)
Click the option for Layers and you’ll see the names of the layers in the Illustrator document along with eyeball controls. Click each of the eyeballs to show or hide the layers.
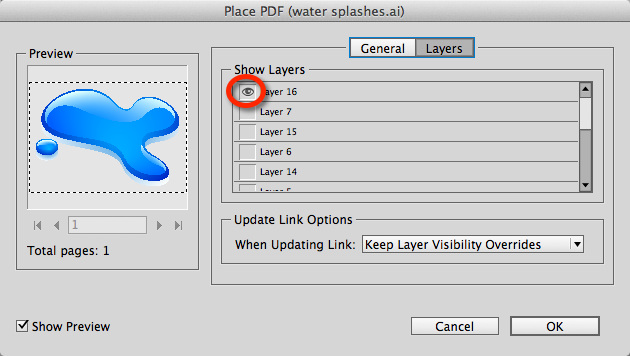
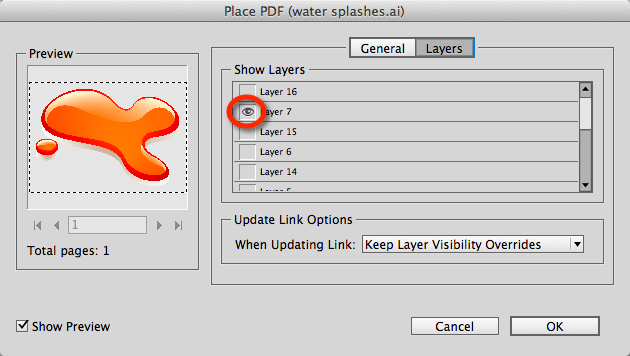

An example of how you can set the visible layers when placing a file.
Unfortunately, there is no way in the core program to place the file multiple times with each layer visible. I create the various options by place the file once and then duplicating it several times. Then I change the layer visibility. (See the next paragraph.)
Once you’ve already placed a file, you can change the layer visibility by selecting the image and choosing Object > Object Layer Options. (If you use this feature often, you’ll want to apply a keyboard shortcut to the command.) This opens the same sort of dialog box where you can change the visibility eyeballs. The major difference is there is no preview field in the dialog box. You need to click the Preview checkbox to see what your actions are doing.

A placed Illustrator file with several layers visible.
The Riddle of the Bounding Box
One thing that recently stumped me was when the Illustrator artwork moved to a new position when I turned off the visibility of the layers. In this case I had the image of a button with a shadow. When I turned the shadow layer on and off, the button shifted position within the frame as shown below.

As the shadow layer is turned on and off, the image shifts within the frame.
The solution for this comes from the Import Options dialog box. Make sure the Crop to menu is set for Bounding Box (All Layers). This makes sure that even if a layer is hidden, its boundary is still used for the position of the art.
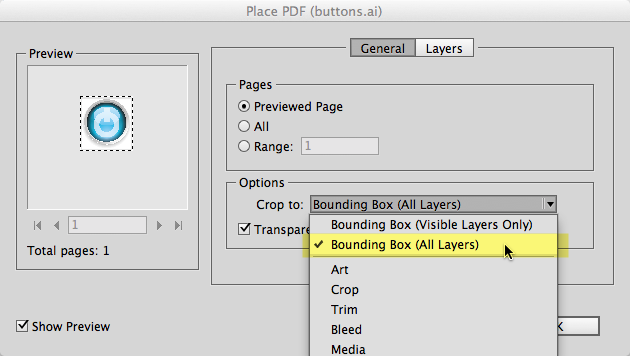
The Crop To menu needs to be set to Bounding Box (All Layers)
Unfortunately I haven’t been able to find any way to change this setting once the file has been placed in the document. The only way I’ve been able to change the setting is to reimport the file. [There is a script that allows it, but it’s not working in CC yet. We’ll update this if we can get the script working.]
Keeping your Visibility Settings
One more thing you need to remember. In the Layer control, make sure your Update Link Options are set to Keep Layer Visibility Overrides. This way you can make changes to the layers in the Illustrator file without losing the visibility settings for each placed version of the file. However, this won’t work if you add new layers to the Illustrator files. InDesign can’t figure out which layers should or should not be visible so it reverts to the saved version of the file.
For more information:
If you want more information, Bob Levine covered this topic a while back.
Great write up Sandee!
The key thing to remember though with Multi-State objects is that they are technically Interactive elements, when you use File>Export>PDF (Print) you have to ensure you select the option of “Interactive Elements: Include Appearance”.
I’d love to see import options to create Multi-State when importing multiple layers from Illy or Photoshop.
That would be terrific.
Thanks Eugene,
I keep forgetting that some people might want their multi-state objects printed as part of a brochure, etc.
There are quite a few scripts that I want for graphics (Photoshop, Illustrator, Acrobat) with layers.
The ability to place with all the layers coming in as separate frames, aligned at centers, at whatever size the cursor drags.
The ability to automatically set all the states for either buttons or multi-state objects with all the layers of the graphic.
The ability to convert an existing graphic with layers into multiple graphics, aligned at centers.
And, of course, the script mentioned in the post to reset the crop for an already placed graphic.
Indeed – I wrote about the multi-state objects for print in an edition of InDesign Magazine #40 Feb/March 2011 :)
I love all those ideas for placing graphics – would open up a whole new world!
Because InDesign loses track of which layers were visible when you add or rename layers in the linked file (which Sandee mentions at the end of the article) I rarely (if ever) use/recommend this technique. What if you add a new icon on a new layer? Then you must manually reset each, and how are you to remember which you used where? I like the idea, but maintaining this is what I’m disappointed with. If the file is never going to change it’s fine, but how can we see into the future? I wish InDesign could remember a layer by it’s name and keep the settings even if you’ve added new layers! Then I could get more excited about this feature.
Dan,
I don’t like what happens when you add a layer to the Illustrator file. But Bob Levine had a great suggestion in his post way back in 2009. If there is any remote chance you will need a new layer, add some empty layers and set them to non-print. Then, if you need them, just turn them on and add graphics.
But by not using or recommending this technique, you’re diminishing the chances that Adobe will ever add the ability to remember layers by name.
Adobe works on the “noisy wheel” theory. When users start clamoring for new features, it is the loudest voices that get heard. If you want a feature fixed, it has to be used a lot. And then the users have to complain that it needs to be fixed.
If you walk away from a feature and never talk about it, no one will ever know that it exists. And without knowing it exists, it will languish.
As a trainer, my job is to look at my student’s needs and anticipate which features they might want to use. I just demonstrated this technique using Illustrator layers last night and it got a great response. So these users will go off and use the feature. And if they need the ability to add layers, they will tell Adobe. With real-world examples.
But Adobe can’t devote resources to fixing features that no one uses.
By not recommending I didn’t mean I never teach it, but I certainly put a disclaimer on it. People often get excited about feautures that are sometimes great in theory and less so in practice. They love the idea, so of course they get excited! While I agree people must be vocal to get Adobe to change, I also am practical and am trusted to give real world advise and bring up problems that might arise so people can decide whether they should use a feature. I don’t want their excitement during a demo to be dashed later when they learn about issues they may have. In some workflows these problems are considerable and they would (rightfully) avoid using it. In others it’s fine as long as they know what to expect. Each workflow is unique.
On an unrelated topic…, I am writing this comment on my iPhone and realized it would be awesome if the comment composition text were slightly larger as well as the text area :)
Dan,
Thanks for the clarification, but you did say, in your original post “rarely (if ever) use/recommend this technique.” That’s not exactly making it common.
And yes, I agree, we must include the disclaimer when promoting it. That’s why people come to our classes instead of just going to Adobe-sponsored events. For years I have gained the trust of my students when I have told them where a feature is lacking. They sometimes gripe and ask me why Adobe would allow such a thing to be. I tell them I have no idea—I don’t work for Adobe.
But I have learned a lot from being on beta cycles when engineers have explained some of the difficulties they have creating a certain feature. For instance, you want InDesign to remember a layer’s name. But what if the new layer gets the same name as another? You do know that Illustrator allows layers to have the same name. What happens then? Which layer should InDesign show/hide?
Regarding your iPhone, I think you have very little chance of Apple increasing the size of the comment composition area. They are notorious for NOT listening to users.
The change to the font size and text area is not for Apple to change. That would be for the web developers of this site (if they so choose), which is why I mentioned it here. It’s just a matter of changing some CSS.
Back to this main topic. You’re right, I use the feature rarely if ever, because for my workflows the updating issue is a deal breaker for me. Maybe your work is different, but even creating some empty layers (like Bob) suggested doesn’t really work well because they wouldn’t be properly named, so handling them in InDesign really isn’t a good solution. And if that was back in 2009, you can see how long this updating problem has been an issue which Adobe has not improved. While layer names can be tricky (such as the duplicates you mention), if you do keep unique layer names it would be a good fallback for Adobe to use instead of just reverting everything back to the default state.
Dan,
Have you tried using Illustrator’s Multiple Artboards as a workaround for this problem?
Good point Ravi. Yes I have used them. I quite like using Illustrator’s artboards as a design tool. Duplicating an artboard and making a change is quick and easy.
Importing layer visibility has it’s uses. There are plenty of people out there that would only have 3 layers in their Illustrator or Photoshop images, up, down, rollover.
Yes there are some things InDesign cannot do, like adding a layer makes it very difficult for InDesign users.
But I think if people are aware of the Do’s and Don’ts of placing an Illy or Photoshop with layers and InDesign’s Do’s and Don’ts then they can make an informed decision.
But if they don’t know about a feature – then they will never know the Do’s and Don’ts.
So until Adobe give better support for importing layers from Illy and Photoshop, we have to do our best to educate people on the best way to manage these types of files and how to implement them into a better workflow.
Well said Eugene.
I was all excited about doing this for my UI schematics until I realized Adobe does not remember the layers order. I’m glad that was brought out in the comments, it saved me a lot of hassle. I guess I’ll try just making a zillion extra layers, which is what you really need to do. But the whole advantage of layers is being able to keep a “master” portion of something and re-use it for the other layers. I used to use an Illustrator plugin from HotDoor called, “MultiPage” for this sort of thing.
Anyway, thanks for the great article.
My Question is this: is it possible to adjust the object layer options within an Object Style? We have a situation where this would be an awesome function. We just can’t find it in the panel or figure out why this is the case. Thoughts?
Chris-
You can’t use an object style because the Object Layer Options (OLOs) apply to the content within the frame instead of the frame itself (i.e., you delete the content and the option is grayed out in the menu). However, if your image files are constructed consistently and have the same layer names and order, you can set the OLOs once in InDesign, and then duplicate that frame to use it as a placeholder, relink and the same OLOs will be honored with the new image. Just be sure you have Keep Layer Visibility Overrides selected in the OLO dialog box when you set up the first image. This relink trick will also work if you export the image as a Snippet and place it into a new file. Hope that helps.
And that’s what we have done. I figured that was the reason on the styles. I just thought there might be a work around I was missing. Thanks for the help!!
Thank you so much Sandee, you saved my day!
André, Québec, Canada
In InDesign CC 2015.1, a new option was introduced under Preferences>File Handling that lets you change how InDesign handles Layer Overrides for placed Illustrator and InDesign files. Enable the “Hide New Layers When Updating and Relinking” option to use the new behavior.
In earlier versions, InDesign could not figure out which layers should or should not be visible, so it reverted to the saved version of the file. But now, with the option enabled, you will no longer need to adjust the Layer Overrides on placed AI and InDesign files when you add new layers to the placed graphic. If you delete layers in the AI file, then those layers will disappear in InDesign (if those deleted layers are enabled).
You can read more here: https://blogs.adobe.com/jlockman/2015/08/12/new-layer-override-behavior-in-indesign-a-boon-to-fashion-and-product-design/
Hi Sandee,
I’m frustrated with this behaviour in the CC 2017 versions of AI & ID—I have imported multi-layer AI logos into ID, in order to have different colors and options available using just one logo file. However, if I make a layer invisible in ID, the logo visibly shifts position, although the layers in the AI file are placed exactly on top of each other. I’ve made PDFs to ensure that this is actually happening and not just a screen displau issue.
Perhaps I’m misunderstanding some feature here—any ideas on the reason for this much appreciated.
is there a way to remove “layer visibility overrides” from all instances of a linked Illustrator file in InDesign? Example: I have 25 instances of an illustrator file and I want to change all of the instances to “use PDF layer visibility” without changing each manually