

Changing Layouts During a Data Merge

I like to try and make Adobe InDesign’s Data Merge perform tasks that shouldn’t be possible, such as heat maps, bar graphs, and changing colours. In this post, I’d like to demonstrate another technique that shouldn’t be possible, and that is changing a layout during a Data Merge.
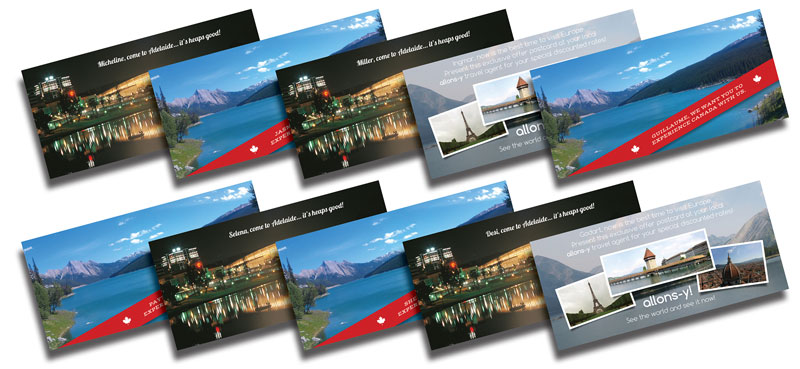
Take the following example: A travel agent is preparing follow-up postcards based on information it received from prospects during a travel expo. To tailor the postcards to each prospect, the front of each postcard will have a layout based on the destination that the prospects indicated they’d like to travel to. For the sake of this example, it will be Canada, Europe, or Australia, and the layouts will differ from each other, not just the picture in the background.

The way I would imagine that most people would tackle this task is to make three postcards in InDesign, separate the prospect list into three different databases and prepare the three Data Merges separately. But what if I told you it was possible to do this using one database with one InDesign file? Well, it can be done!
How this technique works
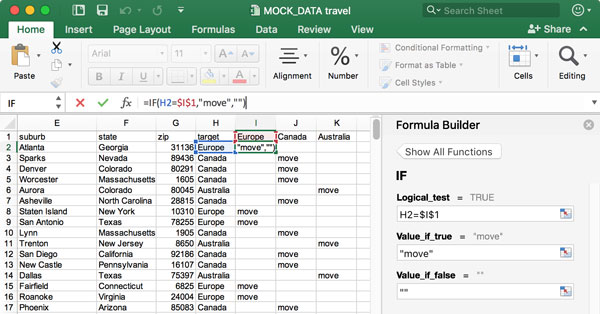
The key here is inside the database that will be used for the Data Merge. The original database in Microsoft Excel contains a column that has the prospects’ destination and also has three columns to the right of it that use an if statement to determine if the copy in the destination column is a match for the column heading. If it is a match, the statement returns the word “move,” otherwise nothing is returned and a blank space is left. This will act as a trigger for later.
It is also important to point out that this technique doesn’t invoke some hidden Data Merge ability involving layers, but instead shows or hides content based upon the trigger in the Excel file.
Preparing the files
The database above will need to be exported as a tab-delimited text file so InDesign can perform a Data Merge.
Back in InDesign, create a layer for the first travel destination, and then prepare the layout as desired along with the relevant Data Merge fields. Group the artwork on that layer, and then create another layer for the second travel destination, repeating this process until all three destinations are prepared and grouped on their own layers.

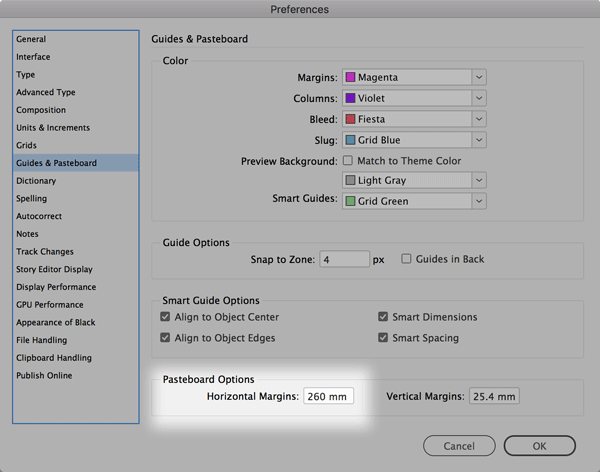
When creating the document, in the Guides & Pasteboard section of the Preferences dialog box, be sure to adjust the horizontal margins value so that it is wider than the artwork. In this example, I’m working to a DL size of 99mm high × 210mm wide, so I want the horizontal margin to be wider than 210mm, so 260mm will be plenty. This will be important soon.
With only one of the layers visible, create a text frame that starts at the top of the bleed edge and as close to the left edge of the pasteboard as possible, and ends with a small portion of the text on the text frame – it is important that part of the text frame is on the page or the technique will not work.

In this text frame, type the word “move” followed by a tab, and show the document tabs. Place a tab stop in the center of the word “move” and then another tab stop at the left bleed margin.

Highlight the word “move” and replace it with a Data Merge field that is to act as a trigger for that layer. In this example, because the Canada layer is visible, I will replace the word “move” with the Data Merge field “Canada”.

Next, click on the grouped layout so that the Anchored Object Control (the little blue square) is visible. Click and drag the square onto the end of the text that was just created.

Click on the square to open Anchored Object Options and change the position so that the Anchored Object Reference Point is the top left, the Anchored Position for the X Relative is to the Anchor Marker with 0 offset, and the Anchored Position for the Y Relative is to the Text Frame with 0 offset, and its reference point is to the top left.

Repeat this process for the remaining two layers.
Once done, make all layers visible and toggle through the Data Merge records. From here, you should now see that the layouts are swapping based on the information from the database.
Variations of this technique
For the sake of the example I’ve only used three layouts but using this technique it is possible to add as many as you like. The technique I’ve used to move the relevant artwork on or off the active page is a simple method that doesn’t require any GREP styles or JavaScripts, but other techniques could be employed, such as:
- Using GREP styles to make the word “move” become large enough to move the type without requiring the tabs;
- Using a CSV file instead of a TXT file. Using a text editor, replace the word “move” with a tab, and this eliminates having to type tabs in the text frame that will act as a slingshot to move/hide text off of the active page;
- Do away with the additional columns in Excel that have the if-else statement and rely solely on GREP triggers to hide/expand the relevant trigger words, though this means making a couple of GREP styles and as many paragraph styles as there are layouts that change.
Thanks. I Will test that
That is pretty nifty. I currently use Fusion Pro but this would be great for small jobs.
Colin. When I export the merged document, in the pdf will contain the other layouts too?
The other layouts will be outside the visible area of the PDF. If viewing the PDF with an Acrobat plugin such as Enfocus Pitstop, it is possible to see the unused layouts by using Enfocus’ selection tools. If the extra unused and invisible layouts have to be removed, Enfocus Pitstop has a default action list that will remove artwork outside of the trim areas – it’s the remove printer marks action, and it will remove artwork that doesn’t cross onto the visible PDF page.
As always, a great post Colin!
Could you explain that in a video or someting?
I’ve tried every step but’s not working :(