

60 Minutes…

Whilst I’m on a roll and writing a series of blog-posts, I might as well take a few minutes to answer a question posted by Jackie in one of my previously written blog-posts:
Hi, I make books for kids and have to make/draw a clock. How do I get the minutes dotted around the circle?
There are definitely different ways of tackling this, but as I’m also a long-time Adobe Illustrator user, I’m using a simple method that rotates and copies the minute dashes (or dots) around the clock’s center-point. In fact, I would prefer to draw an illustration such as a clock in Adobe Illustrator normally, as this application contains many more drawing features.
The technique shown below is a simple transformation that defines a reference point around which the actual transformation occurs, then repeats the transformation action.
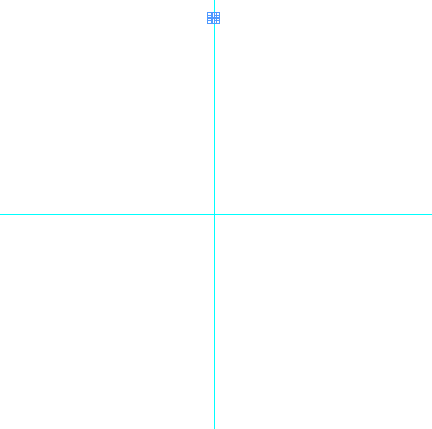
Start by dragging a horizontal and vertical ruler guide onto the page. The intersection of the two rules would be the center point of the clock. Ensure that the guides are locked once you’ve added them to the page (View > Guides & Grids), this is to prevent you from selecting them by mistake later on…

Next draw a tiny circle (the size you want them to be for your minutes) at the 12-o’clock mark, that is centered on the vertical guide and select it.
Now, select your Rotate Tool (R) and Alt/Option click in the center point of the clock. The Rotate dialog appears.

In here enter an Angle of 6-degrees (360/60 = for one dot per minute) and click Copy.

A second dot now appears. It is still selected. Next choose Object > Transform Again > Transform Again (you can also choose Transform Sequence Again, which has a default shortcut in CS5 that is Ctrl(Cmd)+Alt(Option)+4. Each time you press that shortcut another dot is added. Continue until you’ve got all your minute dots set.
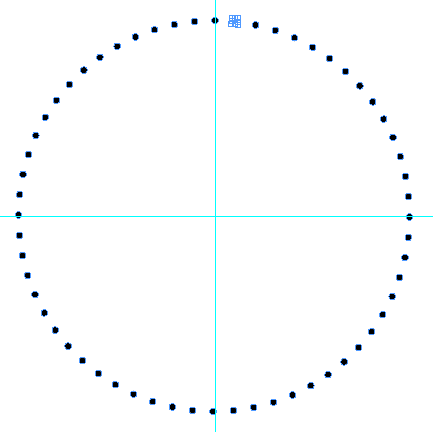
You can now remove any dots you don’t want, for example for the whole, half, quarter hours, and group the remainder of the minute dots together (Object > Group after first selecting the dots) so that you can – if required – increase or decrease the size of the entire group.
Thanks heaps, you have made my day!
Or, you can do it a little faster:
Make a dot, then duplicate it to the desired position at the other side of the clock face, (drag + option, add shift to keep it constrained.)
Group those two dots, select the group, open the rotate tool options. I would input 12 degrees, then click “copy.” Once you have copied it, you can use the power duplicate (command or control D) until you have a complete circle.
Select all and do one more rotate at 6 degrees.
Oh that is an excellent use of the transform again – and a wonderful little tip – I hope everyone remembers it. Such a good tool in Indesign that is slightly burried for some reason?
Here’s how I did it without the drawing of manual dots :D
I drew a circle
Went to the stroke panel
Then to the Sub Menu and went to Stroke Styles
Clicked a new style
Choose Dotted
Then set it to 3 mm and Adjust Gaps selected
Perfect dots, and if you increase or decrease the stroke size the size of the dot changes.
(I started with a circle of 60mm and you scale the cirlce just fine without affecting the spacial relationship in the dots)
You could also do it with a type on path – but I haven’t tried it yet. That could be fun because you could use wingdings or something as the font and choose a fun symbol for the clock divisions :)
Remember too you can Type on a Path with Objects. Make a shape or select an object (suitably scaled down) and copy it to clipboard. Use type on path and Ctrl V to keep pasting objects – use para align (justify all lines to evenly space out). Nice.
Thanks for this post Cari and the answers/comments.
@Lori That would definitely half the transform agains :-) Ctrl/Cmd+D in InDesign is the default shortcut for placing documents (images/text files etc) into InDesign. It’s one of the shortcuts that does totally different things in Illustrator, Photoshop and InDesign :-)
@Eugene I did think about those options as alternatives. However, I ended opting for the simple rotate/copy method as I found it to be quick and accurate ;-)
@Gary, you’ll have to set a right indent on the path with that method, so that the 11 and 12-o’clock items don’t clash, which means eye-balling things a bit :-) But that method is easier to work with in my opinion than using a dotted stroke on a path.
@Carl, that’s right, I was thinking of illustrator (command D)
@Lori: Thought you might :-) … b.t.w. that is Cari with an I, not an L ;-) (e.g. last time I checked I was definitely still a girl :-) :-) )
Thanks for the right indent tip. I am not so worried about the clock as such but I played a bit more with this. A bit tedious to do but you can alternate objects by copy paste method. Select each copy and apply with the type on path tool. Also try lining up objects, grouping, copying and apply with type on path. If you have PS, Ai and InD I also found it easy to create a shape (or one of the predefined ones) in PS copy it to Ai and then copy or drag over to InDesign for this sort of work. Unf. you cannot just create a shape in PS and copy it over to InD – hence the route via Ai.
But fun stuff nevertheless.
Thank u very much. it was very usefull for me.
Thank you very much! I have “lost” some files because of that. Problem fixed.
Great shortcut
cheers.