

Creating Keylines

Keylines are important things to include in your InDesign file when you have items that are going to be cut out using a die form, or if you need to set up folding lines, perforation lines, and the like. Keylines show clearly where the paper should be cut, folded, or perforated, so you can avoid costly mistakes at the printer. Regardless of what you use them for, there are two very important points to remember regarding keylines. First, your keylines must be set in a spot color to separate them from the rest of the objects in the file. Second, they must also be set to overprint. Let’s take a look at an example of how to set up keylines in InDesign.
Creating a Folder
In this example I am going to create a folder (only the outside for this purpose). I want it to have a tab that folds in and can hold A4 sheets of paper, so I have set the document to be 220 mm (w) × 307 mm (h). This ensures I will end up with a folder large enough to hold A4 paper.

To set that up I used the Page tool. I just click and drag the third page beneath the other two. See this post on creating gatefold spreads for more information.
Create a Keyline Layer
It’s important to isolate your keylines on their own layer, separate from all the other content in your document. So create a new layer, call it Keyline or the like and put it above all other layers.

Create a Spot Color
Create a new spot color and call it Keyline. This is really helpful for the prepress operator who has to print your file. They can simply choose not to print the spot color— which is exactly what you want since your keylines should not be printed.

Draw The Keyline
The next thing to do is draw the shape you want to be cut out. I’m going to outline the whole page and the flap that folds in since I need to show the printer what to cut and what to fold. Even though it might be fairly obvious, it’s best to take no chances.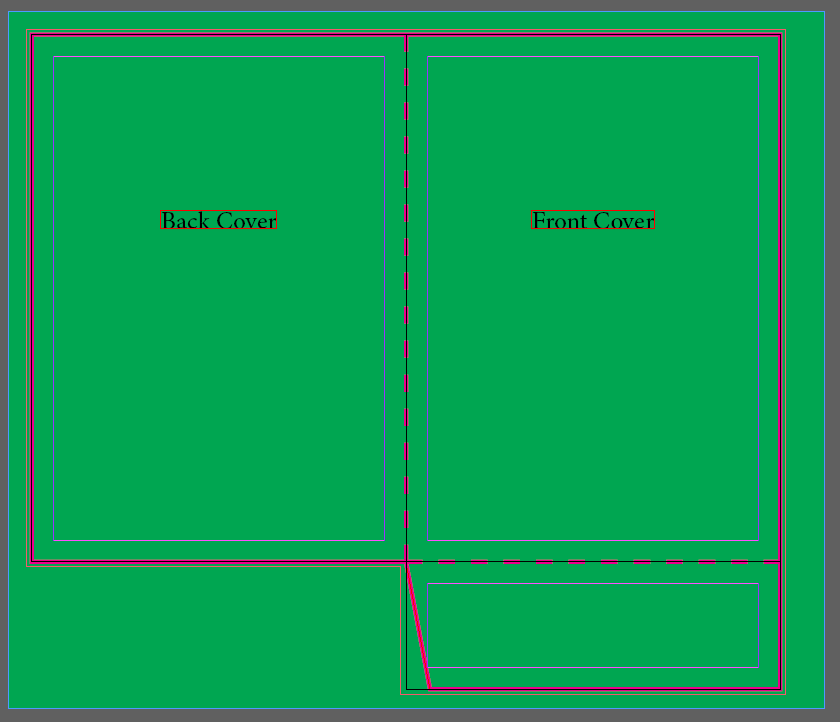
As you can see I’ve overlaid the keyline on top of the design. At this point, you might be wondering about a few things.
Why is there an angle?
As the flap folds upwards, if it’s butting up against the page when folded so it won’t close properly. The angle allows the fold to work.
Why is there a dotted line?
A dotted line means a fold, or if you want to have the page perforated you can write the word perf on it in the keyline color (make sure to put the text on the key line later and set it to overprint—more on that in a moment).
Why do I need to add lines to the spine?
Because it is going to be folded. It doesn’t matter if it’s a single fold or if you have a spine width or not. The die form is made up with metal that will either cut or crease. A non-broken line means a cut, a dotted line means to fold or perforate. And you want to crease your page in the middle to make it easier to fold.
Viewing Separations
There’s one other thing we need to take care of here and it’s only evident when viewing separations (Window>Output>Separations Preview or Shift-F6).
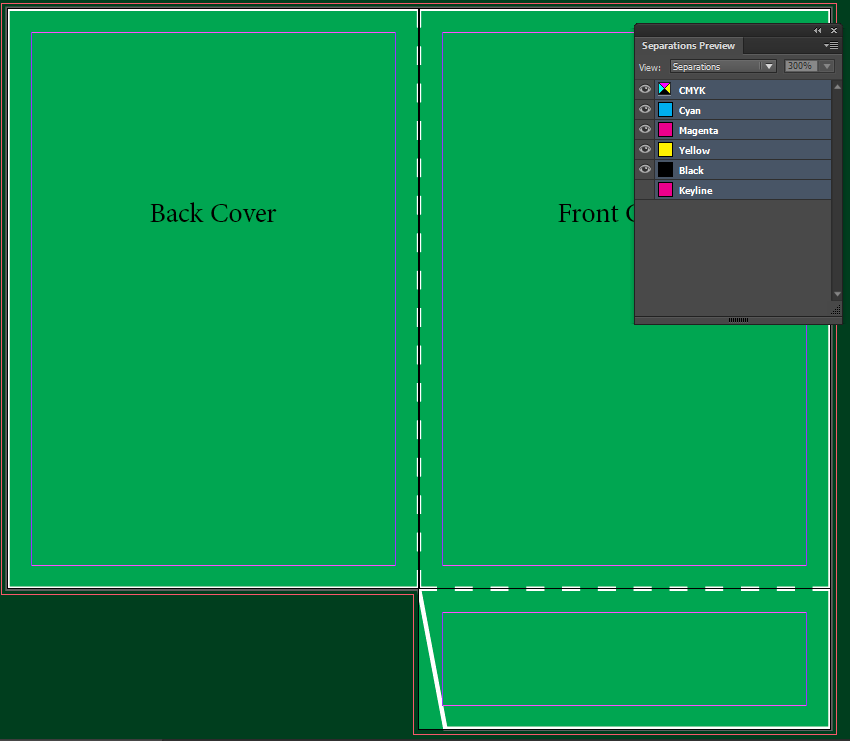
When I click the keyline spot color in the panel to hide it, I can see a white line! Why does it do that? Because the line is set to knockout, meaning that no colors print underneath it. Since it has effectively knocked out the color behind it, InDesign shows us the color of the page.
This is a problem, since the prepress operator will need to turn off your spot color/keyline color before printing, and if left unfixed, it will leave a visible white gap in your designs. So what do we do now?
Set your Keyline Layer to Overprint
Thankfully, the fix is easy. Select your Keyline layer by pressing the little square to the right of the layer name in the Layers Panel. This will select everything on that layer. Go to Window>Output>Attributes and set the Stroke to Overprint. If you’ve put text in there, set that to overprint too (select the text and click Overprint Fill).
You will notice that the line appears darker when it’s set to overprint (and you view it with Separations Preview or Overprint Preview enabled). In my example, the pink keyline color is added to the green background color and I end up with a brownish line. It will revert back to a pink line if I turn off Separations Preview/Overprint Preview.
Creating Custom Folders
Your folder doesn’t have to have a flap shaped like a square, you can be creative. It can be reindeer shaped, or Christmas tree shaped, or shaped like a person, or a car, etc. Any shape is OK as long as you’ve included the keyline and your design fits within your key line. Of course, have a conversation with your printer first to be sure they can execute whatever design you’re envisioning.
Another thing to be aware of is how many pages can fit in your Folder. Will a big document be going inside your folder? Will it have to fit a lot of documents?
If you think you’re going to put a lot of documents then you should consider adding a gusset to the flap and also including a spine. Great video here for laying out a book cover to add the spine to your folder, or a gusset.
To add the gusset to your flap, draw another dotted line underneath it the same width as your spine. I’m going to add a 5mm spine and a 5mm gusset for the flap so that I can add lots of documents into my new folder. You may need to make the flap bigger or whatever suits you.

Now I have a funky flap: a 5mm spine and 5mm gusset.
Final Thoughts
Many printers have standing keylines they use for things like folders. If you need a folder and you’re not too concerned about the shape or position of the flap, then talk to your print provider and get a template from them.
But remember, this wasn’t just about setting up a folder—you could be setting up a job to cut out circles, stars, human body shapes, or anything at all. And for those purposes you’re going to have to set up your own custom keylines.
Once you have a spot color and it’s set to overprint—and your separations panel isn’t showing gaping white when you turn off the spot color—then you’re good to go.
Eugene Tyson — Great folder build with keyline. I have known about the use of keylines for many years, working in preflight/layout, but I never knew about building a full folder build/spread with flap(s) in InDesign. Oh thank you so much for your cleaver and concise tip! Again, thank you.
No problem macian! You can do the exact same thing in Illustrator. But I like using InDesign. You turn off the artwork layers and leave just the keyline and export that as Pdf. All vendors have accepted pdf that I’ve sent to.
It’s just my way and thought I’d share.
In the UK the die form is spelt with an e – forme.
Good point. I’m from Ireland and I’m sure I had it that way or an autocorrect kicked in. Thanks.
Cool Eugene.
It sometimes gets referred to as a cutter too.
Thanks Tim! I’m sure a lot of people have there own terms based on their locality. Here, Keyline and Die Line are almost interchangeable, although I suppose technically it’s a Die Line, for a Die Forme. However, people tend to get what a Keyline and Die Line are, as they are in the know. I’ve also seen people call it a Die-Cut etc.
As long as your clear in your communication with whoever you’re dealing with, then it should go fine.
Also saw the 6-minutes video, these particular articles will help many start-up local designers over here in USA, will share this. Thanks much!
I would like to be informed by email when new comments appear.