

How to Export a Selection to a Precise Size

We are refreshing our oldest and most popular posts with updated information and screenshots. This post was originally published in 2013 and edited most recently in 2021.
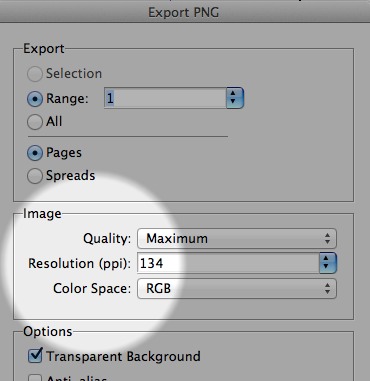
InDesign allows you to export your selection to JPEG or PNG. When you choose File > Export to do this, the dialog allows you to specify the resolution of the export as a pixel per inch value.
Exporting to JPEG or PNG from InDesign allows you to specify only the resolution of the exported image, not the pixel dimensions.
Thinking in terms of pixels per inch is useful for creating an image that will be printed. But exporting to JPEG or PNG directly from InDesign can be really useful for creating web content such as banner ads, icons, splash pages, or other elements needed for projects that will end up on screens.
In these cases, you usually want to output your selected objects to a certain pixel dimension. For example, you may need to create a 512 pixel × 512 pixel PNG icon for an iPad app, or a JPEG banner ad that is 250 pixels wide, or an image for your web content management system that is no wider than 400 pixels.
There are two ways to do this directly from InDesign.
The best way is to create your artwork to the exact pixel dimensions in InDesign (using either pixel or points measurement units), and then export the artwork at a resolution of 72 pixels per inch. In other words, if you create artwork that is 200 × 150 pixels, and export it at 72 pixels per inch, the final pixel dimensions of the PNG or JPEG you export will be 200 × 150 pixels.
But what if you’ve already created the artwork, and need to export to a different size, or perhaps export the same artwork in multiple sizes? This requires some simple math, and I’ll even show you how to make InDesign do the calculations for you!
All you do is divide the desired output width or height by the existing width or height, and multiply the result by 72. Here’s an example:
Let’s say we have content that we’ve created that is 176 pixels wide. We need to output this to JPEG format 400 pixels wide. We can verify the width of the artwork by selecting it and viewing the ‘W’ field in the Control panel at the top of the screen. For this to accurately reflect the width of objects with strokes, be sure that “Dimensions Include Stroke Weight” is selected in the Control panel menu.

The Width field (W) in the Control panel displays the current width of the selected objects.
Next, choose File > Export, and select JPEG for the format. Choose Selection for the Export type, and then in the Resolution field, enter 400/176*72. As soon as you tab or click away from this field, InDesign will do the math and enter 164 as the result. Now, when you click Export, a JPEG image the desired size will be output.

Let InDesign do the math for you!
One caveat: Due to rounding, sometimes the JPEG or PNG image that is output is off by a few pixels in size. In this example, 400/176*72 = 163.636364, which InDesign rounds up to 164 pixels, resulting in a JPEG image that is 401 pixels wide.
To make this even simpler, I’ve written a free script—“Export PNG with dimensions,” available here—that prompts you for the desired width or height, does the math for you, and exports to PNG format.
Cool! It would be cool if Adobe added a Save for Web feature to InDesign, but until that happens, this helps.
Thanks for the script! We’re doing more and more work for digital displays. This will really help save some time.
Too bad InDesign is only focused on web development.
Easier Print use is still needed.
Guys, I am just throwing this question out there. Can Incopy cs6 open Indesign CC files? Obviously I am in a panic.
Hi Lenny. Better place for this question would be our forums, but the answer is no. InCopy has never been able to open later-version InDesign files, and this is true for CS6 InCopy/CC InDesign too.
You need to think of them as a matched set; or think of InCopy as a version-specific plug-in.
The good news is that CC includes one install of InCopy; and your editors should be able to subscribe just to InCopy (rather than the whole CC) which will be a lot less $$.
Hi Anne. Thank you for the information…it does offer some hope.
Trying to get adjusted to the new workflow, infinite rentals, till death do us part.
Sorry again for the post but I was panic stricken wondering what to do after I upgrade to CC versions.
“The best way is to create your artwork to the exact pixel dimensions in InDesign (using either pixel or points measurement units), and then export the artwork at a resolution of 72 pixels per inch. In other words, if you create artwork that is 200 by 150 pixels, and export it at 72 pixels per inch, the final pixel dimensions of the PNG or JPEG you export will be 200 x 150 pixels.”
Can you explain why this works? Is 72 ppi hardcoded as a default translation between pixels and inches in InDesign?
@Shmuel: Yes, a “pixel” in InDesign is hard coded to be the same as a “point” which is 1/72 of an inch.
Actually, you can change the points/inch value in the Units & Increments pane of the Preferences dialog box, but the range is only 60 to 80. But even if you do that, pixels still appears to remain at 72 ppi.
Helpful , thank you very much …
Having trouble with this. Doing the math is cool, but it only “matches” the width. If I need to export a graphic to a precise size, like a standard ad size, it’s likely my ID artwork will be too short or too tall, wouldn’t it? Then I’d have to go back to InDesign and edit it, then rexport with the math. (possible to edit in Photoshop of course but if I need to recenter text on a background image or anything like that, quite difficult with a flattened JPEG or PNG.)
Isn’t it easier to scale the selection in InDesign to the correct width, edit for height, then export the selection at 72ppi?
@Anne-Marie, yes, the best way is just to create the ID file to size, as mentioned in the third para. But I’ve had a few clients that need to quickly extract photos from a print layout to “fit” within a box of a certain width or height for a Web CMS, and this provides a quick way to do so. Often in these cases they just need the image to fit within a certain width, and the height is unimportant, or vice-versa.
Ah … yes, I’ve had that situation of an image needing to fit that way. Hmm.
I would still just enter the desired width or height in the appropriate Scale field, myself. Hit return and you’ve got it sized, then export at 72. The math method does save an Undo step though. ;-D Plus, it’s math. Neat.
Thanks for this script. I found the resolution of the exported PNG varies if we input different pixel width. Is that correct?
If I need 72 ppi and specified pixel width/height of PNG then I copied that artwork in another document and scale it there and then export at 72 ppi.
Virender
I’m working with InDesign CS6 and have 3 layouts set up (desktop, tablet, mobile) in one document. I have all my document presets set to web, made sure that my rulers and guides are all set to pixels, and have set the image sizes on each layout to the exact pixel height/width that I need. When I export to HTML, I select 72 ppi — yet the images that are exported are completely the wrong sizes. For example, my desktop image should be 1500px x 1331px, but it’s exporting out to only 610px x 542px. I’m at a complete loss, and have a massive project deadline soon. Any thoughts or advice on this would be greatly appreciated!
Why is it when you have a 960×320 InDesign image, you export to 72 dpi gives you a 960×320 jpeg.
But if you take that SAME InDesign File and export to a 96 dpi jpeg, it makes the file large at 1280×427? Why wouldn’t it just make a 960×320 @96dpi?
Hello!
Is there a way to in forehand decide exact file size in MB on the out coming PDF-file?
For example: I have a document with 7 sheets in A1 and the total file size should be 35 MB. Could I type in 35 MB somewhere and then indesign/pdf compress the graphic as mush as needed for the file to be 35 MB?
/Andreas
Andreas, you are asking about *file size* while this article is about *pixel size*. Better not confuse the two… I don’t believe it is possible what you ask (neither practically nor technically; what if you type in “5MB”? “0.5MB”?), but you could ask in the general questions forum.
This was a BIG help. Thanks. Essentially: in the export dialog set resolution to 72 to get ‘size as’ OR enter the desired resizing as a fraction of 72 in the resolution box! E.G. 600/800*72 and DONE! Bravo.
I’m trying to save files that are 7200×9600 pixels at 300 DPI and it’s saying they are too big. Am I doing something wrong?
Hi Emily- You should be able to export at that size. Use the formula or the script Keith mentions (the script is easier). But to do it manually for example, if an object in the layout was 360 px wide and you wanted to export it to an image 7200 px wide, enter 7200/360*72 in the image resolution field when you’re exporting. Just remember this only give you the absolute size in terms of pixels. If you need it to also be 300 ppi, open it in Photoshop and change the resolution. You can’t export from InDesign to a specific size AND resolution. It’s either/or.
I tried this on a selection in InDesign. It was 870 px wide and I wanted it to be 400 px wide. In the Export box, for resolution, I put 400/870*72 (which equals 33). When I opened the resulting jpg, It was indeed 400 px wide, but the resolution was 33. Should it have been 72?
Hi Margaret- The tip is just for exporting to a specific size in pixels, not resolution. If you want to change the resolution afterwards, you need to use Photoshop (using Image > Image Size with Resample turned off).