Find Text, Change to Graphic
Some publications call for many inline graphics, to illustrate things, to mark the beginning of new sections, or to call out a special type of text. Lots of textbooks use them, and software books too, like the one David and I wrote (InDesign Breakthroughs — hey people I know it has “CS1/CS2” in the title but the content is timeless! Go buy it!).
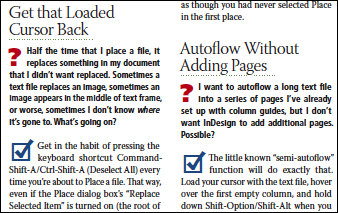
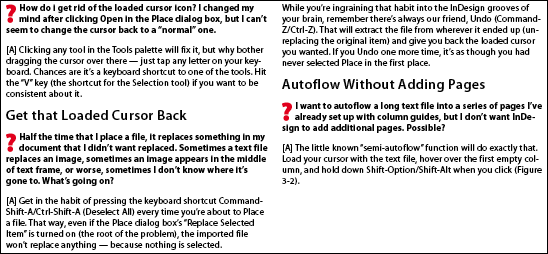
Anyway here’s a screenshot from our book showing a good example of what I’m talking about, the questions and checkmarks we used instead of the tired old Q’s and A’s:
When you’re in charge of designing or producing the publication in InDesign, adding the graphics is your job, not the writer’s. Text comes to you in the form of a Word document with codes that stand in for the inline graphics. It is your job to find each code, select it, delete it, copy the inline graphic you’ve got stashed on the pasteboard, paste it inline, tweak its position and text wrap, and then go on to the next one. Hundreds of times.
There is a faster way to do the job. A MUCH faster way. Use Find/Change!
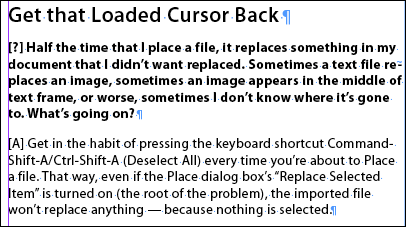
First, import the text with the placeholder codes into the layout and format it. In the excerpt below, the [?] is a placeholder for the red question mark graphic, and the [A] is standing in for the blue checkmark — one example of something that occurs hundreds of times in the full document.
After you format the text, manually insert one example of each type of inline graphic you’ll need to deal with. Format the inline graphic perfectly, including its vertical offset and text wrap. Here’s the question mark:
At this point it’s a good idea to select the graphic and create a new Object Style using it as a source. Apply the new style to the graphic before the next step, when you copy it for Find/Change. That way, the style itself is part of the formatting, and all the instances InDesign inserts will carry it, making them easy to adjust later on by editing their object style. (None of this is required, though, for the tip to work.)
Next, select the formatted inline object, copy it to the clipboard (Edit > Copy), and open the Find/Change dialog box.
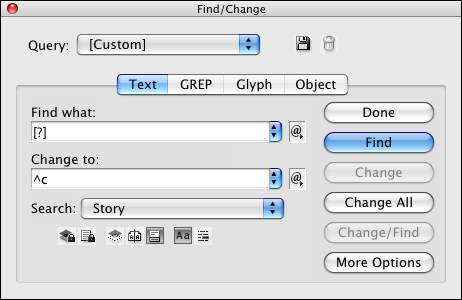
In the Find What field, enter the code that stands for the graphic, and anything else you want to replace with the graphic. In this case, I included the trailing space after the code. I don’t want a space after the graphic.
In the Change To field, enter “^c” (without the quotes), which is Find/Change-ese for “What I’ve got in my clipboard, including its formatting.”
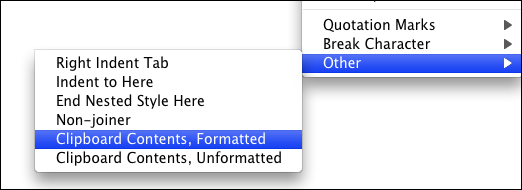
If you forget the code for clipboard contents, you can choose it from the Change To fly-out menu of special codes, in the Other category. Here’s the bottom of the menu.
Finally, as usual with Find/Change runs, start slow. First click Find, then Change, to make sure it’s working — what gets replaced is what you want. When you’re confident, click Change All.
Do the same thing with the other graphics you need to insert — copy the formatted example to the clipboard, then use Find/Change to do the tedious work for you in a couple seconds flat.
Unfortunately, the Find What field doesn’t accept clipboard contents, only Change To. Still, you can save a heckuva lot of tedious production work just with Change To! (And it’s available in Find/Change GREP, too.)



Brilliant! A very useful tip; thanks, Anne-Marie :D
My job is all about text books, this looks mighty powerful, will report back on its use.
Thanks Anne-Marie
Thanks for another great tip!
I use find and replace all the time – even formatting a whole book can take just a few minutes once you’ve got a few good find/replace methods clear. For example if you set style sheets you can then find all elements that require that style and apply it very quickly.
Also I use f/r to search for text set in Registration and replace with black.
Find and Replace is a really useful and versatile tool – often under used in the design world! Although I know a handful of typesetters that couldn’t live without it!!!
Would like to learn more about GREP but it’s difficult to find the time! At the moment though I’m using find and replace more and more.
Great tip! I layout very detailed product labels and place the text from Word files prepared by another dept. Need I say they don’t get the theory of styles, etc. So in order to fit all the EPA required text onto a limited label size, I typically have to convert to a condensed font, which then converts all the bold to regular type. Grrr. But using this tip, the bold and regular type can be converted easily.
Wow. Thanks again.
Hi Adam, Could you not use data merge for these labels? Perhaps if the other dept can be convinced to use Excel instead?
Pete
Pete,
I appreciate the suggestion but getting the other dept to convert their hundreds of files to Excel falls into the old dog-new trick category. Actually falls into the “not my problem” category, from their view.
Thx – adam
Sounds familiar Adam! At least the find and replace should help!
Adam Said: I typically have to convert to a condensed font, which then converts all the bold to regular type. Grrr.
Adam, converting to another typeface is a cinch for imported word files. If you get a script called “preservelocalformatting.jsx” you can import a word file, run the script and it makes and applies character styles for Bold, Bold Italic, Italic, Superscript and Subscript (probably others too).
Anywho, this gets all the text into appropriate character styles. All you have to do is hit the paragraph override button on the paragraph panel. Voilla! All the bold, italic etc. is still in tact.
Also, another thing I do when I get word files is I massage them first. Very first. This simply involves having a Word Template that I apply the to the text. I then have similar style names to that of my indesign document.
The reason it’s in Word and I don’t do the styles in InDesign because I work in a small team for this project. Word files come in, someone processes them with styles in word, then changes are made by the copy editor (in word, they can clearly see level 1 headings, level 2 etc.), I import the Word file with the styles into the magazine and I have the styles map to the InDesign ones.
I find it a good workflow once I got into it.
This is one of those techniques that can save a lot of time, and its very easy to learn! Thanks for sharing
This seems like a really great tip, but I can’t seem to do this in InDesign CS2 on Windows.
I don’t get the “Other” choice in the Change To fly-out
Should this be working in Windows versions? Am I missing a plug-in or something?
Sometime I’d like to transform whole inline graphic in my file, but I can do that with available tools of Indesign.
How to do “Fit frame to content” with multi inline graphics
@Chien: Unfortunately, I do not know any way to select more than one anchored object at a time. Frustrating!
Hi I was reading your suggestions. I have Word 2002 SP2. I would like to do what you are suggesting in Word by replacing a graphic image I don’t like with another version of the image throughout the text. The find replace wont let me put the symbol for the graphic in the find box. I know quite a bid of VBA macro language but I don’t know how to do this. Any ideas?
Thanks.
John
I also use find/replace with clipboard contents to swap in graphics for text placeholders, it’s great!
But what about round-tripping back to the originating dept. to update for the next issue? I have to change all of those graphics back to their original place-holder text in order to send the final text (with all the changes that were made during revision rounds) back to the content originator.
Is there a way to tag each inline graphic as something unique that can be found? If you copy one, it finds any inline graphic.
Thanks,
Tina
This is amazing! Thank you so much for this tip. I had never explored the world of object styles before. Powerful stuff. Thanks again!!
i love you
Great tip David! This is (almost) exactly what I need. I have a document that I need to do this in, only using the GREP tab of the Find/Replace window. Is there an equivalent of “^c” in the GREP replace field?
Background: I’m working on a legal document that is nothing but sections and subsections (i.e., 20.01, 20.02, 20.03, etc.). I work on this document every couple of years and there are always sections and subsections added and removed – so I would like to have at least the subsections being auto numbered. I have made the subsections part of the number an inline text box with a numbered bullet. This way as subsections are added or removed they all re-number automatically – which is very helpful as some sections have up to 50 subsections! I say I’ve done this already because the document is produced in English and French. So I did the replacing manually [ sigh ] in the English document already, but it took a long time. It would be great if I could use your tip above, only I need to do it in the GREP window to be able isolate the subsection numerals to replace them with the inline text box.
Thanks!
Yes, look in the @ pop-up menu to the right of the Find field. Inside there, you’ll find an Other submenu. This menu is great for finding features/characters when you don’t know the code.
it’s a lot of problem solver
thanks for sharing this. saved a lot of time.
Hi All,
Please help me.
how to find style group style?
Example: app.changeGrepPreferences.characterStyleGroups(“03_Text”).characterStyleGroups(“TXT1_FrutigerLTCom”).appliedCharacterStyle = “TXT1_it”;
Sumit: I suggest asking in our scripting forum here or on the Adobe scripting forums.
Thanks! Thank you! Thanks again.
You really really really made my day(s)!! I need to import 2000 image frames into a 5000 page text. This method makes this a 2 minute job! Thanks!
Dear Anne Marie. I have a related question… Is there a way to format the object style of an image frame so that it will automatically change the size of the frame to the size of the image that is imported into it? Or more specific… I want the width to be the same and the height to be adjusted to the image size after it has filled out the width.
Thanks!