

Fixing Over-Extended Paragraph Borders in InDesign

With the new March 2018 release of InDesign, the paragraph border feature has been improved. But an old problem remains. When a paragraph with borders breaks across a page, the borders extend beyond the page margins.
The reason for these over-extended borders is the offset setting in the Borders dialog.

In this example, we’ve told InDesign to extend the top offset by 13 points and the bottom offset by 12 points and this is reflected by those extra, unwanted border bits above and below the margins.
So to fix the over-extended border problem, just set these numbers to 0. Easy, right? Wrong! What then happens is this:

The first problem has been fixed. The borders do not extend beyond the page margins any more.
But we can’t just get rid of the offset. We need it. The top and bottom borders are now much too close to the text! This looks terrible.
The problem reminds me of a too-short blanket: Pull up and your toes poke out. Pull down and your shoulders get cold. Typographically speaking of course.
So what is the answer?
A possible answer is to add a white rectangle above the top margin and below the bottom margin to mask the extra border lines. But this is clumsy, especially since these rectangles will not travel along with the paragraph if changes are made. They also risk accidentally hiding parts of the layout.
Instead, I came up with the following solution.
InDesign’s engineers seem to have ensured that the top margin is drawn above the tallest ascender on the top line, and the bottom margin, below the deepest descender on the bottom line.
So adding a very large character on the top line pushes the margin up. Ditto for the bottom line. However, large characters take up extra width as well as extra height. So increasing the point size of a character isn’t so good. But there is another option.
Changing the “vertical scale” of a character makes it taller without making it wider. Luckily, it also pushes the borders away from the text. Bingo!
Here, then, are the steps to make sure that a paragraph’s borders do not extend beyond the page margins, but are sufficiently distance from the first and last lines of text:
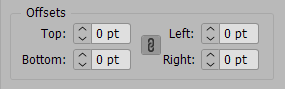
- Set the top and bottom Offsets of the paragraph border to 0 (or even -2).
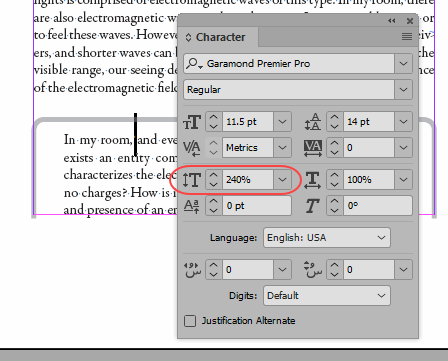
- Select a space character in the first line of the paragraph and apply something like 240% vertical scaling. This will push the top border away from the first line of text.
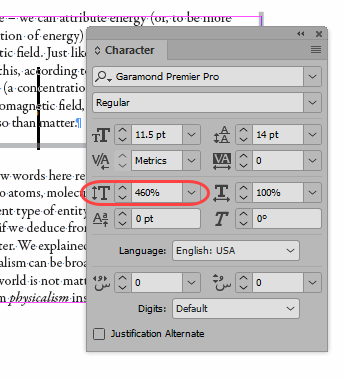
- Select a space character in the last line of the paragraph, or you could even select the final paragraph return, and apply around 460% vertical scaling (for technical reasons to do with font construction this value must be greater than the previous one). Of course both these numbers need to be adjusted to suit different layouts.
The end result is perfect:
The borders extend just the right amount (that is, they are flush with the font ascenders and descenders), and the border is nicely spaced away from the first and last lines of text.
You can tweak the offset and vertical scaling to get just the right look – don’t forget that offset values for paragraph borders can be negative as well as positive.
The beauty of this solution is that everything travels with the paragraph. No extra objects are needed to cover up the over-extended border bits. Moreover, judicious use of character styles (I mean, using two custom-made character styles to apply the vertical scaling—one for the first line, one for the last line) will ensure that (a) clearing the paragraph’s style overrides does not inadvertently mess up the borders; (b) the applied vertical scaling will not show up as a paragraph-level override, and (c) that the formatting is consistent (the standard advantage of using character styles).
Advanced: One paragraph style to rule them all!
As a final challenge, I asked myself whether these vertical scaling settings could be included as part of single paragraph style definition. We would need the paragraph style itself to target the first space on the first line of the paragraph and the last space on the last line and apply the necessary character styles. Since this is the sort of thing GREP styles do, it seemed easy.
Well, GREP styles seem to be the way to go here, but in fact there is a catch. It is surprisingly difficult to come up with an expression that targets the first space in a paragraph. (Using a nested style to target this first space is perhaps the simpler solution; but can it be done with GREP alone?)
I turned to David Blatner, and he posted the question on the excellent “Treasures of GREP” Facebook group, and the user Dhafir Foto (one of the group’s moderators) came up with an ingenious answer that works:
(?m)^\H+\K\h
The details of this expression, including the purpose of the initial (?m), are beyond the scope of this article. For more information, check out the Facebook post itself.
The last space in the paragraph is also rather hard to target, but targeting the final return of a paragraph is much simpler and should work just as well (better, maybe, since the final return, unlike the last space, is guaranteed to be in the last line of paragraph). Just in case the paragraph ends not with a return character but with one of InDesign’s other end-of-paragraph markers (column breaks, frame breaks, etc.), however, it may be safer to use this expression instead, which includes all possibilities: \r|~M|~R|~P|~L|~E.
After creating the two character styles necessary to push away the border, your final paragraph style GREP-style settings should look similar to this:

So, while we wait for Adobe to add the clearly required “Keep border in frame” checkbox as part of the border options settings (it’s already there in the paragraph rules dialog, after all), at least you now have a “set and forget” workaround that gives full control of paragraph border padding even when a paragraph spans two pages.
Hi Ariel,
great workaround! Thank you very much for this article.
One thing we have to keep in mind: The end of the border at the bottom of a column or a frame can be different with the same formatting in paragraphs!
Case 1: There is no ascender in the first line.
E.g. All character heights end on the baseline.
Case 2: There is at least one ascender in the first line.
Case 3: There are different ascenders like in p and q and they end on a different position.
Best,
Uwe
Have to correct myself: Not in the first line but in the last line of text at the bottom of a column or a frame.
Best,
Uwe
Hi Uwe!
Good point that requires further investigation. Mind your p’s and q’s, as they say…
Does anyone know how to solve this problem? When you import text into a document, InDesign creates a text box that extends to the bottom of the page, regardless of whether the text fills that entire space or if there are other elements already placed below the text box. (Think of placing text into editorial space above ads on a page.) Then, if you click the overset tab to create another text box, it does the same thing. What I’d like to be able to do is to either have the text box only extend down to the next placed element or, at the least, only extend down to the last bit of copy and not have a mostly empty box extending down to the bottom of the page. Any ideas?
Yes. Drag it out instead of clicking ;-) And/or use Auto scale text frame ootion.
Thanks! Much appreciated.
Clever!
How it will solve the issue if tables are coming in the shaded box?
Please suggest how to apply paragraph border property in the table.
Lorraine, for your May 4 question this might help. I have had some success getting paragraph borders to show up (and even merge!) by setting tables into separate text frames and then pasting these other text frames into the main paragraph with the borders and/or shading. Shading should work the same way.
The basic technique a riff on a way of making tables with rounded corners detailed here (credit to Barb Binder):
https://www.rockymountaintraining.com/adobe-indesign-round-corners-table/
Basically, apply shading or a border to a paragraph in your document, then paste a separate text frame that has the table in it into the paragraph. Unless your tables are really long and break across pages, this should work. The only alternative I could figure out was manually extending the border and/or shading from an adjoining paragraph. Yuck.
It looks to me that this is a programming problem, where maybe the programming for shading and borders assigned to the table is interfering with any paragraph shading and borders assigned to the paragraph the table is set on. I’m often setting blind tables (no shading or borders, basically multi-column lists) and paragraph borders will not appear for me without pasting tables into a separate embedded text frame first.
And thank you, Ariel, for this brilliant article! It really solves a problem that makes this spiffy border feature almost useless without your fix.
This article may help you as a workaround:
https://creativepro.com/using-paragraph-shading-to-create-corners-in-a-table.php
Re: targeting the final return or break character… I cannot get your grep code to work. But it does work if I just use
\r(and this single code appears to target the carriage return, column break, frame break, and so on… I don’t need to use all those various codes)Yep, the \r is all end of paragraph markers, no need for the others.
Interesting find that I wasn’t aware of!
But why the | doesn’t work is weird.
Anyway,
\rseems to be the way to go then, and it’s simpler anyway!(By the way, did you notice the easy mnemonic for the various frame-break characters? Just think Miss Marple…!)
Yes, I noticed the Miss Marple thing, too! Haha! The problem with using just the end of paragraph marker is that it is inclusive…what if you ONLY wanted to find frame breaks OR column breaks. It won’t let you, strangely.
The reason for these over-extended borders is the offset setting in the Borders dialog.As a final challenge, We would need the paragraph style itself to target the first space on the line